FoneDog Screen Recorder
FoneDog Screen Recorder
Special Offer
Special Offer


By Gina Barrow, Last updated: January 13, 2022
Your iTunes library is a warehouse of all of the music, playlists, and other media content that you add to iTunes for Windows. Make sure you know how to find the iTunes library location on your PC.
It is in fact, categorized into two, the iTunes library files and iTunes Media folder. And before you can fully restore iTunes, you first need to restore these files apart from the media files.
There are many instances wherein you need to restore previous iTunes library. It could be that you need to change your computer, reformat it, or perhaps, the hard drive crashed. Luckily, you can back up your library and media folder so you can restore it at any time.
Find out how to restore previous iTunes library in this new article!
Tip: If you want to restore your iTunes backup to your iPhone selectively, you can refer to another guide.
Part 1. How to Restore Previous iTunes Library from a BackupPart 2. Rebuild Previous iTunes Library from iTunes Library FilesPart 3. Restore Previous iTunes Library - FoneDog iOS Data Recovery [Direct & Fast]Video Guide: Restore Previous iTunes Library Using FoneDog iOS Data RecoveryPart 4. Summary
If you have a freshly restored computer, you may need to reinstall iTunes or restore from the backup.
Once installed, your music in the previous library will not be restored automatically. If you have turned on the Sync option on your iPhone and you connect it to the new iTunes, your music library might be lost. You have to restore the iTunes library completely, before connecting your iPhone or iPad to avoid data loss.
If you want to restore previous iTunes Library, first, you need to consolidate the iTunes library, then back it up to an external drive and restore it. Follow the full guide below:
Consolidate Your iTunes Library:
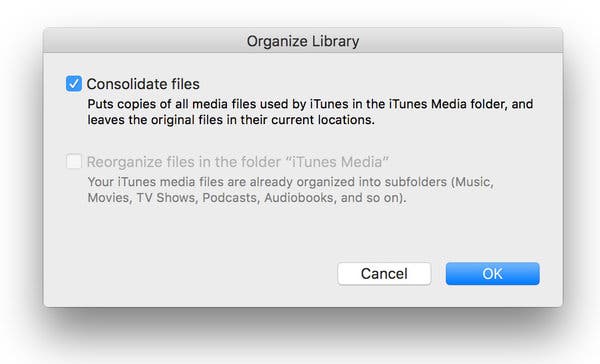
Now that you have consolidated all your files in the library, all the copies of your music and media files that were saved outside of the iTunes Media folder are merged into the iTunes Media folder.
At this point, you can erase the actual files in order to save space on your hard drive. Just make sure that everything you need is now in the Media folder.
Next, make sure that your Media folder is accessible. The iTunes Media folder, by default, is inside the iTunes folder. The default location would be in User, select Music, go to iTunes, and then iTunes Media.
Otherwise, you can go to:
You are now ready to back up your iTunes library and media files, follow these:
Here are the steps to restore previous iTunes library from a backup:
Attention: When you try to restore the iTunes library from a backup, you may get error messages, like iTunes error 13010, iTunes error 3600, iTunes error 4037 or 50, and more restore errors. Then you need a strong repair tool - iOS System Recovery.
Every time you update iTunes to the latest version, Apple automatically keeps a copy of the previous version. Through this backup, we can rebuild your iTunes library. Follow these steps:
Note the following iTunes location on your computer (Windows or Mac):
Windows: /Users/username/My Music/iTunes
Mac: /Users/username/Music/iTunes
The most critical thing that can happen during the restoration of your iTunes library is data loss. This usually happens when you connect your iPhone to the newly installed or restored iTunes without restoring the library first. It will automatically sync the devices and update your playlists and music files.
You might get caught in this trap and find it more difficult to get through. What’s even worse is that you don’t know where and how to restore the deleted content.
FoneDog iOS Data Recovery is a professional iTunes backup extracting tool that has the complete features needed to recover essential files whether lost or deleted. It scans through your iOS device, your iTunes backup, and the iCloud backup.
You can practically recover almost all files with FoneDog iOS Data Recovery from different iOS devices and from varying situations.
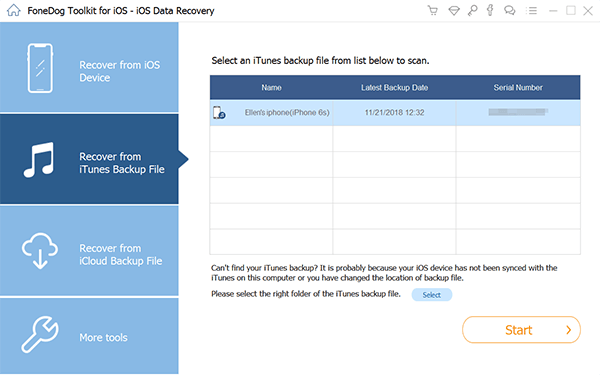
Let’s find out how to restore your music and media files from the iTunes backup using FoneDog iOS Data Recovery:
On your computer, download the free trial of iOS Data Recovery, and install it by following the onscreen installation procedure.
iOS Data Recovery
Recover photos, videos, contacts, messages, call logs, WhatsApp data, and more.
Recover data from iPhone, iTunes and iCloud.
Compatible with latest iPhone and iOS.
Free Download
Free Download

After you have installed FoneDog iOS Data Recovery, click the Recover from iTunes Backup and select the recent backup file. The software will download, scan, and extract the backup content.
Navigate to the various files extracted from your iTunes backup and find the missing content. You can also use the Preview option to check the items. Once you are sure of what files to restore, mark the items and click the Recover button.
You can set the output file location of all the recovered files.
People Also ReadHow to Recover an Unsaved Word Document on iPad/iPhoneHow to Find and Recover Missing or Deleted Files
Although it is quite easy to navigate through iTunes, the process on how to restore previous iTunes library can be exhausting. It involves various steps that can be confusing and might even cause data loss.
Fortunately, we have gathered the simplest method possible for you to restore previous iTunes library and even added a recommendation in case you lose or delete your iTunes media content.
FoneDog iOS Data Recovery manages lost or deleted items in a highly efficient and convenient manner.
Leave a Comment
Comment

Technical/Creative Writer
Kitchen, my safe space; black, my favorite color
Was a Technical Specialist for a while, troubleshooting Smartphone and Software-related issues until a writing stint caught my attention.
iOS Data Recovery
3 Methods to recover your deleted data from iPhone or iPad.
Free Download Free DownloadHot Articles
 /
/
INTERESTINGDULL
/
SIMPLEDIFFICULT
Thank you! Here' re your choices:
Excellent
Rating: 4.6 / 5 (based on 109 ratings)
