FoneDog Screen Recorder
FoneDog Screen Recorder
Special Offer
Special Offer


By Gina Barrow, Last updated: December 3, 2021
Encryption is another layer of protection that you can use especially if you have sensitive information saved on your backup.
It works by saving your data in an unreadable and scrambled manner, making it more difficult for hackers to decode. Encrypting your backup also blocks unauthorized access especially if someone to gets holds of your computer or shares it with another user.
It will require them to enter a password to open. You can encrypt your backup using your Mac or Windows computer, but then, there might be certain issues during the process.
Many users claim that they received ‘the password you entered to protect your iPhone backup could not be set’ error message. If you are one of those, find out how to correct this error below.
Part 1. How to Encrypt Your BackupPart 2. How to Fix the iTunes Error “the password you entered to protect your iPhone backup could not be set”Part 3. How to Recover Deleted BackupsPart 4. Summary
If you are the type of person who mostly rely on everything on the iPhone even for sensitive information such as your credit card details, bank passwords, and other sensitive content, then you might need to add extra protection on your backup.
Perhaps, you may not have these details on the iPhone but just wanted to add double security then you can turn on backup encryption. However, you need to turn this feature on, because your backup is not encrypted by default.
So before we talk about how to fix “the password you entered to protect your iPhone backup could not be set”, we will show you the normal process.
For first-time users of backup encryption, you need to turn on the password-protected "Encrypt local backup" option in Finder or iTunes. Doing this will automatically encrypt all your backups from then on.
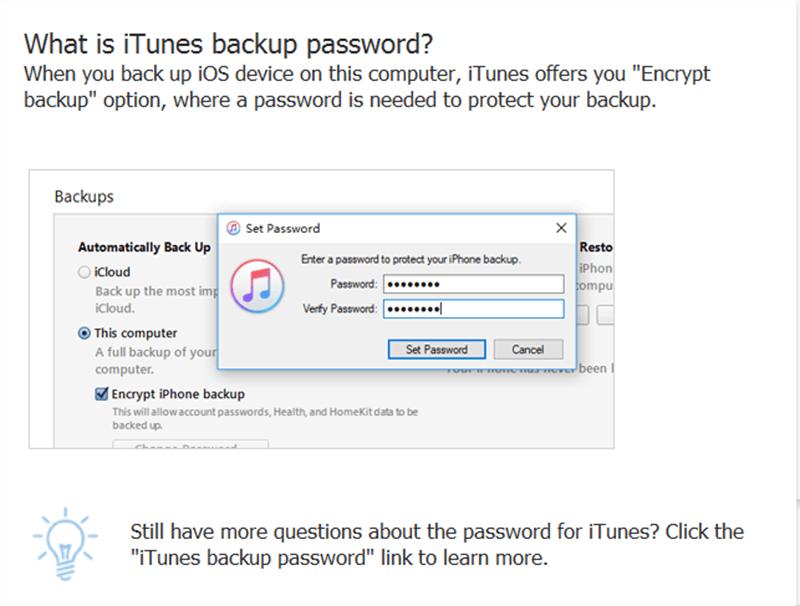
After you have created the encrypted backup, you can now see a lock icon beside your backup lists on iTunes or Finder.
To deactivate backup encryption, simply uncheck the option for Encrypt local backup in Finder or iTunes. You will be asked to enter the password.
This error ‘the password you entered to protect your iPhone backup could not be set’ will appear if you are syncing over Wi-Fi with iTunes. The best way to get rid of this error is to plug the device into your computer when attempting to create an encrypted backup.
However, if it is plugged in already, you can simply remove the USB cable and reconnect after a while, here is the full guide:
This should quickly fix the error ‘the password you entered to protect your iPhone backup could not be set’.
You should now know how to fix “the password you entered to protect your iPhone backup could not be set’”, so now we are going to talk about some related issues. Unfortunately, if you have deleted your data during the backup process, you can always get them back by restoring the previous backup in iTunes. However, this could lead to more data loss since it will overwrite the existing iPhone contents.
iOS Data Recovery
Recover photos, videos, contacts, messages, call logs, WhatsApp data, and more.
Recover data from iPhone, iTunes and iCloud.
Compatible with latest iPhone and iOS.
Free Download
Free Download

To recover deleted backups or data, you can use an excellent alternative which is FoneDog iOS Data Recovery. This software easily retrieves all the files from the iPhone using 3 recovery options: Recover from Device, Recover from iTunes Backup, and Recover from iCloud.
FoneDog iOS Data Recovery features the following:
To learn more about how FoneDog iOS Data Recovery works, check this out:
If you haven’t downloaded and installed FoneDog iOS Data Recovery yet, you can do so by clicking on the link or by getting it from its official website.
Follow the prompts on how to complete the installation. Select iOS Data Recovery and connect your iPhone via a USB cable.
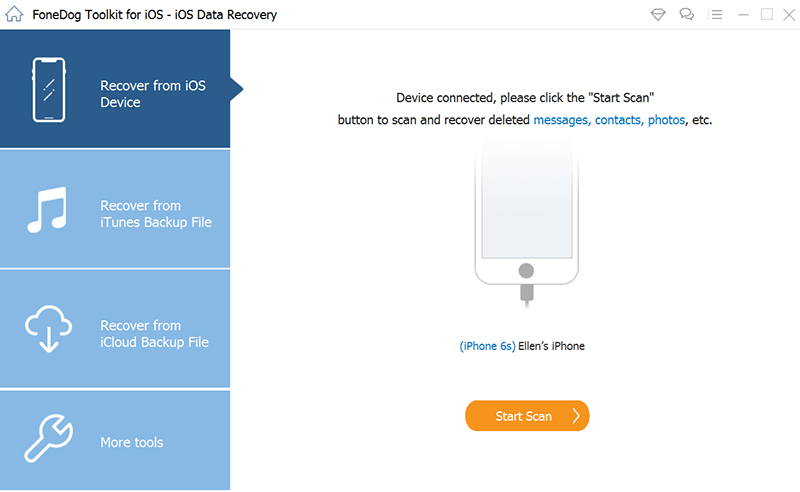
On the main menu of the program, select your preferred mode of recovery, you can choose whether to Recover directly from the iPhone, this is suitable if you don’t have backups. Or Recover from iTunes backup and Recover from iCloud.
The steps may slightly vary. For the iCloud recovery, you will be asked to log in to your iCloud account. FoneDog iOS Data Recovery will then scan your device and extract the backups (iTunes or iCloud).
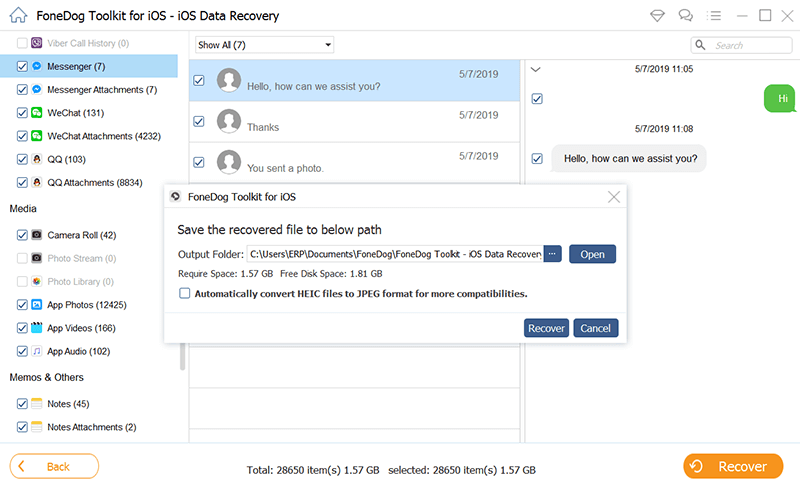
Once FoneDog iOS Data Recovery completed the scanning and extracting, you can now preview all the recovered items and mark those you need. FoneDog iOS Data Recovery lets you selectively restore important data even from your iTunes or iCloud backup.
Set the destination folder of the recovered items and click Recover.
There you have it, you have finally settled the error ‘the password you entered to protect your iPhone backup could not be set’. Again, this error pops up if you are attempting to encrypt a backup via Wi-Fi in iTunes.
There is no deeper and further explain why this error appears on wireless syncing but this is to better protect your data. You can simply use the USB cable option to encrypt your backup as suggested above. Of course, in the case of data loss, you might want to use FoneDog iOS Data Recovery. This software will easily recover your deleted data in no time using 3 recovery options.
Have you encountered this error too?
People Also ReadHow to Recover/Retrieve Deleted Text Messages on iPhoneHow to Recover Deleted Photos from iPhone 11/XS/XR/X/8
Leave a Comment
Comment

Technical/Creative Writer
Kitchen, my safe space; black, my favorite color
Was a Technical Specialist for a while, troubleshooting Smartphone and Software-related issues until a writing stint caught my attention.
iOS Data Recovery
3 Methods to recover your deleted data from iPhone or iPad.
Free Download Free DownloadHot Articles
 /
/
INTERESTINGDULL
/
SIMPLEDIFFICULT
Thank you! Here' re your choices:
Excellent
Rating: 4.7 / 5 (based on 83 ratings)
