FoneDog Screen Recorder
FoneDog Screen Recorder
Special Offer
Special Offer


By Nathan E. Malpass, Last updated: March 1, 2024
iPhones have become an integral part of our lives, capturing cherished memories at every turn. Whether it's a picturesque sunset, a family gathering, or a candid selfie, our iPhones store these precious moments in the form of photos. However, as our photo collections grow, so does the need to free up space on our devices and ensure our memories are safely backed up.
This is where the process of how to get photos from iPhone to computer comes into play. In this article, we will guide you through a range of methods, from the simplest to the most advanced, on how to get photos from your iPhone to your computer.
By the end of this guide, you'll have the best iPhone transfer tools and knowledge to effortlessly manage your photo library, ensuring that your memories remain secure and easily accessible for years to come. Let's dive in!
Part #1: 5 Common Ways on How to Get Photos from iPhone to ComputerPart #2: The Easiest Way to Get Photos from iPhone to Computer at One ClickConclusion
AirDrop is a seamless and wireless method to transfer photos from your iPhone to your Mac computer, and it's incredibly user-friendly. If you're a Mac user, follow these steps to transfer photos effortlessly:
Step #1: Enable Wi-Fi and Bluetooth on Both Devices
Make sure Wi-Fi and Bluetooth are enabled on both your iPhone and your Mac. This is crucial for AirDrop to work.
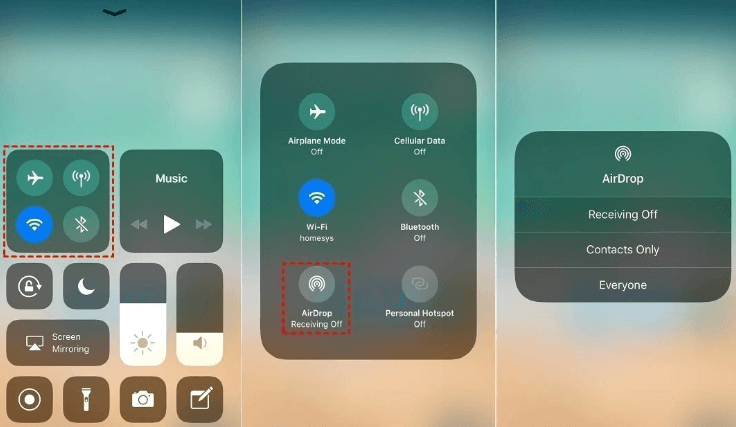
Step #2: Open the Control Center on the iPhone
Swipe down from the upper-right corner of your iPhone screen to open Control Center.
Step #3: Activate AirDrop
In Control Center, tap and hold the network settings box in the top-left corner. This will open the AirDrop menu. Choose whether to allow AirDrop from Contacts Only or Everyone, depending on your preference for sharing.
Step #4: Select Photos to Transfer
Open the Photos app on your iPhone and select the photos you want to transfer to your Mac.
Step #5: Share via AirDrop
Tap the Share icon (a square with an arrow pointing up). In the Share sheet, you should see your Mac's name listed under AirDrop. Tap your Mac's name.
Step #6: Accept on Mac
On your Mac, you'll receive a notification with a preview of the photos. Click "Accept" to initiate the transfer.
Step #7: Complete the Transfer
Wait for the transfer to complete. The photos will appear in your Mac's Downloads folder by default.
That's it! Your selected photos have now been successfully transferred from your iPhone to your Mac using AirDrop. This method offers a quick and wireless way to move your photos and is perfect for sharing a few pictures at a time. However, for larger photo libraries or non-Mac users, we'll explore alternative methods in the following sections.
If you prefer a wired connection to transfer photos from your iPhone to your computer or if you're a Windows user, using iTunes is a reliable method. Follow these steps on how to get photos from iPhone to computer using iTunes:
Step #1: Install iTunes (If Not Already Installed)
If you don't have iTunes installed on your computer, download and install it from the official Apple website (https://www.apple.com/itunes/download/).
Step #2: Connect iPhone to Computer
Use a USB cable to connect your iPhone to your computer. Ensure both devices are powered on.
Step #3: Trust This Computer
A dialog box may appear on your iPhone asking if you trust this computer. Tap "Trust" to proceed.
Step #4: Open iTunes
Launch iTunes on your computer if it doesn't open automatically upon connecting your iPhone.
Step #5: Select Your Device
In iTunes, click on the device icon (an iPhone-shaped icon) located in the top left corner of the iTunes window.
Step #6: Access Photos Settings
In the left sidebar, click on "Photos" under your device's settings.
Step #7: Choose Sync Photos
Check the box labeled "Sync Photos". Select the application or folder from which you want to sync photos (e.g., your Photos library or a specific folder).
Step #8: Select Albums or Folders
Choose whether you want to sync all your photos and albums or only select folders and albums.
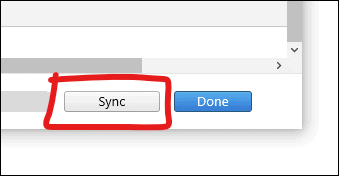
Step #9: Apply Changes
Click the "Apply" or "Sync" button in the bottom-right corner of the iTunes window.
Step #10: Wait for Sync
iTunes will start syncing your selected photos from your iPhone to your computer. The process may take some time, depending on the number of photos.
By following these steps, you can transfer photos from your iPhone to your computer using iTunes and a USB cable. This method is suitable for those who prefer a wired connection or need to transfer a large number of photos at once.
iCloud provides a seamless way to sync your photos between your iPhone and your Mac. This method is particularly convenient for Mac users who want their photos to be automatically and wirelessly transferred to their computer. Here's how to set up iCloud sync for photos:
Step #1: Ensure iCloud is Enabled on Your Devices
Make sure you are signed in to the same Apple ID on both your iPhone and Mac. On your iPhone, go to "Settings" > [your name] > "iCloud" and ensure that "Photos" is turned on.
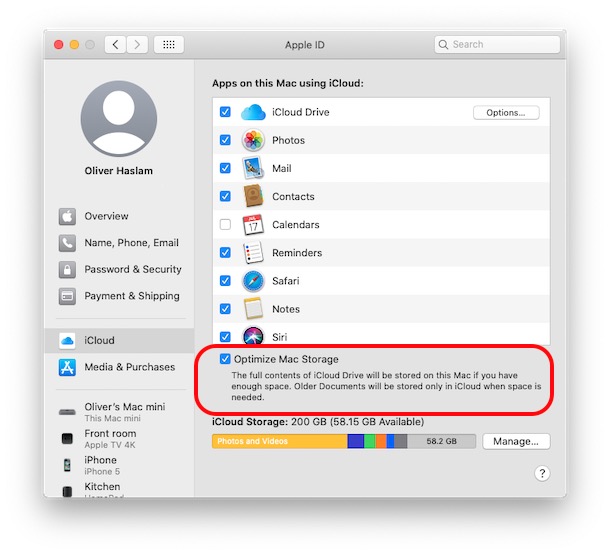
Step #2: Enable iCloud Photos on Your Mac
On your Mac, click the Apple menu in the top-left corner and select "System Preferences". Click on "Apple ID" (it may also be labeled as "iCloud" depending on your macOS version). In the left sidebar, select "Photos". Check the box next to "Photos" to enable iCloud Photos on your Mac. Optionally, select "Optimize Mac Storage" to save space on your Mac by storing full-resolution photos and videos in iCloud and smaller versions on your Mac.
Step #3: Wait for Sync
Your photos will now begin syncing between your iPhone and Mac via iCloud. This may take some time depending on the number of photos and your internet connection speed.
Step #4: Access Your Photos on Your Mac
Once the sync is complete, you can access your iPhone photos on your Mac through the Photos app. They will be organized in albums and accessible just like any other photos on your Mac.
With iCloud Photos enabled on both your iPhone and Mac, your photo library will remain synchronized, ensuring that your latest pictures are always available on your computer. This method is convenient for users who want an automatic and wireless solution for transferring and backing up their photos.
Is there any way to move photos from iPhone to PC without iTunes or iCloud? Sure, using messaging apps or email can be a quick and straightforward option. Here's how to get photos from iPhone to computer using Messaging apps:
Step #1: Select Photos on Your iPhone
Open the "Photos" app on your iPhone. Browse and select the photos you want to transfer to your computer.
Step #2: Share the Photos
After selecting the photos, tap the "Share" button. It looks like a square with an arrow pointing upward.
Step #3: Choose a Messaging App or Email
From the Share sheet, select a messaging app or email client that you use, such as iMessage, WhatsApp, or Mail. If you choose email, you'll need to attach the selected photos to an email message.
Step #4: Send the Photos
Compose a new message or email and enter the recipient's address. If you're sending it to yourself, enter your email or messaging app contact. Add any necessary message or subject. Send a message or email.
Step #5: Access Photos on Your Computer
On your computer, open the messaging app or email client you used to send the photos. Locate the message or email containing the photos. Download the attached photos to your computer. Typically, you can do this by clicking on the photo attachments and selecting a download option.
By following these steps, you can quickly transfer selected photos from your iPhone to your computer using messaging apps or email. This method is ideal for sending a small number of photos, but it may become cumbersome if you need to transfer a large photo collection. For larger transfers, consider using one of the previous methods mentioned in this article.
Google Drive is a versatile cloud storage service that allows you to easily transfer photos from your iPhone to your computer. It's especially useful if you want to access your photos from any device with an internet connection. Here's how to use Google Drive for this purpose:
Step #1: Install Google Drive on Your iPhone
If you don't already have Google Drive installed on your iPhone, download it from the App Store and sign in with your Google account.
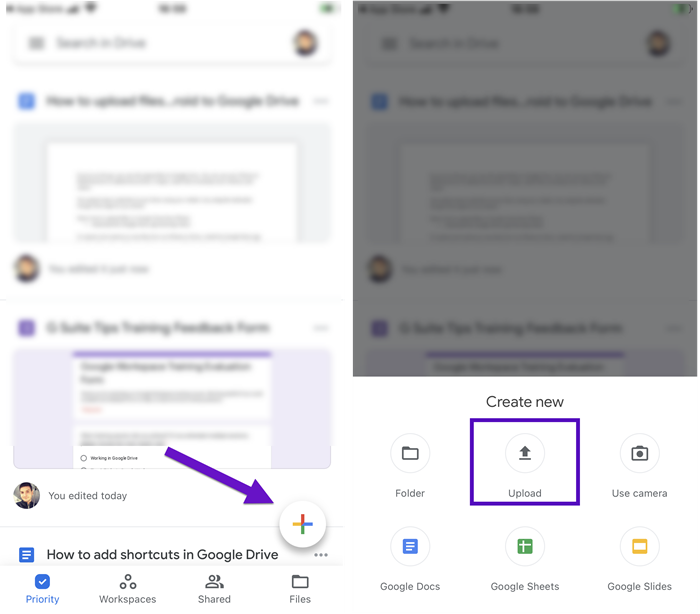
Step #2: Upload Photos to Google Drive
Open the Google Drive app on your iPhone. Tap the "+" or "Add" button (usually a "+") to create a new folder or navigate to an existing folder where you want to upload your photos. Inside the folder, tap the "+" button again and select "Upload". Choose "Photos and Videos". Select the photos you want to transfer to your computer from your iPhone's Photos library. Tap "Upload".
Step #3: Access Google Drive on Your Computer
On your computer, open a web browser and go to the Google Drive website (drive.google.com). Sign in with the same Google account you used on your iPhone.
Step #4: Download Photos to Your Computer
Locate the folder where you uploaded your photos on Google Drive. Select the photos you want to transfer to your computer. Right-click on the selected photos and choose "Download" or click the download icon in the toolbar.
Step #5: Retrieve Photos on Your Computer
After downloading, your selected photos will be saved to your computer, typically in your computer's default download folder.
This method leverages the convenience of cloud storage and allows you to access your photos from any device with internet access. It's particularly handy if you need to transfer a large number of photos without using a physical cable or if you want to keep your photos securely backed up in the cloud.
While there are several methods to transfer photos from your iPhone to your computer, some users prefer the convenience and versatility of third-party software. Among the numerous options available, one standout tool is FoneDog Phone Transfer. In this section, we'll explore why FoneDog Phone Transfer is an excellent iPhone 15-supported choice for managing your iPhone photos and effortlessly transferring them to your computer.
Phone Transfer
Transfer files among iOS, Android and Windows PC.
Transfer and backup text messages, contacts, photos, video, music on computer easily.
Fully compatible with the latest iOS and Android.
Free Download

Follow these steps on how to get photos from iPhone to computer to use FoneDog Phone Transfer:
Step #1: Install and Launch FoneDog Phone Transfer
Download and install FoneDog Phone Transfer on your computer. Launch the program.
Step #2: Connect Your iPhone
Use a USB cable to connect your iPhone to your computer. Ensure that your iPhone is recognized by the software.
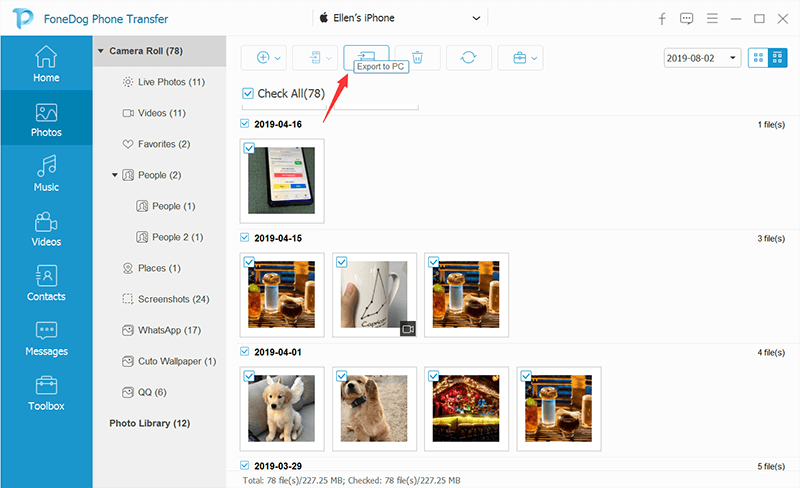
Step #3: Select Data Type and Photos
In the FoneDog Phone Transfer interface, select "Phone to Phone Transfer" or "Phone to Computer Transfer", depending on your needs. Choose "Photos" as the data type to transfer.
Step #4: Begin Transfer
Click the "Start Transfer" button to initiate the transfer process. Wait for the transfer to complete. The time required depends on the number and size of the photos.
Step #5: Access Transferred Photos on Your Computer
Once the transfer is finished, you can find your photos on your computer in the specified destination folder.
FoneDog Phone Transfer simplifies the process of transferring photos from your iPhone to your computer, making it an excellent choice for those who prioritize ease of use and efficiency. Whether you want to create backups, free up space on your iPhone, or move photos to your computer for editing or sharing, FoneDog Phone Transfer offers a reliable solution.
People Also ReadTips: How to Transfer Photos from Android to iPhone 15How to Transfer Photos from Old iPhone to New iPhone? [2024]
In this comprehensive guide, we've explored various methods on how to get photos from iPhone to computer. Whether you prefer wireless options like AirDrop and iCloud, using iTunes and a USB cable, sharing via messaging apps or email, or utilizing third-party software like FoneDog Phone Transfer, you have a range of choices to suit your needs.
Choose the method that best aligns with your preferences and requirements to effortlessly manage your photo library, keep your memories safe, and ensure easy access to your cherished moments on your computer. With these methods at your disposal, you can enjoy greater flexibility and control over your iPhone photos, ensuring they are where you want them to be.
Leave a Comment
Comment

iPhone/Android Devices’ Maintenance Expert
Staying home, listening to music, writing tech articles
Many people asked me to repair their mobile phones so I have a lot of experience in mobile phone repair, and I know a lot about Android or Apple phones.
Phone Transfer
Transfer data from iPhone, Android, iOS, and Computer to Anywhere without any loss with FoneDog Phone Transfer. Such as photo, messages, contacts, music, etc.
Free DownloadHot Articles
 /
/
INTERESTINGDULL
/
SIMPLEDIFFICULT
Thank you! Here' re your choices:
Excellent
Rating: 4.7 / 5 (based on 63 ratings)
