FoneDog Screen Recorder
FoneDog Screen Recorder
Special Offer
Special Offer


By Nathan E. Malpass, Last updated: September 4, 2023
Upgrading to a new iPhone is an exciting prospect, but the task of transferring all your cherished data from your old device to the new one can seem daunting, especially if you're not keen on using iCloud for the process.
Whether you're concerned about storage limitations, or data security, or simply prefer a more direct transfer method, rest assured that you can implement how to transfer everything from iPhone to iPhone without iCloud. No worry, transferring between two iOS devices is considered easier than transferring data between iPhone and Android.
In this article, we'll walk you through a variety of efficient methods to transfer everything from your old iPhone to your new one, all without relying on iCloud. From using iTunes to employing third-party software, we've got you covered with step-by-step instructions and expert tips to make the transition smooth and stress-free.
By the time you're done reading, you'll be equipped with the knowledge to effortlessly migrate your data and continue enjoying your digital life on your brand-new iPhone.
Part #1: How to Transfer Everything from iPhone to iPhone without iCloudPart #2: The Best Way on How to Transfer Everything from iPhone to iPhone without iCloudConclusion
When it comes to transferring your data from one iPhone to another without iCloud, using iTunes backup is a reliable method that has stood the test of time. This method allows you to create a complete backup of your old iPhone and then restore it to your new device.
Follow these steps on how to transfer everything from iPhone to iPhone without iCloud (iTunes):
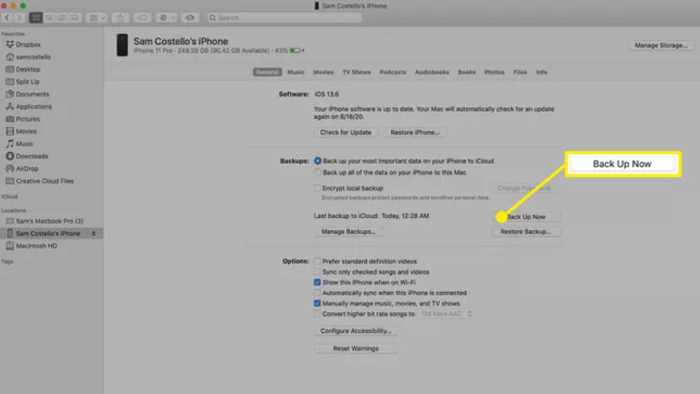
While using iTunes backup is an effective way to transfer everything from one iPhone to another, it's essential to note that it might not be the fastest method, especially for users with large amounts of data. In such cases, considering alternative methods or a combination of methods might be beneficial.
For users running macOS Catalina and later, Finder takes over the role of iTunes for device management, including data transfer between iPhones. Using Finder to transfer your data offers a straightforward alternative to iCloud. Here's how to do it:
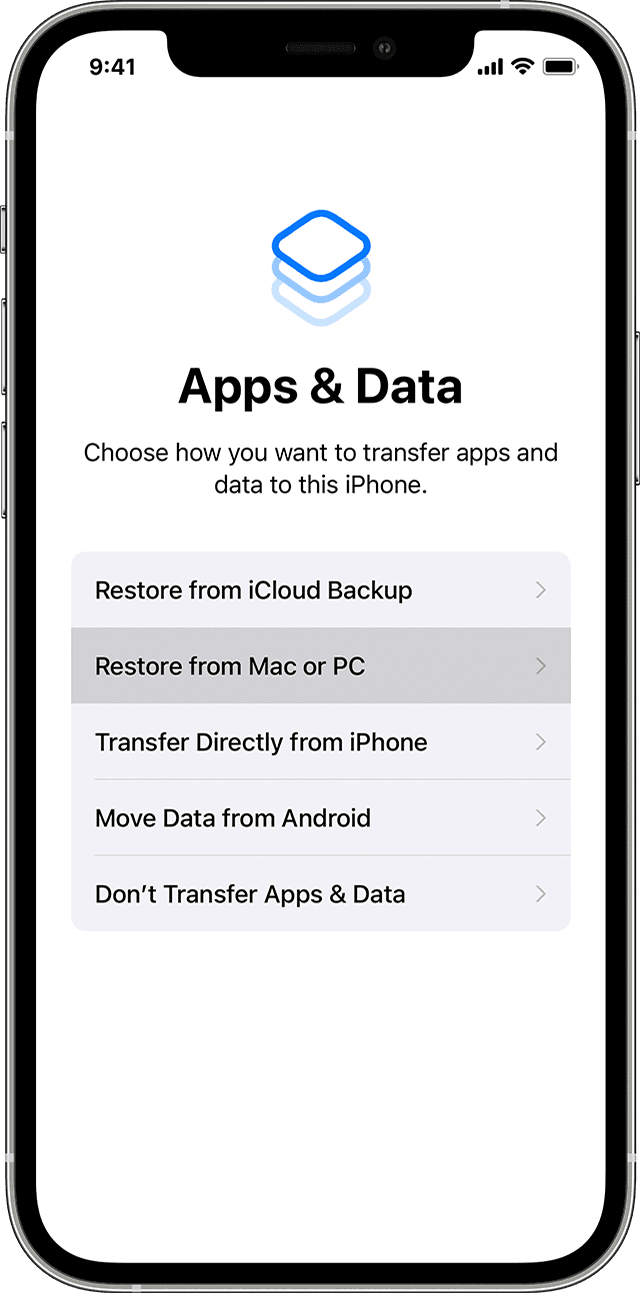
Using Finder to transfer your data between iPhones is particularly advantageous if you're looking for a method that doesn't rely on cloud services and keeps your data within your own local environment. However, if you prefer an even more automated and user-friendly solution, the next method utilizing third-party software might pique your interest.
If you're seeking a wireless and convenient way to transfer selected data from your old iPhone to your new one, AirDrop comes to the rescue. This method allows you to transfer photos, videos, contacts, documents, and more directly between devices. Follow these steps on how to transfer everything from iPhone to iPhone without iCloud using AirDrop:
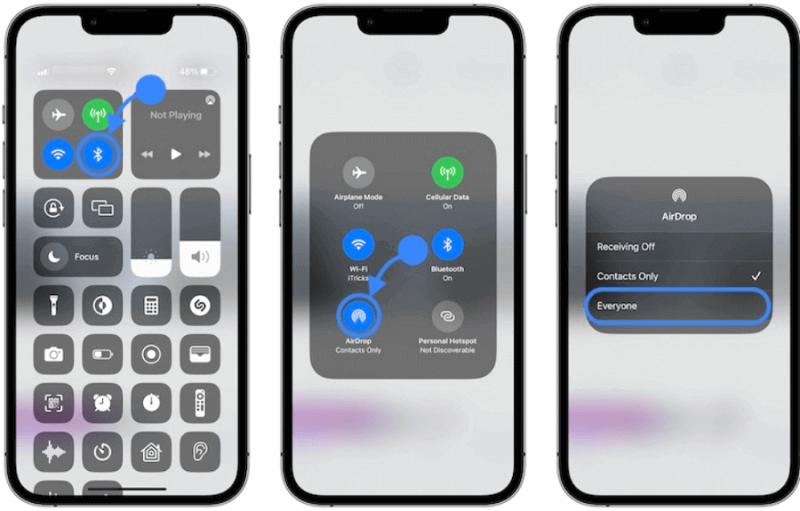
AirDrop is perfect for those who want to transfer a handful of items quickly without the need for a comprehensive backup and restore process. However, bear in mind that it might not be the most efficient choice for transferring a large volume of data or complex app settings.
When it comes to transferring everything from one iPhone to another without relying on iCloud, a powerful and efficient tool that stands out is FoneDog Phone Transfer. This software provides a comprehensive solution that is iPhone 15 supported for seamlessly migrating all your data, apps, settings, and more between iPhones, and it offers several advantages that make the process a breeze.
Phone Transfer
Transfer files among iOS, Android and Windows PC.
Transfer and backup text messages, contacts, photos, video, music on computer easily.
Fully compatible with the latest iOS and Android.
Free Download

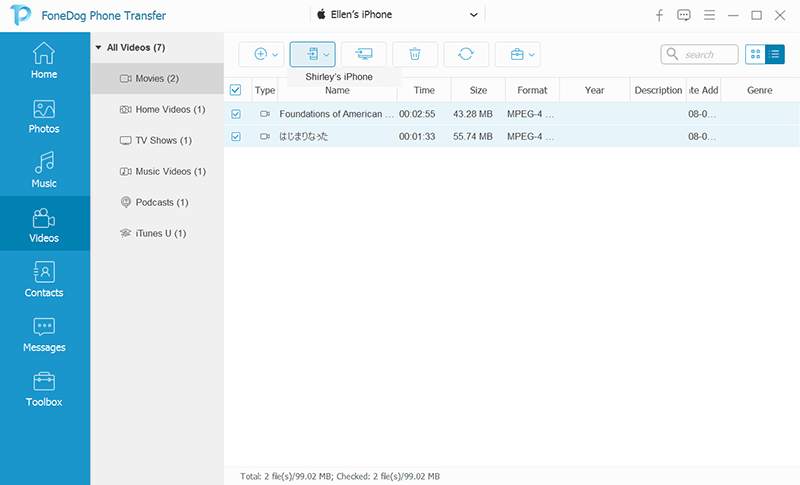
FoneDog Phone Transfer is designed to simplify the process of transferring data from one iPhone to another, regardless of the models involved. This tool offers a user-friendly interface and a range of features that make transferring your digital life from one device to another a smooth and hassle-free experience.
Here are some of the advantages of this model-level iPhone transfer software:
The steps to use on how to transfer everything from iPhone to iPhone without iCloud include the following:
FoneDog Phone Transfer offers a robust and reliable solution for transferring everything from one iPhone to another without relying on iCloud. With its user-friendly interface, wide data type support, compatibility with the latest iPhone models, and ability to ensure data integrity, FoneDog Phone Transfer emerges as a standout choice for anyone looking to seamlessly migrate their digital world to a new device. Whether you're upgrading to the iPhone 15 or any other model, FoneDog Phone Transfer has you covered.
People Also Read2023 Fixed: How to Transfer Music from Computer to iPhone without iTunes?How to Transfer Files to iPad without iTunes: All Things That You Have to Learn
In the ever-evolving world of smartphones, upgrading to a new iPhone is both exciting and rewarding. However, the process of transferring everything from your old device to the new one can be a daunting task, especially when you're looking to avoid iCloud. Thankfully, we've explored a range of methods on how to transfer everything from iPhone to iPhone without iCloud.
From using the traditional iTunes backup and Finder methods to the wireless convenience of AirDrop, we've covered various approaches to suit different preferences and requirements. Each method has its advantages, allowing you to choose the one that aligns best with your needs.
However, for a truly comprehensive and user-friendly solution, FoneDog Phone Transfer shines as an exceptional tool. With its ability to seamlessly transfer an array of data types, support for the latest iPhone models, and commitment to data integrity, FoneDog Phone Transfer offers a seamless experience. Whether you're a tech enthusiast or a novice, this software empowers you to effortlessly migrate your digital world from one iPhone to another.
As you embark on the journey of upgrading to a new iPhone, remember that you have options at your disposal to ensure that your cherished memories, contacts, messages, and apps make the journey with you. The key is to choose the method that aligns with your preferences, and for a reliable and efficient option, FoneDog Phone Transfer stands out as a top recommendation.
Leave a Comment
Comment

iPhone/Android Devices’ Maintenance Expert
Staying home, listening to music, writing tech articles
Many people asked me to repair their mobile phones so I have a lot of experience in mobile phone repair, and I know a lot about Android or Apple phones.
Phone Transfer
Transfer data from iPhone, Android, iOS, and Computer to Anywhere without any loss with FoneDog Phone Transfer. Such as photo, messages, contacts, music, etc.
Free DownloadHot Articles
 /
/
INTERESTINGDULL
/
SIMPLEDIFFICULT
Thank you! Here' re your choices:
Excellent
Rating: 4.7 / 5 (based on 78 ratings)
