FoneDog Screen Recorder
FoneDog Screen Recorder
Special Offer
Special Offer


By Vernon Roderick, Last updated: April 15, 2020
Nowadays, you can see an iPhone user in every corner of the room. It has become more and more prevalent over the years owing to the fact that it is easier to manage files with it.
This article compiles the five most effective and surefire ways to transfer files from PC to iPhone. Let’s start with our first entry for the day.
After several years of coding software for electronic products, we have developed software that is easy to use and suitable for everyone.
Here is a tip: Download FoneDog Phone Transfer to automatically and safely transfer your files from PC to iPhone easily using a USB cable. Get it quickly by clicking the button below to move your data between iOS, Android, or Windows PC in the quickest way.
Phone Transfer
Transfer files among iOS, Android and Windows PC.
Transfer and backup text messages, contacts, photos, video, music on computer easily.
Fully compatible with the latest iOS and Android.
Free Download

If you want to do the transfer manually, we have collected some common solutions below.
1. Easiest Way to Transfer Files from PC to iPhone/iPad (Latest iOS/ipadOS Supported)2. Transfer Files from PC to iPhone with iCloud Drive3. Transfer Files from PC to iPhone with iTunes4. Transfer Files from PC to iPhone Using File Explorer5. Transfer Files from PC to iPhone with Nearby SharingConclusion
As our most recommended method to transfer your files from PC to your iPhone without iTunes, we have third-party software named FoneDog Phone Transfer.
FoneDog Phone Transfer is a data transfer software specializing in transferring all kinds of files. It can transfer photos, videos, music, and even small bits of data such as contacts. In addition, FoneDog Phone Transfer supports the latest version of iPhone up to iOS 17.
To start transferring your files from PC to iPhone with the software, here are simple steps to copy the files:
Phone Transfer
Transfer files among iOS, Android and Windows PC.
Transfer and backup text messages, contacts, photos, video, music on computer easily.
Fully compatible with iOS 17 and Android 14.
Free Download
To begin with, launch the FoneDog Phone Transfer software. Next, connect the PC where the file you want to transfer is found to the iPhone where you want to transfer those files. You can do this in any way you like, but we strongly suggest using a USB cable for a more stable connection.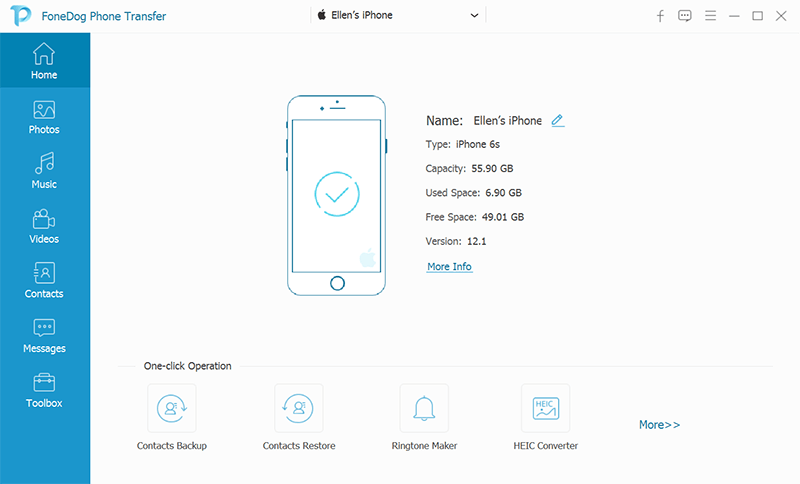
Once a connection is established between the two, you will see that the FoneDog Phone Transfer window will show you some information about the connected device. At the left panel, there will be a selection of file types namely Photos, Music, Videos, Contacts, and Messages. Simply select the one that you want to transfer.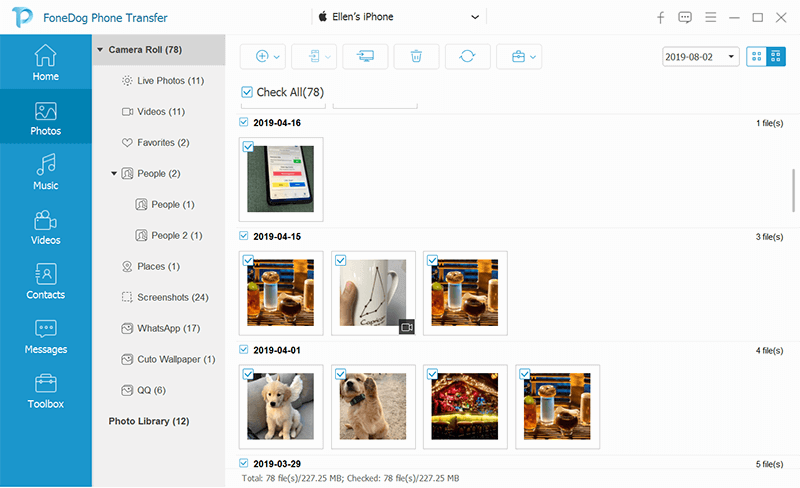
Once a file type is selected, you will get a list of items at the right panel. There, you can select the items that you want to transfer by ticking their corresponding checkboxes. Once you’re done with the selection, click on the Export to PC button or other iPhone devices at the top of the selection panel.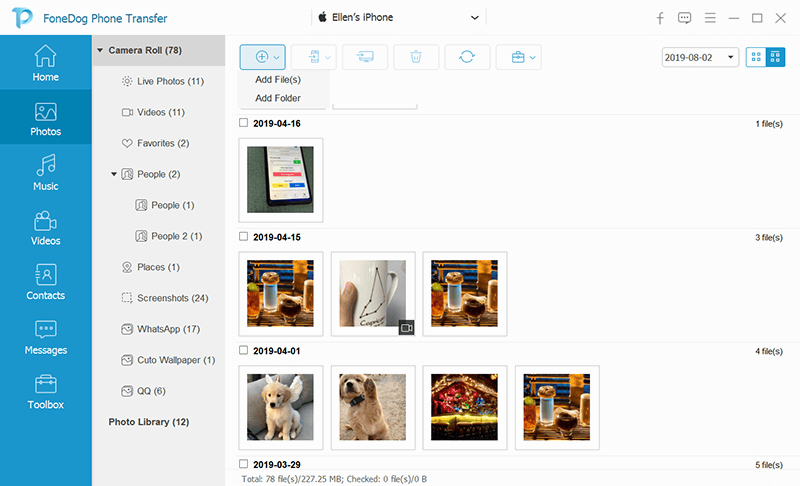
Once you’ve done all these three steps, you only have to wait for the file transfer process to complete. But this way is not made for those that aren’t fond of using third-party tools. We have a more suited method for such cases.
A: If you encounter issues, ensure that your devices are properly connected, that you have the latest software updates installed, and that there are no restrictions or permissions preventing the transfer.
Restarting both your PC and iPhone can often resolve common connectivity issues. If problems persist, please contact FoneDog Support.
You might have already heard of iCloud, the cloud service available to most Apple users. iCloud Drive is basically what they call the storage drive of this service.
iCloud Drive allows users to store their files in it so they can access it in the future. These files can be videos, images, documents, and such, and it is a feature available to most devices including Mac, Windows PC, Android, and iOS. Here are some of the things you can do with iCloud Drive:
That sums up the capabilities of the iCloud. So other than being able to transfer files from PC to iPhone, you may also do these things. Now here are the requirements to use such method:
Once you satisfy these conditions, you will be able to use iCloud Drive to transfer the files without iTunes. With that said, there are different ways to do that with this method.
To transfer files from your PC to iPhone using iCloud drive, follow the methods below:
Now once you access the iCloud Drive, you will be able to store files from your PC. Conversely, you can take those files and transfer them into your iPhone without iTunes. Thus, it is an effective way to help you do that. The only downside is that you will need an internet connection for this. If you don’t want that, then here’s a solution that doesn’t require internet.
Another built-in feature that was developed by Apple is iTunes. It is different from iCloud since it wasn’t exactly built as a cloud storage feature. iTunes is more of a multimedia player that has file management functions allowing it to transfer files.
While there are many functions that helps with file management, what we will be using to transfer files from PC to iPhone is the File Sharing feature of iTunes. Here’s what you should do to access this feature:
As you can see, your ultimate goal is to make sure that your devices are all updated. This is because the File Sharing feature is a recent addition to iTunes arsenal of tools. In addition, you have to have a suitable app, and here’s how you can check it when using iTunes to transfer your files:
To start transferring files from PC/laptop to iPhone using iTunes, simply drag a file from your PC to the list of files. You may also click on the Add button then browse for the file that you want to transfer.
As you may have already realized, the main downside of using iTunes is that you will need to have a compatible app for File Sharing. Otherwise, you won’t be able to make use of this method at all. In that case, you have to use another method.
You may think that you will need to use a specialized tool in order to transfer files without iTunes. In reality, you can easily do this with File Explorer.
You might know File Explorer as the file transfer or manager app for Windows PC. It allows you to access your files easily and navigate around your PC’s storage. To be frank, it is the easiest way.
There are, however, quite a few conditions you will need to satisfy first in order to make use of this method. Here’s a look at those requirements:
That’s pretty much it. Once you have these three things, you can easily transfer files from PC to iPhone using File Explorer so can without iTunes. You can do these with the following steps:
It may take some time, but it should be able the quickest way possible. This time, it is exclusive to specific versions of Windows. If yours doesn’t support this method, then you can try to use Phone Transfer to transfer files. It's easy to use for everyone. Click the button below to free try it:
Our last entry to transfer your files from PC to iPhone without iTunes will make use of Nearby Sharing. It is what many people use for sharing or receiving files from their friends.
You can think of it as a lesser version of iCloud since it can only be used by nearby users, compared to iCloud which can be used by those that are miles away from the source. Either way, here’s a checklist of what to do first:
Once you’ve done all this, you are now ready to transfer files from PC to iPhone with Nearby Sharing. Here are the steps that you will need to follow:
This will start the sharing process. There may be messages that will ask if you will accept the file. Of course, you have to agree first before the transferring files process can commence.
Phone Transfer
Transfer files among iOS, Android and Windows PC.
Transfer and backup text messages, contacts, photos, video, music on computer easily.
Fully compatible with iOS 17 and Android 14.
Free Download
At this point, you now have five methods to transfer files from PC to iPhone with or without iTunes. While each of these have the same purpose, they have their own strengths and downsides. It’s up to you to decide which would be the best method for you scenario.
Regardless of which you choose to use, we suggest that you always keep backups of your files, especially if you are transferring them. This is so that you can avoid issues such as data loss.
Leave a Comment
Comment

Technical Expertise for PC/Website Optimization
One of my passion is to develop software of my own
I write articles to share knowledge about IT technology and some experience in developing my own software, and developing my own software is one of my passions for work.
Phone Transfer
Transfer data from iPhone, Android, iOS, and Computer to Anywhere without any loss with FoneDog Phone Transfer. Such as photo, messages, contacts, music, etc.
Free DownloadHot Articles
 /
/
INTERESTINGDULL
/
SIMPLEDIFFICULT
Thank you! Here' re your choices:
Excellent
Rating: 4.6 / 5 (based on 69 ratings)
