FoneDog Screen Recorder FoneDog Screen Recorder
Special Offer Special Offer
Only Only
$4.49 $4.49
to get a ONE-month license to get a ONE-month license
Sale ends in xx days Sale ends in xx days
Buy Now
sale

Ultimate Guide: Transfer Pictures from iPhone to Computer

By Nathan E. Malpass, Last updated: December 1, 2023

Smartphones have become the primary repository of our memories, capturing everything from special moments to everyday snapshots. iPhones, with their high-quality cameras, have revolutionized the way we capture and store these memories. However, as our photo libraries grow, it's important to ensure they're securely backed up and organized. One of the most reliable ways to do this is to transfer pictures from iPhone to computer.

In this comprehensive guide, we'll walk you through various methods, catering to both Windows and Mac users, so you can easily and efficiently manage your photo library. By the end, you'll be empowered to take control of your photo collection, ensuring that your precious memories are safe, accessible, and ready to be enjoyed whenever you wish.

Part #1: How to Transfer Pictures from iPhone to Computer: Runner-Up MethodsPart #2: The Top Tool to Transfer Pictures from iPhone to Computer: FoneDog Phone TransferConclusion

Part #1: How to Transfer Pictures from iPhone to Computer: Runner-Up Methods

Method #1: Using USB Or Lightning Cable

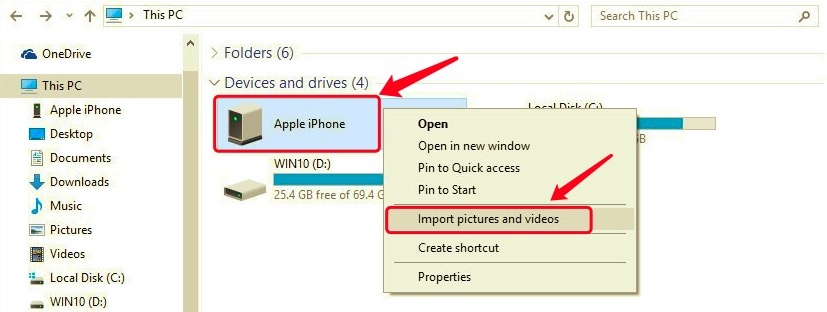
Transferring pictures from your iPhone to your computer using a USB or Lightning cable is a straightforward and traditional method. This method works for both Windows and Mac computers, allowing you to directly copy your photos to your computer's storage. Follow these steps to get started:

  1. Connect your iPhone to your computer using a USB or Lightning cable. Ensure that your iPhone is unlocked, and if prompted, trust the computer on your iPhone.
  2. The next steps depending on your operating system are as follows:
  • On a Windows PC: A pop-up Autoplay window may appear. Click on "Import pictures and videos". Choose the photos you want to transfer or select "Import all". You can also choose where to save the imported photos.
  • On a Mac: The Photos app will most likely open automatically. If not, open it manually. Your iPhone will appear in the sidebar under "Devices". Click on it. Select the photos you want to import, then click "Import Selected" or "Import All New Photos".
  1. Once the transfer is complete, disconnect your iPhone from the computer.

Transfer Pictures from iPhone to Computer Using USB Or Lightning Cable

Method #2: Using iCloud.com Storage Service

Transferring pictures from your iPhone to your computer can also be achieved seamlessly through the iCloud.com storage service. iCloud provides a cloud-based solution that allows you to access your photos from any device with an internet connection. Follow these steps to transfer pictures from iPhone to computer using iCloud:

  1. Enable iCloud Photo Library on Your iPhone: On your iPhone, go to “Settings” and tap on your name at the top. Tap on “iCloud” and then “Photos”. Toggle on “iCloud Photos”. This ensures your photos are synced with iCloud.
  2. Access iCloud.com on Your Computer: Open a web browser on your computer and go to iCloud.com. Log in with your Apple ID and password.
  3. Access and Download Your Photos: Click on the “Photos” icon within iCloud. Browse through your photo collection organized by date and albums.
  4. Select and Download Photos: To select individual photos, hold down the “Shift” key while clicking on them. To select a range, click the first photo and then hold down the “Shift” key and click the last photo in the range. Click the “Download” icon (a cloud with an arrow pointing downward).
  5. Retrieve the Downloaded Photos: Check your computer’s default download location for the downloaded photos.

Using iCloud.com to transfer photos is a convenient way to ensure your pictures are safely stored and accessible from various devices. However, if you're concerned about storage limitations or want more control over the organization, explore other methods mentioned in this guide.

Method #3: Using Email Service Providers

People tend to use email to transfer WhatsApp data or WeChat data since most of them are conversations and thus won't be too big. Transferring pictures using email might not be the most efficient method for large numbers of photos, but it can work well for a small number of images. Here's how to use email to transfer your photos:

  1. Select the Photos: Open the Photos app on your iPhone.
  2. Navigate to the album or collection containing the photos you want to transfer.
  3. Choose the Email Option: Select a photo and tap the share icon (a square with an arrow pointing upward). Choose the “Mail” option from the sharing menu.
  4. Compose the Email: A new email draft will open with the selected photo attached. Enter your email address in the recipient field.
  5. Send the Email: Send the email to yourself.
  6. Download Photos on Your Computer: Open your email inbox on your computer. Locate the email you sent to yourself. Download the attached photos by right-clicking on them and selecting “Save As” or the equivalent option in your email client.

Transfer Pictures from iPhone to Computer Using Email

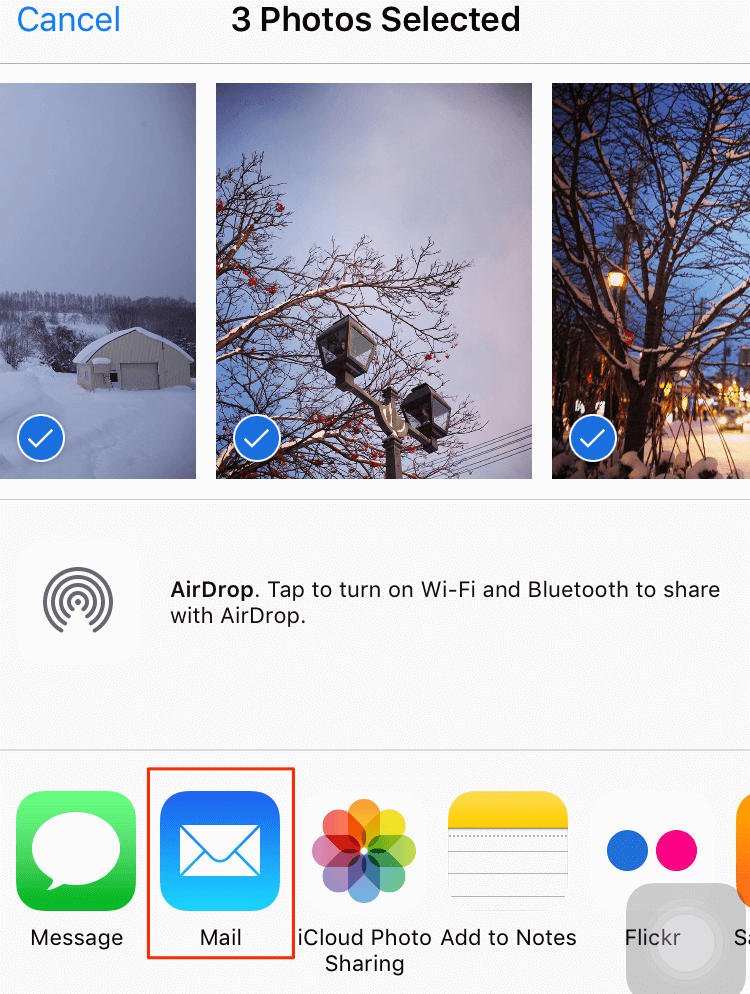
While using email to transfer photos is convenient for a few pictures, it's not the most efficient choice for larger albums. If you're dealing with numerous photos or want to maintain higher image quality, consider exploring other methods outlined in this guide.

Method #4: Using AirDrop (iPhone to Mac Computer)

AirDrop is an excellent wireless method for transferring photos and other files directly between your iPhone and Mac. It offers a seamless and fast way to move your pictures without the need for cables or cloud services. Here's how to transfer pictures from iPhone to computer using AirDrop:

  1. Enable AirDrop on Your iPhone: Swipe down from the upper-right corner of your iPhone screen (on newer iPhones) or swipe up from the bottom of the screen (on older iPhones) to access the Control Center. Press and hold the "Network Settings" card in the upper-left corner.
  2. Tap on "AirDrop" and choose either "Contacts Only" or "Everyone" based on your preference.
  3. Enable AirDrop on Your Mac: On your Mac, ensure that Bluetooth and Wi-Fi are turned on. Open a Finder window, and in the left sidebar, you'll see "AirDrop". Click on it. Choose either "Contacts Only" or "Everyone" to match the setting on your iPhone.
  4. Transfer Photos Using AirDrop: On your iPhone, open the Photos app and navigate to the album containing the photos you want to transfer. Select the photos you want to transfer by tapping on them. Tap the share icon (a square with an arrow pointing upward). A list of available AirDrop devices will appear at the top of the sharing menu. Select your Mac's name.
  5. Accept the AirDrop on Your Mac: A notification will appear on your Mac, showing the photos being sent from your iPhone. Click "Accept" to initiate the transfer.
  6. Find Your Photos on Your Mac: Once the transfer is complete, the photos will be saved in your Mac's "Downloads" folder by default. You can move them to any desired location.

Transfer Pictures from iPhone to Computer Using AirDrop

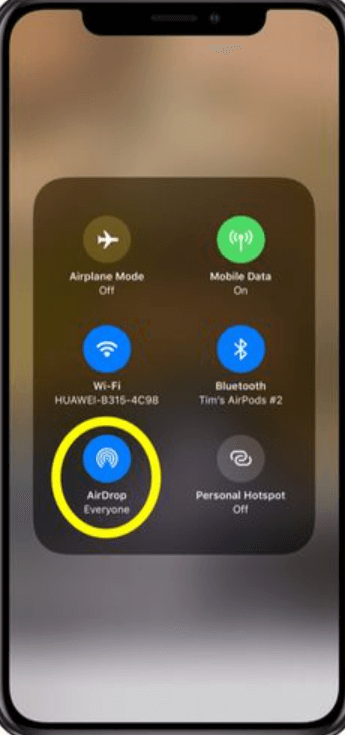
AirDrop is an efficient and reliable method if you're within the Apple ecosystem and want to transfer photos wirelessly between your iPhone and Mac. However, if you're looking for cross-platform solutions or exploring alternatives, continue reading the rest of this guide.

Method #5: Using Google Drive

Transferring pictures from your iPhone to your computer through Google Drive offers a versatile and cloud-based solution. This method works for both Windows and Mac computers and doesn't restrict you to a specific platform. Here's how to use Google Drive to transfer your photos:

  1. Install Google Drive on Your iPhone: Download and install the Google Drive app from the App Store. Sign in with your Google account or create one if you don't have an account.
  2. Upload Photos to Google Drive: Open the Google Drive app on your iPhone. Tap the "+" (plus) icon to add a new file. Select "Upload" and choose the photos you want to transfer. You can select multiple photos at once.
  3. Access Google Drive on Your Computer: Open a web browser on your computer and go to Google Drive (drive.google.com). Sign in with the same Google account used on your iPhone.
  4. Download Photos to Your Computer: Locate the uploaded photos in your Google Drive. Select the photos you want to download. You can hold down the "Shift" key to select multiple photos. Right-click on the selected photos and choose "Download".
  5. Retrieve the Downloaded Photos: Check your computer's default download location for the downloaded photos.

Transfer Pictures from iPhone to Computer Using Google Drive

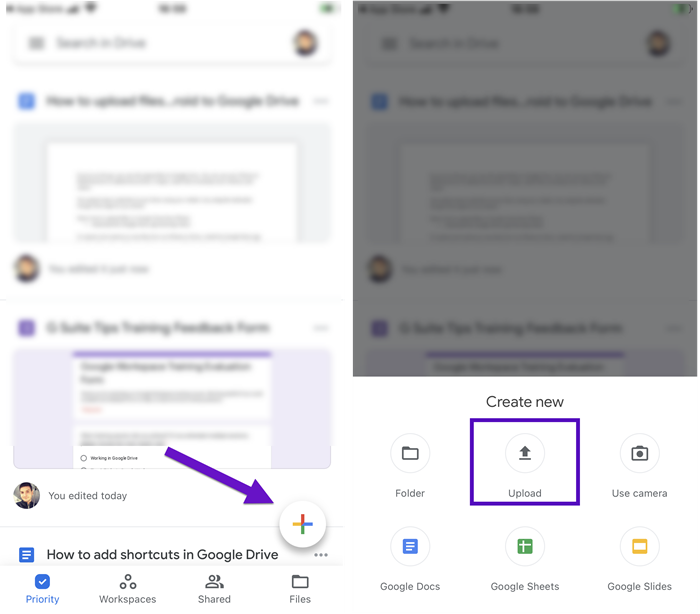
Using Google Drive to transfer photos is a practical solution for those who want a versatile and platform-independent method. However, if you're dealing with large photo collections or want to explore more dedicated photo management tools, continue exploring the other methods in this guide.

Method #6: Using Messaging Apps

Transferring pictures from your iPhone to your computer using messaging apps like iMessage, WhatsApp, or Telegram can be a convenient way to quickly share photos with yourself. While this method might not be as well-suited for organizing large collections, it's worth considering for sharing a few photos. Here's how to transfer pictures from iPhone to computer using Messaging apps:

  1. Select the Messaging App: Choose a messaging app that you regularly use and is available on both your iPhone and your computer.
  2. Send the Photos to Yourself: Open the messaging app on your iPhone. Start a new conversation with yourself or use a dedicated note or chat. Attach the photos you want to transfer to the message. Send the message to yourself.
  3. Access the Message on Your Computer: Open the messaging app on your computer using the same account. Locate the message you sent to yourself and download the attached photos.
  4. Retrieve the Downloaded Photos: Check your computer's default download location for the downloaded photos.

Using messaging apps to transfer photos is a simple way to quickly move a handful of images from your iPhone to your computer. However, if you're looking for a more structured approach to photo organization or need to transfer numerous pictures, consider exploring the other methods presented in this guide.

Part #2: The Top Tool to Transfer Pictures from iPhone to Computer: FoneDog Phone Transfer

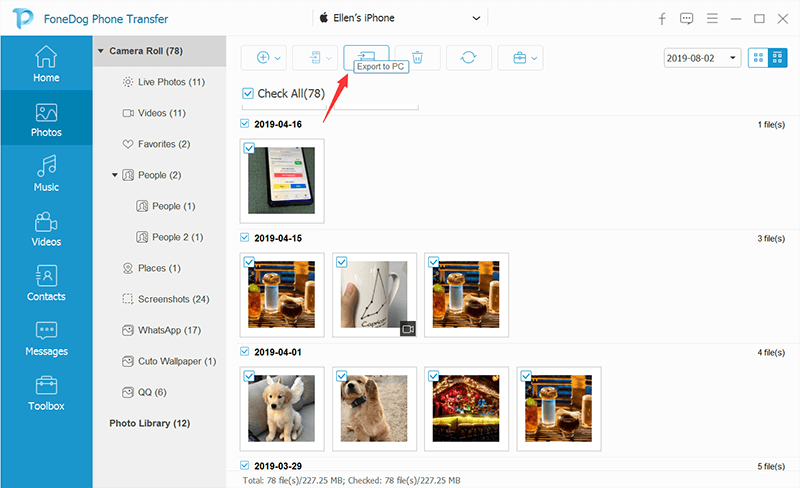
When it comes to efficiently transferring pictures from your iPhone to your computer, using dedicated software can provide a comprehensive and user-friendly solution. One such tool that stands out is the FoneDog Phone Transfer. This versatile software streamlines the process, offering a range of features that cater to both Windows and Mac users.

Phone Transfer Transfer files among iOS, Android and Windows PC. Transfer and backup text messages, contacts, photos, video, music on computer easily. Fully compatible with the latest iOS and Android. Free Download FoneDog Phone Transfer

Here's why FoneDog Phone Transfer is a top choice:

  • Simplified Transfer Process: FoneDog Phone Transfer is an iPhone 15-supported tool that simplifies transferring pictures by providing a step-by-step interface that guides you through the process. Its user-friendly design ensures that even those with limited technical expertise can effortlessly move their photos.
  • Compatibility with Various Platforms: Whether you’re using a Windows PC or a Mac, FoneDog Phone Transfer offers cross-platform compatibility. This means you can seamlessly transfer your photos regardless of your computer’s operating system.
  • Bulk Transfer and Selective Backup: Unlike some methods that limit the number of photos you can transfer at once, FoneDog Phone Transfer allows you to transfer photos in bulk. Additionally, you have the flexibility to selectively choose which photos to transfer, providing better control over your photo library.
  • Preservation of Image Quality: FoneDog Phone Transfer ensures that the image quality remains intact during the transfer process. Your cherished memories will retain their original resolution and clarity.

Here are the steps to use it to transfer pictures from iPhone to computer:

  1. Download and Install FoneDog Phone Transfer: Visit the official FoneDog website and download the FoneDog Phone Transfer software. Install the software on your Windows or Mac computer by following the on-screen instructions.
  2. Launch FoneDog Phone Transfer: Once the installation is complete, launch the FoneDog Phone Transfer software on your computer.
  3. Connect Your iPhone: Use a USB cable to connect your iPhone to your computer. Make sure to unlock your iPhone and tap "Trust" if prompted to establish the connection.
  4. Choose "Phone Transfer" Mode: On the FoneDog Phone Transfer main interface, you'll see different options. Choose "Phone Transfer" mode.
  5. Prepare for Transfer: The software will analyze your iPhone's data and display the different types of content you can transfer. Ensure that "Photos" is selected.
  6. Select Photos for Transfer: You'll see a list of categories on the left side. Click on "Photos" to view your iPhone's photo library. Select the photos you want to transfer. You can choose individual photos or entire albums.
  7. Start Transfer: Click on the "Start Transfer" button. The software will begin transferring the selected photos from your iPhone to your computer.

Transfer Pictures from iPhone to Computer: FoneDog Phone Transfer

While there are several methods available to transfer pictures from your iPhone to your computer, using specialized software like FoneDog Phone Transfer can enhance the process with its user-friendly interface, bulk transfer capabilities, and features designed to preserve image quality and organization. If you're seeking a reliable and efficient way to manage your iPhone's photo library, FoneDog Phone Transfer stands out as a top 5 iPhone to PC file transfer tool to consider.

People Also Read2023 Guide: How to Transfer Pictures from iPod to Computer?3 Methods on How to Transfer Pictures to SD Card

Conclusion

In today's digital age, choosing to transfer pictures from iPhone to computer is essential for safekeeping, organization, and creating space on your device. This guide has explored a variety of methods, each catering to different preferences and needs.

As a dedicated software, FoneDog Phone Transfer stands out for its user-friendly interface, bulk transfer capabilities, and preservation of image quality. It's a comprehensive solution for efficiently managing your photo library.

Choosing the right method depends on your specific preferences, the size of your photo collection, and the devices you're using. Whether you prioritize convenience, image quality, or organization, there's a method in this guide that suits your needs. By understanding and utilizing these various methods, you can ensure your precious memories are securely stored, easily accessible, and ready to be enjoyed on your computer whenever you wish.

Leave a Comment

Comment

Comment ()
author image

Nathan E. Malpass

iPhone/Android Devices’ Maintenance Expert

Staying home, listening to music, writing tech articles

Many people asked me to repair their mobile phones so I have a lot of experience in mobile phone repair, and I know a lot about Android or Apple phones.

Phone Transfer logo

Phone Transfer

Transfer data from iPhone, Android, iOS, and Computer to Anywhere without any loss with FoneDog Phone Transfer. Such as photo, messages, contacts, music, etc.

Free Download

How Do You Like This Article?

Check icon/ Check icon

INTERESTINGDULL

Check icon/ Check icon

SIMPLEDIFFICULT

Thank you! Here' re your choices:

Rate This Article: Excellent

Rating: 4.6 / 5 (based on 76 ratings)

Phone Transfer logo

Phone Transfer

Transfer data from iPhone, Android, iOS, and Computer to Anywhere without any loss with FoneDog Phone Transfer. Such as photo, messages, contacts, music, etc.

Free Download

FoneDog uses cookies to ensure you get the best experience on our website. Click here to learn more.