FoneDog Screen Recorder
FoneDog Screen Recorder
Special Offer
Special Offer


By Vernon Roderick, Last updated: July 7, 2021
Email is a common method we use to exchange messages in electronic means to other people. An email can contain images, texts, attachments, and other files that we send or receive from other users. Therefore, it is necessary to know which email repair tools are available. A widely used application program for email management is Microsoft Outlook that is part of the MS Office package.
With it, we can store and manage our emails, contacts, tasks, calendar appointments, and other items. There are times however that we encounter issues with our emails such as corrupted, lost, or deleted files caused by a number of reasons. Here are some methods to recover deleted email Outlook, you could click on it to learn more about it.
In this article, we will discuss the different email repair tools that can be used to help repair and recover your corrupted and damaged Outlook data files.
Part 1. Recommended Steps Before Running Email Repair ToolPart 2. Email Repair Tool Using the Inbox Repair Tool (Scan PST) Part 3. Free Email Repair ToolsPart 4. In Summary
This section provides recommended processes that you can follow before you click and run the email repair tool. Different problems may arise from your MS Outlook app such as corrupted files, the application suddenly closes, freezes keeps crashing or does not respond. The most common reasons for these problems may be due to malware threats, sudden power interruption, low memory, outdated app version, conflict with an anti-virus program and other applications; file has been in use by another program, formatting errors, conflict with add-ins, and many others.
Whatever the reason, you need to restore your Outlook app and recover your Outlook data files. Make sure to create a backup of your Outlook files (pst, ost) before running email repair tools.
First and foremost, do a restart of the Microsoft Outlook app. Or you can do a restart of your computer.
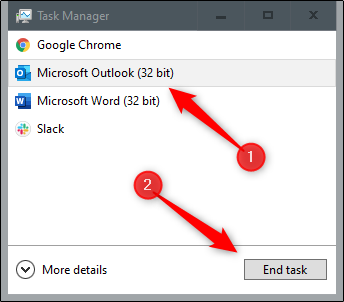
Step 01: End the Outlook process by going to the taskbar. Right-click and select Task Manager.
Step 02: Go to the Processes tab and find Microsoft Outlook.
Step 03: Right-click on the application process and select End Task.
Restarting your computer will fix most problems in your device such as software-related issues. This process will clear and reset the memory state of your device to make it perform faster and better.
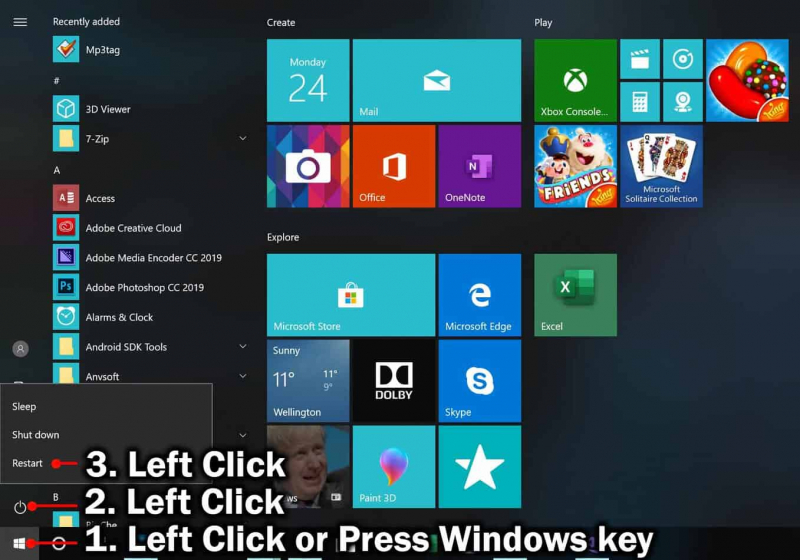
Step 01: On your Windows computer, press and hold the CTRL + ALT + DELETE keys at the same time until the list of options appears.
Step 02: On the bottom part of the screen, click on the Power button.
Step 03: Click Restart from the list that pops up. Your computer will reboot. Wait until it completes with the restart and launch again the MS Outlook application.
How to Clean Up the Temporary Data in Your Computer:
Temp data can take a good amount of space in your computer so you need to clean them up regularly.
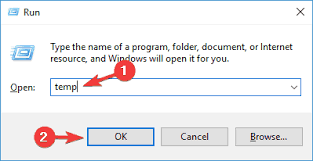
Step 01: Press and hold Window logo + R keys to launch the Run dialog window.
Step 02: The Run dialog will appear. Type in temp in the Open box and press Enter key or click OK.
Step 03: Click Continue when prompted for Administrator access. Select all files and folders in the Temp folder. As a shortcut, press CTRL + A keys.
Step 04: Press the Delete key to erase all the temp data in the folder which are automatically sent to the Recycle Bin. Or right-click on the selected files and select Delete from the list.
Step 05: Launch again the MS Outlook app.
Try to run the application in safe mode to isolate the problem and check if the add-ins may be causing the issue.
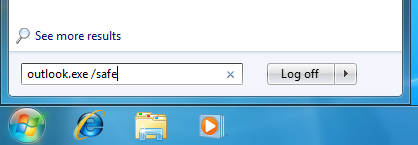
Step 01: Press and hold Window logo + R keys until the Run dialog is launched.
Step 02: The Run dialog appears. In the Open box, enter outlook.exe /safe.
Step 03: Press the Enter key or click OK.
Step 04: MS Outlook will run in safe mode. Check if the issue is resolved when the startup program or add-ins are bypassed in safe mode.
To run the app in normal mode, exit the program and launch again the app.
This section provides the step by step instructions on how to run an email repair tool if the previous methods do not solve the issue. Inbox Repair Tool is a built-in program installed together with MS Outlook application.
The tool will scan and repair your Outlook data files for any problems but it cannot assure that it can repair every problem that it finds.
Step 01: Close the MS Outlook application (if it is opened).
Or you can end the Outlook process in the Task Manager. Go to the Processes tab and find Microsoft Outlook. Right-click on the application process and select End Task.
Step 02: Show the hidden files and folders. Go to the Start menu and launch the Control Panel.
Step 03: Click on the File Explorer Options or Folder Options.
Step 04: Click on the View tab.
Step 05: Under Advanced settings, go to Hidden files and folders.
Step 06: Select the option Show hidden files, folders, and drives.
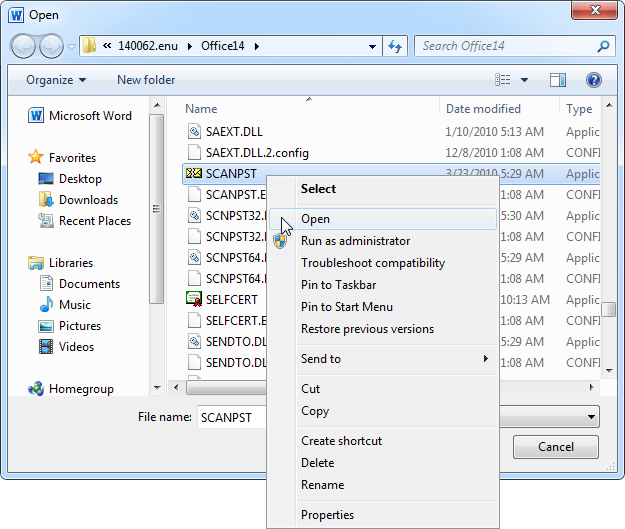
Step 07: Navigate to the Microsoft Office installation folder in File Explorer to find the Inbox Repair tool (scanpst.exe). Usual path locations of MS office can be one of the following:
< drive>\Program Files(x86) \Microsoft Office \Office
< drive>\Program Files(x86) \Microsoft Office \root \Office
< drive>\Program Files \Microsoft Office \Office
< drive>\Program Files \Microsoft Office \root \Office
< drive>:\Program Files \Common Files \System \Map i\1033\
< drive>:\Program Files \Common Files \System \MSMAP I\1033
Or you can search for the scanpst.exe tool manually in File Explorer.
Step 08: Double-click to open the scanpst.exe tool.
Step 09: Locate the Outlook Data file (ost, pst) that you want to repair. Click Browse.
Step 10: Navigate to the location of the Outlook data file and select the file to be scanned. Usual file locations can be one of the following:
< drive>:\Users \
< drive>:\Users \
< drive>:\Documents and Settings \
< drive>:\Users \
< drive>:\Users \
Step 11: Click on the Start button, to begin with scanning the Outlook data file for any problems. Wait until the data scan is done.
Step 12: If there are errors found, click the Repair button. Make sure to check the option Make a backup of scanned file before repairing in order to create a backup copy of the data in case issues arise. Wait until the repair process is done.
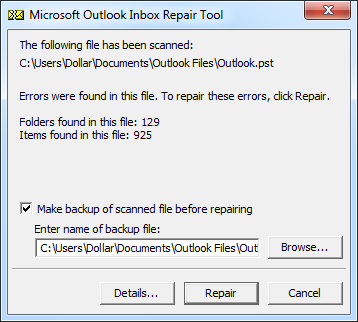
You may run the Inbox Repair Tool several times to achieve a full repair of your Outlook file.
If the Inbox Repair tool cannot be found, try to run the Repair program:
Step 01: On your computer, launch the Control Panel.
You can launch the application via the Start menu or search box in the taskbar.
Step 02: Go to Apps and Features or Programs and Features (in previous versions).
Step 03: Locate and select Microsoft Office from the list of programs.
Step 04: Right-click on the program and click Change or Modify.
Step 05: The MS Office dialog appears. Click Repair from the list of options.
Step 06: Select the option on how you would like to repair your Office programs.
Step 07: Click on the Repair button.
Step 08: Follow the instructions to proceed. Wait until the repair process is done. Launch again the MS Outlook to check.
You can also try to reinstall the program. This will also get the latest updates of the application. First, uninstall the application program then install an updated version:
Step 01: On your computer, launch the Control Panel.
You can launch the application via the Start menu or search box in the taskbar.
Step 02: Go to Apps and Features or Programs and Features (in previous versions).
Step 03: Locate and select Microsoft Office from the list of programs.
Step 04: Right-click on the program and click Uninstall.
Step 05: Follow the instructions to proceed. Wait until the program is uninstalled successfully.
Step 06: Run the Office installation file to install the program. If it is not stored on your computer or disk, you can download one from the Microsoft website.
Step 07: Follow the instructions to proceed. Wait until the program is installed successfully. Launch again the MS Outlook to check.
Step 01: Re-launch the Microsoft Outlook app. Recover the repaired items in your Outlook.
Step 02: Enable the Folder List view or press CTRL + 6 keys as a shortcut.
Step 03: The recovered personal folders will be shown. The Lost and Found folder contain the recovered items from the Inbox Repair tool.
Step 04: Create a new PST file to transfer the recovered items to the new PST file.
Go to the File menu then select Info.
Step 05: Click the Account Settings button.
Step 06: Go to Account Settings.
Step 07: Click Data Files and then click Add.
Step 08: Enter a new filename for the Outlook PST file.
Step 09: Click OK.
Step 10: Move the recovered items from the Lost and Found folder by dragging the items to the new PST file.
Step 11: Verify that the recovered items are successfully moved and accessible in the new PST file.
How to Recover the Missing Items From the Outlook Backup:
Step 01: Navigate to the location of the PST file. This is also where the backup file (.bak) is stored during the time your Outlook data file has been repaired.
Step 02: Copy the backup file. Press the CTRL + C keys or right-click on the file and select Copy.
Step 03: Paste the backup file. Press the CTRL + V keys or right-click on the file and select Paste.
Step 04: A copy of the backup is created. Rename the backup file to .bak.pst. Right-click on the file and click Rename or press the F2 key.
Step 04: Press Enter key to save the new file name of the backup file.
Step 05: Launch the MS Outlook application.
Step 06: Go to the File menu.
Step 07: Click the Open & Export tab located on the left pane.
Step 08: On the right, click the Import/Export button.
Step 09: The Import and Export wizard will appear. Select Import from another program or file in the list of actions to perform.
Step 10: Click Next to proceed.
Step 11: On the list of the file types to import from, select Outlook Data File (.pst).
Step 12: Click Next to proceed.
Step 13: Click Browse to select the location of the backup file to be imported.
Step 14: Choose from the list of options how you want the backup file is to be imported.
Step 15: Click Next to proceed.
Step 16: Select the folder to import from as well as the other options and filter.
Step 17: Click Finish. Verify that the missing items have been recovered and imported successfully to Outlook.
This section lists down examples of free email repair tools that you can try to run to repair corrupted or damaged Outlook data files.
This tool works in both Windows and Mac OS. It can repair corrupted Outlook files (PST) and recover lost or deleted Outlook items.
Pros: SysTools Outlook Recovery can also decrypt and remove encryption, search PST files, and do selective export of files.
Cons: Its free trial version is limited to up to 25 files per folder when exporting PST files to other formats and importing them to the mailbox. The full version starts at $49.
This email repair tool is available in a free trial version for Windows which repairs corrupted and damaged Outlook data files such as PST and OST. It supports all Outlook versions.
Pros: iMyFone ScanOutlook can also export the file in various formats and recover deleted Outlook items with a quick search, auto-locate of files, and advanced repair mode features.
Cons: In its free trial version, recovery is not available but only repair and file preview on a limited number of files. Software price starts at $39.95 for repair and recovery of unlimited files.
This tool available in the free trial version can repair damaged and corrupted Outlook files (PST) and recover deleted messages and attachments.
Pros: Kernel for Outlook PST Repair can also repair encrypted and password-protected files, archive PST files, and exports file to other formats.
Cons: Its free trial version is limited to up to 25 files per folder to save to PST files. The full version starts at $69.

Most of the software recommended above requires money, if you want to know about the free Outlook Email Recovery Software download, this article is definitely for you.
People Also ReadHow to Recover Deleted Emails in Gmail from Your AccountA Guide To Hotmail Email Recovery in 2020
Most people used emails to communicate messages between different users at any location in electronic means. Issues, however, arise that will result in corrupted, damaged, or lost emails. Given the important data that is stored in our email files, we need to recover these files and restore them to Outlook. With the help of email repair tools, we can conveniently and easily recover the Outlook data files.
Leave a Comment
Comment

Technical Expertise for PC/Website Optimization
One of my passion is to develop software of my own
I write articles to share knowledge about IT technology and some experience in developing my own software, and developing my own software is one of my passions for work.
Data Recovery
FoneDog Data Recovery recovers the deleted photos, videos, audios, emails, and more from your Windows, Mac, hard drive, memory card, flash drive, etc.
Free Download Free DownloadHot Articles
 /
/
INTERESTINGDULL
/
SIMPLEDIFFICULT
Thank you! Here' re your choices:
Excellent
Rating: 4.8 / 5 (based on 65 ratings)
