
By Adela D. Louie, Last updated: March 17, 2023
As of the moment, while you are starting to read this post, you must have so many videos saved on your iPad that you want to transfer over to your Mac. And as all iOS users know, saving a lot of photos and videos eats up a huge space on your iPad. And we all know that these types of files are the ones that have a large size. Which is the reason that makes you want to transfer videos from iPad to Mac.
And since deleting is not an option for you to free up space on your iPhone or iPad, then transferring over to another device is the best option. And because of that, we have come up with the perfect guide on the ways of transferring videos from iPad to Mac. So, if you want to know how you can do this, better read this post up until the end and we guarantee you that you will be able to do this in just a few clicks.
Part #1: Transferring Videos from iPad to Mac Using Photo App or iPhoto Part #2: Transferring Videos from iPad to Mac Using Image Capture Part #3: Transferring Videos from iPad to Mac Using iTunes Part #4: Transferring Videos from iPad to Mac Using iCloud Part #5: Convert Any Videos Not Compatible to Mac from iPad Part #6: Conclusion
If you are one of those users who prefers to use the cable to transfer any data like music from your iPad to your computer, then using the iPhoto or Photo App is your best option. But when you do this method, we must say that you might want to do this carefully. Because you can only transfer videos from iPad to Mac that were taken with your iPad camera.
Below is a guide on transferring videos from iPad to Mac.
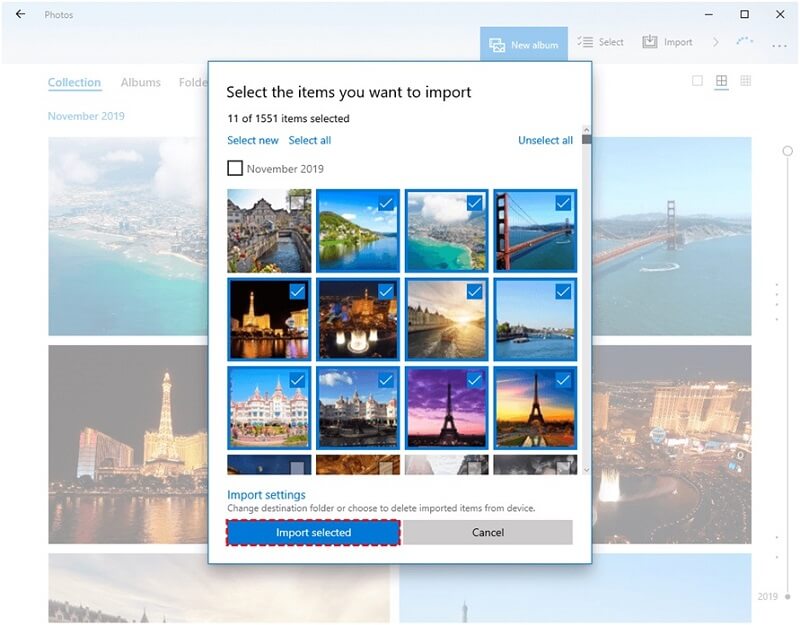
Once you have connected your iPad to your Mac using your USB cable, your iPhoto app will then pop up automatically. If it does not, then you can launch it manually instead of on your Mac.
Then, select the video that you want to transfer from your iPad to your Mac. Once done, simply click on the “Import Selected” option for you to transfer them over from your iPad to your Mac.

Then, go to the “Last Import” tab. And then, simply click on the “Edit” button and choose “Select All”. Then choose Edit, and click on Copy so that you can copy the videos that can see on your screen.
After that, launch Finder and then click on the Edit button and choose Paste Items. This will then have your videos be pasted or transferred over to your hard drive.
The Image Capture app is known as one of the pre-installed applications on Mac when you buy one. And with this app, you will be able to transfer videos from iPad to Mac in the easiest way. And to give you guidance on how you can do this, just follow the steps we have below.

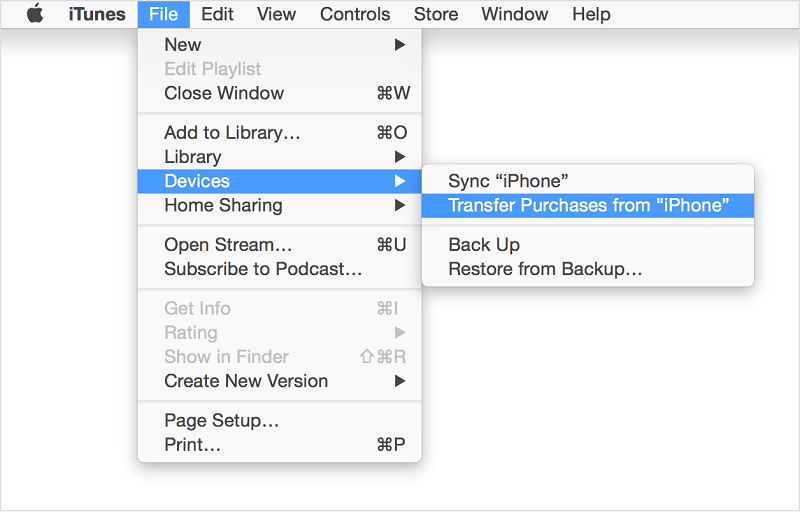
The iTunes application is known as one of the most reliable tools that your Mac has. And with that, you can use it for transferring videos from iPad to Mac. However, the only downside to this method is that you can only transfer videos that you have purchased because there is an issue with copyrights. But, if you have so many videos that you have purchased on iTunes saved on your iPad, then you can definitely use this method so you can move them over to your Mac.
And to do this, go ahead and simply follow the steps below.

Now, another way on how you can transfer data from one iOS device to another is by using iCloud, which is another reliable tool that all iOS users use. And the best thing about using iCloud is that you can make transfers wirelessly. All you need is a stable internet connection to do so. And to show you how you can use this method for transferring videos from iPad to Mac, below is a guide that you can follow.
In this method, as we have mentioned earlier, you must ensure that you have a stable internet connection on both your iPad and Mac. And if you have a large size of videos, the transfer process may take longer than usual.
If in any case, you try transferring videos from iPad to Mac that you cannot play, then this means that your Mac does not support the format of the video you transferred. And with that, the best solution to do this is to have that certain video be converted. And what else is the perfect tool that you can use when it comes to converting videos rather than FoneDog Video Converter?
FoneDog Video Converter is a fast and easy tool that you can use for you to convert your videos and audios as well from one format to another. And all thanks to its great interface, you will be able to convert your videos easily. And even though that FoneDog Video Converter comes with a high-speed process, it will never affect the quality of your video. And to show you how easy this tool to use is, below is a guide that you can refer to.
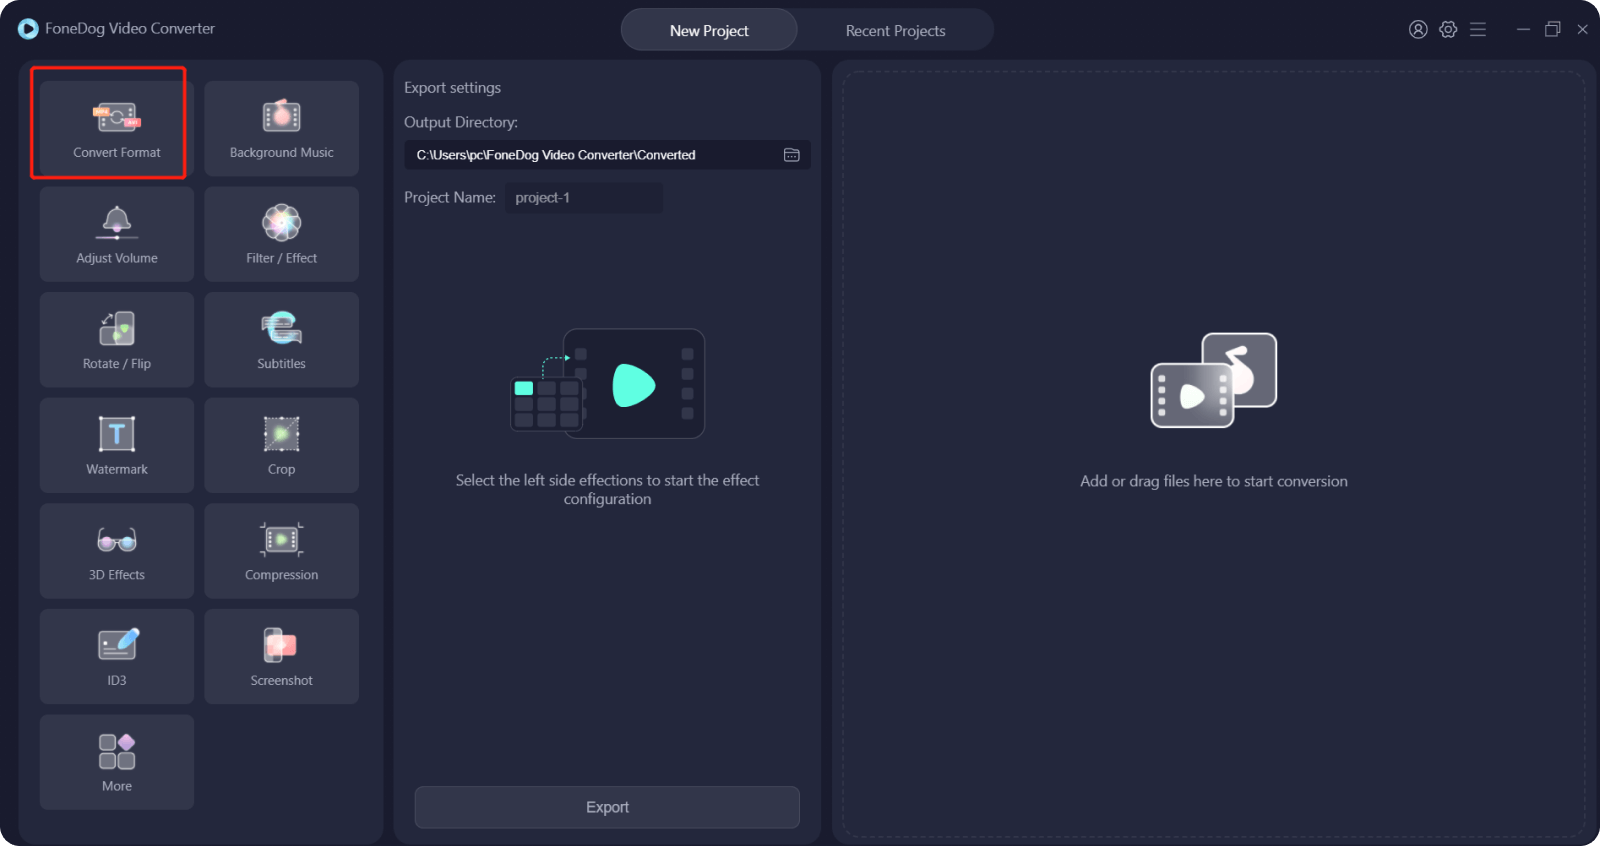
Launch FoneDog Video Converter on your computer. And once you reach the main page of the program, go ahead and add or drag the video that you want to convert.

Once you have added the video, click on the Convert Format button from the left side of your screen and select the format that is compatible with your Mac. Then, choose the location as well where you want to save the converted video then click on the Save button.

Once done, click on the Convert button to start the conversion process. And once done, you can now preview the video from the Recent Projects folder to make sure that the video is now playable on your Mac.

People Also Read4 Powerful Methods to Transfer Video from iPhone to PC3 Effective Ways on How to Transfer Videos from iPhone to Mac
All in all, the methods that we have shown you above are all perfect ways on transferring videos from iPad to Mac. All you have to do from here is to select the method that suits your need. And in case there are videos you have transferred from your iPad to your Mac does cannot be played, then consider using FoneDog Video Converter as this is the tool highly recommended by many when it comes to converting videos and audios from one format to another easily.
Leave a Comment
Comment
Hot Articles
/
INTERESTINGDULL
/
SIMPLEDIFFICULT
Thank you! Here' re your choices:
Excellent
Rating: 4.7 / 5 (based on 82 ratings)