

By Nathan E. Malpass, Last updated: March 12, 2019
I have an Android smartphone that I use to save photos, videos, music, and even documents. I make sure these files are backed up into cloud storage all the time. For that, I use Dropbox instead of Google Drive. I just like the platform better than the other. Right now, though, I’m having problems with it. Dropbox is not syncing. How do I fix this problem? Also, what are the possible causes of Dropbox not syncing?
~Android Smartphone/ Dropbox User
Part I: IntroductionPart II: Solutions To The Problem Of Dropbox Not SyncingPart III: Conclusion
People Also ReadHow to Export or Sync Chrome BookmarksHow to fix Google Drive Does Not Sync Issue?
Dropbox is a great way to back up your files into cloud storage. It is a great way to recover files that have been mistakenly deleted. You just simply copy the back up from Dropbox and then your mistakenly deleted file will already be with you again.
However, Dropbox has its own flaws too. There are times when Dropbox always seems to be busy syncing all the time. There are other times wherein Dropbox doesn’t sync every single file you have on your Desktop or mobile device. Fortunately, we are here to help you with the problems you are currently facing with Dropbox.
There are other users who report that they have files that are not syncing on Dropbox. Sometimes, the icon displays a green tick on it and it also states that it is currently updated. However, these files do not show up even though it says it’s updated. This means Dropbox is not currently syncing properly.
Other users meet other situations and syncing problems with that of their computer, tablet, phone, or even online Dropbox accounts. Dropbox usually relies on an Internet connection that is unrestricted in order to sync files and data to that of the cloud and also its mobile and desktop clients.
Dropbox not syncing is caused by a variety of reasons that might be different from one user to the other. These reasons include incompatibility with that of bad files, client errors, blocking of a firewall, etc. Whatever the reason may be, there are still solutions to the problem of Dropbox not syncing.
Fortunately, you are in this guide. This article will focus on various methods you can implement in order to fix the issue of Dropbox not syncing. We will be tackling the different method and teach you how to do it to solve your problem once and for all.
We will give you various methods of solving the problem of Dropbox not syncing. Let’s get started with the first method below.
Method 01: Checking Out Your Connection To The Internet
Dropbox is only able to sync your files (or data) when your device (e.g. computer, smartphone, tablet) is online. Thus, the first thing necessary for you to do is to check if the device is actually connected to the Internet through a Wi-Fi network or a cellular data network. Check it out if it works normally as it should be. You can also try to reconnect it if you want to.
Method 02: Restarting Dropbox and Restarting The Device
If the Dropbox application or program is stuck within the computer device, your data and files might have been synced properly. However, Dropbox has failed when it comes to reading these files properly.
When this happens, you can simply restart Dropbox. In order to do this, you have to quit the Dropbox application or program and then open it back up again. This will fix the problem easily.
The best thing to do though is to close Dropbox. After which, shut down your computer (or smartphone or tablet) and then restart the device again. After which, you should open Dropbox finally.
Method 03: Checking Up Your Dropbox Account
The syncing of your files to that of Dropbox only works when you are actually signed into the identical account (of Dropbox) across multiple platforms and devices (e.g. website, computer, smartphone, tablet).
If you are currently logged into an account that is different, then syncing won’t work properly. It makes sense right? That’s why it is best to make sure that the same account is logged into different devices.
Method 04: Checking Out The Selective Sync Feature
The selective sync feature gives users the ability to select the specific files they wish to be synced from Dropbox’ website (i.e. Dropbox.com) to that of the Dropbox folder of the computer (or any device). If your data are files are actually synced on all except for one computer, it might be possible that Selective Sync is actually ignoring specific folders.
In order to check if these data or files missing from that of your computer were actually selectively synced, you can do so by going to the Preferences of Dropbox. Simply visit Dropbox Preferences. After which, select Account. After which, go to Change Settings. Finally, go to Selective Sync.
Method 05: Checking Out If There Are Incompatible Files
There are times wherein the name of the files contains an incompatible character. That’s why Dropbox doesn’t sync this file because it makes an exception for it. These characters include the following: Forward Slash (/), Back Slash (\), Less Than (<), Greater Than (>), and Colon (:).
By no means is this list exclusive. To make sure of all the characters that Dropbox doesn’t sync, you can use the Bad File Name Tool For Dropbox.
Method 06: Using A Substitute Tool In Order To Sync Data To That Of Dropbox
Have you tried all the methods above? Did none of them work? Well, fortunately, you can still go through this issues and fix the problem of Dropbox not syncing. If you tried to change the file names of the different data and it still didn’t work, there’s still a way around it.
What you can do is to use an alternative tool for Dropbox. Instead of making a backup on cloud storage, you can make a backup to that of your PC or any other storage device. In order to do this, you need a tool called FoneDog’s Android Data Backup & Restore. Below are the advantages and the steps on how to use this amazing tool:
* You are given the ability to choose which files or data to back up and even restore. Plus, you can do it with a few clicks only.
* It allows you to back up a device’ applications. Plus, the contents of these applications are included as well.
* You are given the ability to preview the backup file and the contents of this backup file.
* You are given the ability to selectively restore data you want to restore to any device you wish.
* It supports a lot of Android devices, over eight thousand (8000+) of them.
* It is very secure. You are the only one who can access your backup files and the data within it.
* Your data will always be kept safe. You don’t have to worry about your data being overwritten.
* You have the option to get the 30-day free trial. Meaning, you can actually experience the best of the best when it comes to backup and restore tools without the need to pay for it first.
* Your data is backed up in great lossless quality.
Here are the steps on how to use Android Data Backup & Restore:
Step 01 - Go to FoneDog’s website.
Step 02 - Download the toolkit of FoneDog on this website. You can either pay for it upfront or get the free trial first.
Step 03 - Open the FoneDog toolkit on your computer.
Step 04 - Make sure that other backup tools are not operating while you are opening FoneDog and using it.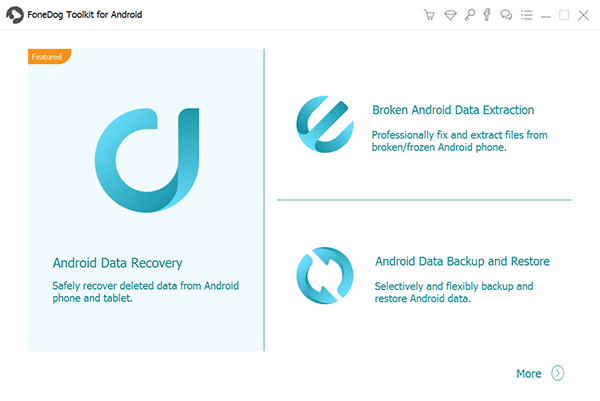
Step 05 - Select Android Data Backup & Restore.
Step 06 - Connect your Android device to that of your computer by using a USB cable. Make sure the mode called Debugging is activated on the said Android smartphone or tablet.
If your Android device has a version number of 4.0 or up, a specific pop-up window will be displayed. Press OK in this popup window to confirm that you want to activate Debugging Mode.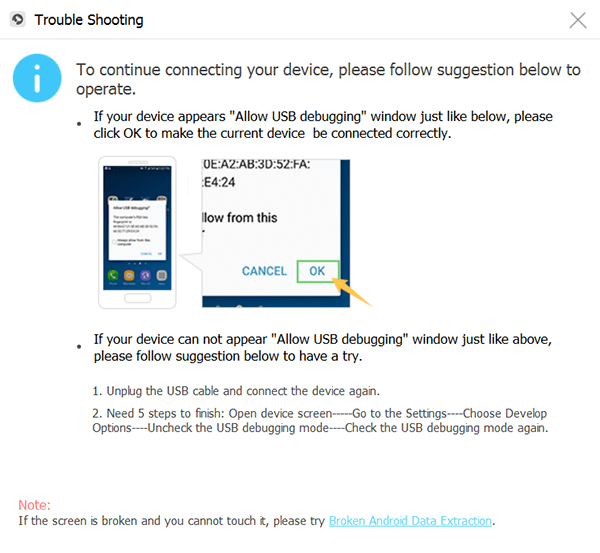
Step 07 - FoneDog toolkit must have detected your device by now. If this happens, click out Device Data Backup. In normal cases, FoneDog sets the different types of files it scans for you. However, you still have the ability to choose which data type you actually want to back up.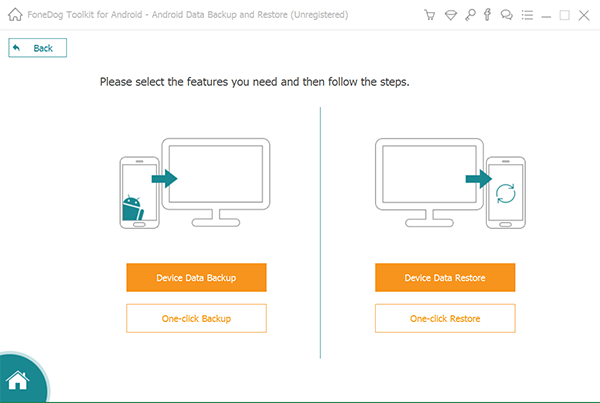
Step 08 - Press Start if you have already selected the different types of data you wish to back up. Now, the backing up process will start. Make sure you do not remove the connection between the Android device and the computer. Do not use the Android device as well. Also, do not delete data while the backup process is being done.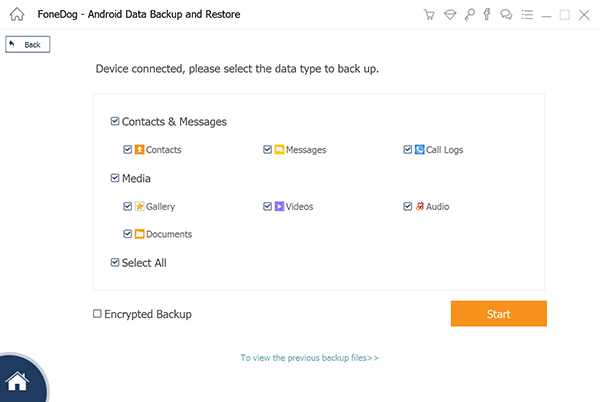
Step 09 - Press OK after the backup process is done. Now, you have the ability to check the backup files’ data or contents. Or, you can also restore these data you have backed up to that of another device.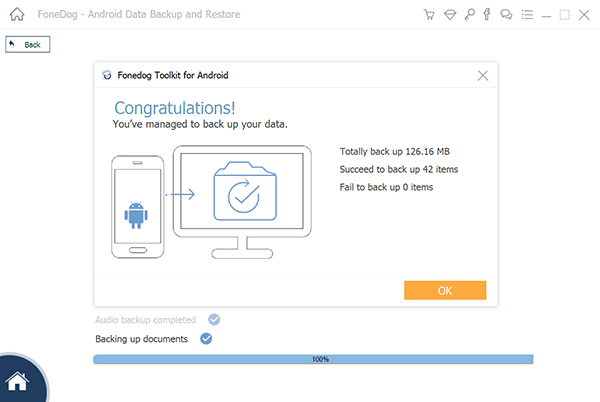
Here’s how to do it (i.e. restore your data to another device):
Step 10 - Open FoneDog toolkit again.
Step 11 - Choose Android Data Backup & Restore.
Step 12 - Choose Device Data Restore.
Step 13 - FoneDog will not show you the different backup files. Select a backup file that you want to restore.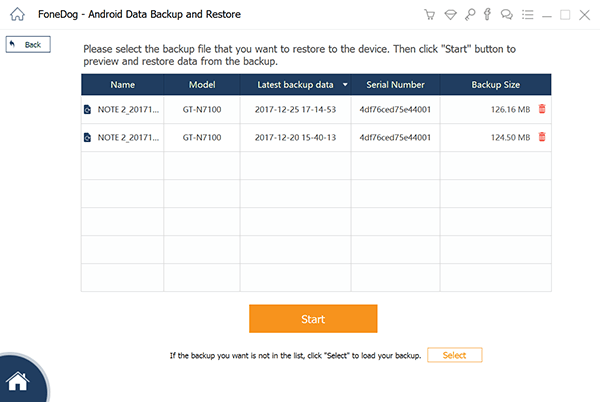
Step 14 - Select data types you wish to restore. After which, select the specific data you want to restore.
Step 15 - Click Restore to start the restore process.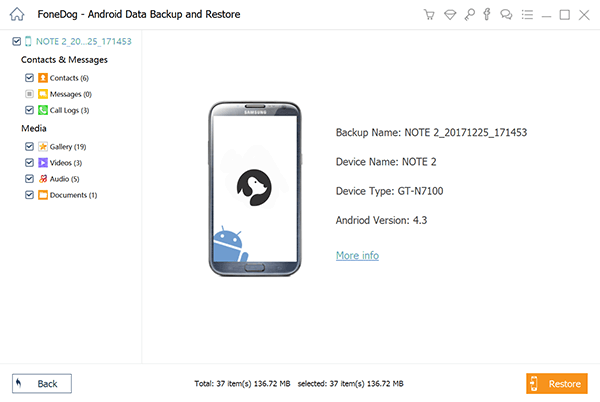
Step 16 - In order to start the process of restoring the files, press OK.
Step 17 - Wait for the restore process to be complete. Make sure you do not remove the connection between the Android device and the computer. Do not use the Android device as well. Also, do not delete data while the backup process is being done. Plus, do not use a phone or device management tool during the process.
Step 18 - Make sure the entire process is finished by checking if FoneDog has shown you a confirmation of the process completion.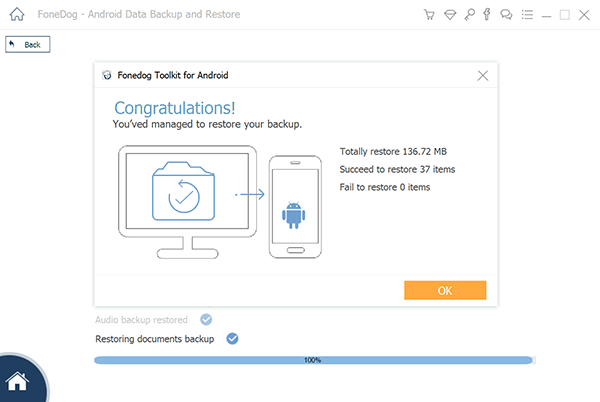
Dropbox is a great way to make sure your files are backed up and can be retrieved in case they are mistakenly deleted. However, Dropbox is not a perfect platform. There are problems you can find with it like issues that users say wherein the Dropbox is not syncing.
For you to fix this Dropbox not syncing problem, you can follow our guide here. And once you are able to fix this problem, you can enjoy the benefits and perks of having a useful Dropbox account.
Leave a Comment
Comment
Android Data Backup & Restore
Back up your Android data and selectively restore to Android
Free Download Free DownloadHot Articles
/
INTERESTINGDULL
/
SIMPLEDIFFICULT
Thank you! Here' re your choices:
Excellent
Rating: 4.6 / 5 (based on 57 ratings)