FoneDog Screen Recorder FoneDog Screen Recorder
Special Offer Special Offer
Only Only
$4.49 $4.49
to get a ONE-month license to get a ONE-month license
Sale ends in xx days Sale ends in xx days
Buy Now
sale

BEST DETAILED GUIDE: How to Back Up Contacts on Android

By Nathan E. Malpass, Last updated: April 17, 2024

Phones store a treasure trove of personal and professional information, including our contact lists, which are a lifeline to our connections. Losing these contacts can be a nightmare, and that's where the importance of backing up your contacts on Android comes into play. Whether you're upgrading your phone, safeguarding against data loss, or simply switching contacts to a new phone, knowing how to back up contacts on Android is a crucial skill to have in your tech arsenal.

In this article, we will take you through a step-by-step journey on how to back up your contacts on Android. We'll explore various methods, from using built-in features to third-party apps, ensuring that your valuable contact information remains safe and accessible. So, if you're ready to learn how to protect your digital Rolodex, let's dive into the world of Android contact backup.

Part #1: Methods on How to Back Up Contacts on Android DevicesPart #2: Best Tool on How to Back Up Contacts on Android: FoneDog Android Data Backup & RestoreSummary

Part #1: Methods on How to Back Up Contacts on Android Devices

Method #1: By Exporting to A CSV File And Saving to Computer

Backing up your Android contacts by exporting them to a CSV (Comma-Separated Values) file is a straightforward and reliable method. This approach allows you to create a digital copy of your contacts, which you can easily transfer to your computer for safekeeping or future use. Follow these steps to get started:

  1. Open the Contacts App: Begin by launching the Contacts app on your Android device. You can typically find this app in your app drawer or on your home screen.
  2. Access the Contacts Menu: Once in the Contacts app, tap on the three vertical dots or the menu icon (usually located in the top-right or top-left corner of the screen).
  3. Select 'Export' or 'Import/Export': In the menu, choose the 'Export' or 'Import/Export' option, depending on your Android device and software version. This option might be labeled differently on some devices.
  4. Choose 'Export to .vcf File' or 'Export to Storage': Now, select 'Export to .vcf file' or 'Export to storage' to begin the export process. This action will save your contacts as a VCF (Virtual Contact File) file on your device.
  5. Select Contacts to Export: A list of available contacts will appear. Choose the contacts you want to back up, or select 'All' to export all of them.
  6. Save the VCF File: After selecting your contacts, tap 'Save' or 'Export'. Your Android device will generate a VCF file containing your selected contacts.
  7. Transfer to Computer: To complete the backup process, you'll need to transfer the VCF file to your computer. You can use various methods for this, such as email, cloud storage, or a USB cable.
  8. Save on Your Computer: Once the VCF file is on your computer, save it in a secure location, such as your Documents or Contacts folder. This ensures that your contacts are safe and easily accessible whenever needed.

Back Up Contacts on Android Devices by Exporting to A CSV

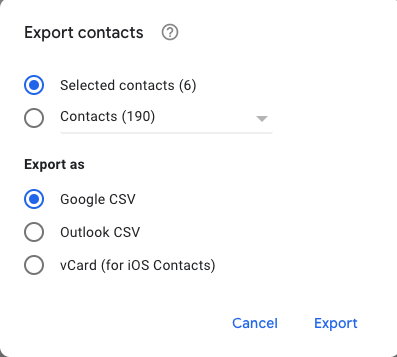
By following these steps, you'll have successfully backed up your Android contacts to a CSV file, protecting your valuable contact information from unexpected data loss. This method is a versatile and effective way to safeguard your contacts and is especially useful when you plan to switch to a new Android device or need a backup for security and peace of mind.

Method #2: Using Google Contacts

Another excellent way to back up your Android contacts is by using Google Contacts. Google offers a seamless solution that not only keeps your contacts safe but also synchronizes them across your devices. Here's how to back up contacts on Android using Google Contacts:

  1. Access Google Contacts: Open the "Google Contacts" app on your Android device. If you don't have it, you can download it from the Google Play Store.
  2. Sign In with Your Google Account: If you're not already signed in, enter your Google account credentials or create one if you don't have an account.
  3. Synchronize Your Contacts: Google Contacts automatically syncs your device's contacts with your Google account. This means your contacts are already backed up as long as you've been signed in with your Google account.
  4. Verify Your Contacts Backup: To ensure your contacts are being backed up, go to the Google Contacts website on your computer (contacts.google.com). Log in with the same Google account, and you'll see your contacts listed there.
  5. Additional Settings (Optional): If you want to access your contacts from other devices, make sure you've enabled synchronization. You can do this in your Android device's settings by going to "Settings" > "Accounts" > "Google" > "Account sync" and ensuring "Contacts" is turned on.
  6. Restore Contacts: In case you lose your contacts or switch to a new device, signing in with your Google account will automatically restore your contacts to the new device.

By using Google Contacts, your contacts are not only securely backed up but also easily accessible from any device with internet access. It's a reliable method to ensure that your contact information is preserved and can be quickly recovered when needed.

Method #3: By Activating Google Backup on Settings App

Android devices offer a built-in feature that allows you to automatically back up various data, including your contacts, to your Google account. This method ensures that your contacts are continuously saved and can be easily restored on a new device or after a factory reset. Here's how to activate Google Backup in the Settings app:

  1. Access Device Settings: Open the "Settings" app on your Android device. You can typically find it in your app drawer or by swiping down from the top of your screen and tapping the gear icon.
  2. Navigate to 'Accounts' or 'System': Scroll down to find either 'Accounts', 'System', or a similar option, depending on your Android version and device.
  3. Select 'Backup' or 'Backup & Reset': In the 'Accounts' or 'System' section, look for an option labeled 'Backup' or 'Backup & Reset' and tap on it.
  4. Turn On 'Backup to Google Drive': You'll find an option to enable "Back up my data" or "Backup to Google Drive". Turn this option on.
  5. Choose Your Google Account: If you haven't added a Google account to your device, you'll be prompted to do so. Select your Google account or add one if necessary.
  6. Customize Backup Options (Optional): Depending on your device, you may have the option to customize what data gets backed up. Make sure that "Contacts" is selected.
  7. Manual Backup (Optional): Some Android devices allow you to manually initiate a backup. If available, select "Back up now".
  8. Automatic Backup: Once enabled, your Android device will automatically back up your contacts and other selected data to your Google account. This process occurs periodically, ensuring your contacts are continually up to date.

Back Up Contacts on Android by Activating Google Backup

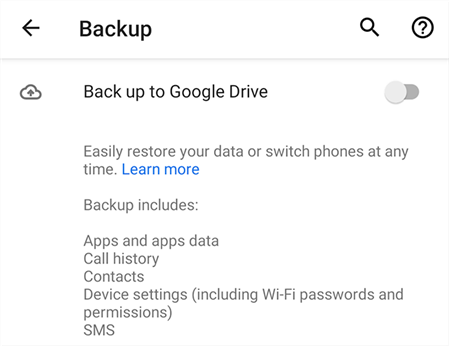
By activating Google Backup in your device's settings, you can rest assured that your contacts are safely stored on Google servers and can be restored whenever needed. This method is particularly useful when switching to a new Android device or after performing a factory reset, as it simplifies the process of recovering your contact information.

Method #4: Using Device Manufacturer’s Cloud Service (e.g. Samsung Cloud)

Many Android device manufacturers offer their own cloud backup services, such as Samsung Cloud for Samsung devices. These services allow you to back up your contacts, apps, settings, and other data to the manufacturer's cloud servers. Here's how to back up contacts on Android using cloud service:

(Note: The availability of this method may depend on your device's brand and model, off-model may cause Samsung Cloud backup failure.)

  1. Access the Manufacturer's Cloud Service: Open the cloud backup service provided by your device's manufacturer. For example, if you have a Samsung device, you can find and open "Samsung Cloud" from your device's settings or app drawer.
  2. Sign In with Your Account: Sign in with your manufacturer-specific account. If you don't have an account, you may need to create one.
  3. Navigate to Contacts Backup: Find the option for contacts backup or synchronization. The exact location and labeling may vary depending on your device and manufacturer.
  4. Initiate Backup: Select "Backup Contacts" or a similar option. Your device will begin to back up your contacts to the manufacturer's cloud servers.
  5. Check Your Backup: Confirm that your contacts have been successfully backed up by navigating to the contacts section within the manufacturer's cloud service.

Back Up Contacts on Android Using Device Manufacturer’s Cloud Service

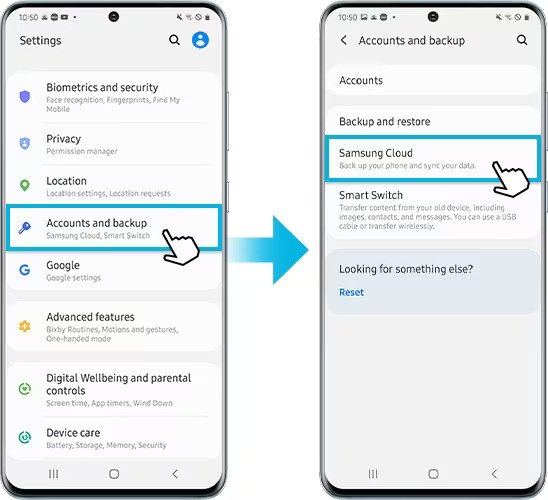
Using your device manufacturer's cloud service is a convenient way to back up your contacts and other data, especially if you want to stay within the ecosystem of your device brand. This method ensures that your contacts are securely stored, and you can easily retrieve them on the same brand of device or, in some cases, on the web using a web portal provided by the manufacturer.

Method #5: By Saving Contacts on SIM Card

Saving contacts to your SIM card is a basic but effective way to create a physical backup of your contacts that can be transferred to another device or used as a backup in case of data loss. Here's how to save your contacts to a SIM card:

  1. Access the Contacts App: Open the "Contacts" app on your Android device. This app is usually located in your app drawer or on your home screen.
  2. Access Contact Management Options: In the Contacts app, tap on the three vertical dots or the menu icon, often located in the top-right corner.
  3. Select "Manage Contacts" or "Import/Export Contacts": In the menu, choose the option that allows you to manage contacts or import/export them. The exact wording may vary depending on your device.
  4. Choose "Export Contacts to SIM Card" or Similar: Look for the option to export your contacts to the SIM card. This may be labeled "Export to SIM card" or something similar.
  5. Select Contacts for Export: You will typically be presented with a list of your contacts. Choose the contacts you want to save to the SIM card. You can usually select all contacts or individual contacts.
  6. Begin the Export Process: Once you've made your selections, tap "Export" or "Save" to start the export process.
  7. Confirm Export: Confirm the action when prompted. Your contacts will be saved to your SIM card.

Back Up Contacts on Android by Saving Contacts on SIM Card

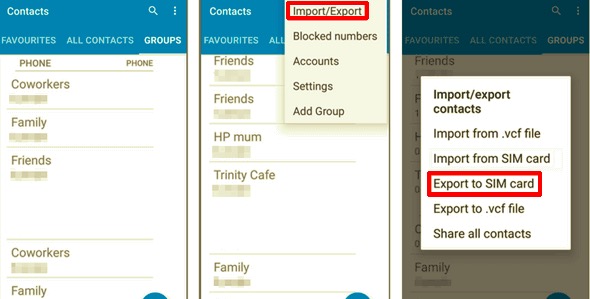
Please note that the SIM card has limited storage space, and it may not support advanced contact details such as multiple phone numbers, email addresses, and detailed contact notes. If you have an extensive contact list, you may not be able to save all your contacts on the SIM card due to storage limitations. However, it's a straightforward method for saving essential contacts and can be useful for transferring contacts between devices, especially when upgrading to a new phone.

Part #2: Best Tool on How to Back Up Contacts on Android: FoneDog Android Data Backup & Restore

FoneDog Android Data Backup & Restore is a powerful and versatile tool designed to help Android users efficiently back up and restore their data, including contacts, with ease. Whether you're preparing for a device switch, safeguarding against data loss, or simply organizing your contact information, this software provides a comprehensive solution.

Android Data Backup and Restore Selectively backup Android data to computer with one click. Encrypt your backup files. Compatible with 6000+ Android devices. Free Download Free Download FoneDog Android Data Backup & Restore

Key Features:

  • Flexible Data Backup: FoneDog allows you to selectively back up contacts and other data types, providing complete control over what you save.
  • Encrypted Backups: Your data is securely encrypted during the backup process, ensuring the privacy and safety of your contacts.
  • Cross-Platform Compatibility: The tool works with various Android devices and operating systems, making it accessible to a broad range of users.
  • Preview and Restore: You can preview your backed-up contacts and choose specific items to restore, eliminating the need to restore the entire backup.
  • User-Friendly Interface: FoneDog's intuitive interface makes it accessible for users of all experience levels.

Steps on how to back up contacts on Android using FoneDog Android Data Backup & Restore:

  1. Download and Install FoneDog: Start by downloading and installing FoneDog Android Data Backup & Restore on your computer. The software is available for both Windows and Mac.
  2. Launch the Program: Launch FoneDog and choose "Android Data Backup & Restore" from the main menu.
  3. Connect Your Android Device: Use a USB cable to connect your Android device to your computer. Ensure that USB debugging is enabled on your Android device.
  4. Select "Device Data Backup": In the FoneDog interface, select "Device Data Backup" to initiate the backup process.
  5. Choose Data Types: Select the data types you want to back up. In this case, choose "Contacts" or any other data you wish to save.
  6. Start the Backup: Click the "Start" button to begin the backup process. FoneDog will save your selected contacts to your computer.
  7. View and Restore Contacts: Once the backup is complete, you can preview the contacts and other data. If needed, select specific contacts to restore to your Android device.

Back Up Contacts on Android: FoneDog Android Data Backup & Restore

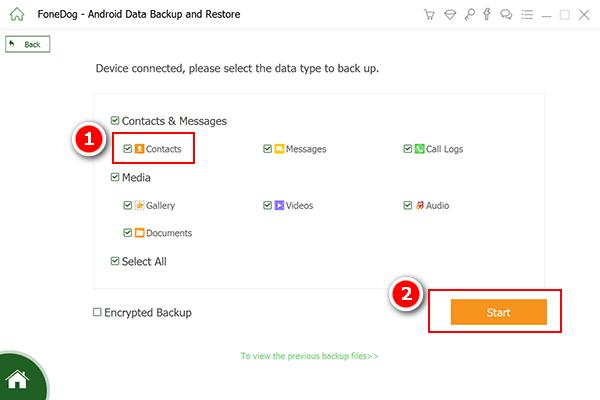
FoneDog Android Data Backup & Restore is a reliable and user-friendly tool that simplifies the process of backing up your Android contacts. Its flexible features, cross-platform compatibility, and the ability to selectively back up and restore data make it an excellent choice for users looking to ensure the safety of their contact information. Whether you're switching devices or simply want to keep your contacts secure, FoneDog offers a comprehensive solution that's accessible to users of all experience levels.

People Also ReadAndroid SMS Backup and Restore - How to view on Computer [2024 Update]How to Do An SMS Backup to Gmail the Easy Way [Guide]

Summary

Backing up your contacts on Android is a crucial task to ensure the safety and accessibility of your valuable contact information. Several methods are available, allowing you to choose the one that best suits your preferences and needs.

How to back up contacts on Android depends on your specific requirements, including the level of control you want over your contacts, the brand of your Android device, and your preferred backup location. Regardless of the method you choose, regularly backing up your contacts ensures that you won't lose essential information in case of device loss, damage, or upgrades.

Leave a Comment

Comment

Comment ()
author image

Nathan E. Malpass

iPhone/Android Devices’ Maintenance Expert

Staying home, listening to music, writing tech articles

Many people asked me to repair their mobile phones so I have a lot of experience in mobile phone repair, and I know a lot about Android or Apple phones.

Android Data Backup & Restore logo

Android Data Backup & Restore

Back up your Android data and selectively restore to Android

Free Download Free Download

How Do You Like This Article?

Check icon/ Check icon

INTERESTINGDULL

Check icon/ Check icon

SIMPLEDIFFICULT

Thank you! Here' re your choices:

Rate This Article: Excellent

Rating: 4.4 / 5 (based on 99 ratings)

Android Data Backup & Restore logo

Android Data Backup & Restore

Back up your Android data and selectively restore to Android

Free Download Free Download

FoneDog uses cookies to ensure you get the best experience on our website. Click here to learn more.