FoneDog Screen Recorder
FoneDog Screen Recorder
Special Offer
Special Offer


By Nathan E. Malpass, Last updated: March 11, 2019
I used Apple products for a very long time. A friend of mine gave me an Android smartphone as a gift. Now, I pretty much want to use Android devices instead of Apple products. The problem is I want to transfer important files including contacts from my iCloud and iPhone to that of my Android device. How do I do this?
~New Android Device User
Part I: IntroductionPart II: Transfer Contacts (Or Different File Types) From iCloud Or iPhone To Android (And Vice Versa)Part III: Other Methods To Use When Transferring Contacts From iCloud And/ Or iPhone To AndroidPart IV: Conclusion
In the world of mobile devices, there are two operating systems that lead the pack: iOS of Apple and of course, Android. These two operating systems pretty much dominate the world of mobile OS. There are users who love Apple products and the iOS that comes with it. Also, there are users that gravitate toward Android devices.
There’s one problem though. What if you change from one operating system to another? What if you want to change from Apple products to Android devices? Or, what if you want to change from Android devices to Apple products. How do you do transfer all data from one type of operating system to the other?
Well, you’re lucky you’re in this post. This article will show you how to transfer contacts (and other types of files) from iCloud and/ or iPhone to that of Android. We’ll show you multiple ways on how to do it. Let’s get started.
In this section, we’ll look at transferring files between two types of devices which use these two operating systems. Let’s start with Android to iOS.
To transfer files from Android to that of Apple products, first, you have to back up your files from your Android device to your computer. After which, you have to restore it to your iOS product. With this, you need to utilize Android Data Backup & Restore by FoneDog. Here are the advantages and the steps on how to use the product:
* You are given the ability to choose which files or data to back up and even restore. Plus, you can do it with a few clicks only.
* It allows you to back up a device’ applications. Plus, the contents of these applications are included as well.
* You are given the ability to preview the backup file and the contents of this backup file.
* You are given the ability to selectively restore data you want to restore to any device you wish.
* It supports a lot of Android devices, over eight thousand (8000+) of them.
* It is very secure. You are the only one who can access your backup files and the data within it.
* Your data will always be kept safe. You don’t have to worry about your data being overwritten.
* You have the option to get the 30-day free trial. Meaning, you can actually experience the best of the best when it comes to backup and restore tools without the need to pay for it first.
* Your data is backed up in great lossless quality.
Here are the steps on how to use Android Data Backup & Restore:
Step 01 - Go to FoneDog’s website.
Step 02 - Download the toolkit of FoneDog on this website. You can either pay for it upfront or get the free trial first.
Step 03 - Open the FoneDog toolkit on your computer.
Step 04 - Make sure that other backup tools are not operating while you are opening FoneDog and using it.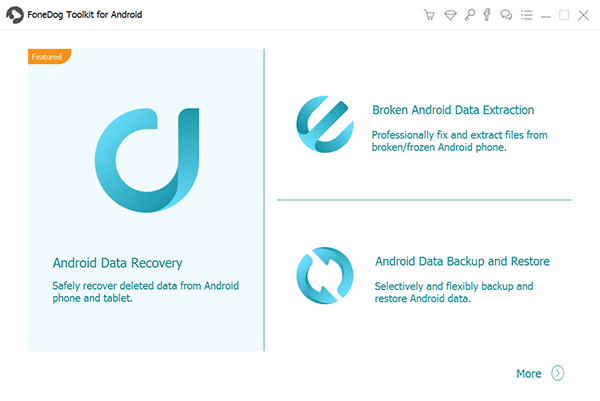
Step 05 - Select Android Data Backup & Restore.
Step 06 - Connect your Android device to that of your computer by using a USB cable. Make sure the mode called Debugging is activated on the said Android smartphone or tablet.
If your Android device has a version number of 4.0 or up, a specific pop-up window will be displayed. Press OK in this popup window to confirm that you want to activate Debugging Mode.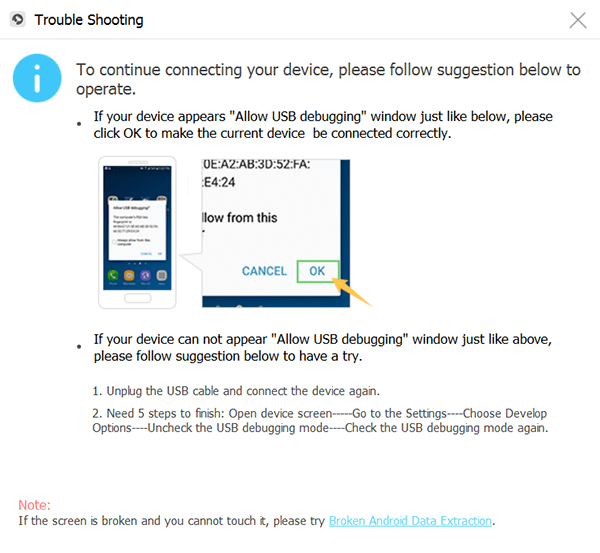
Step 07 - FoneDog toolkit must have detected your device by now. If this happens, click out Device Data Backup. In normal cases, FoneDog sets the different types of files it scans for you. However, you still have the ability to choose which data type you actually want to back up.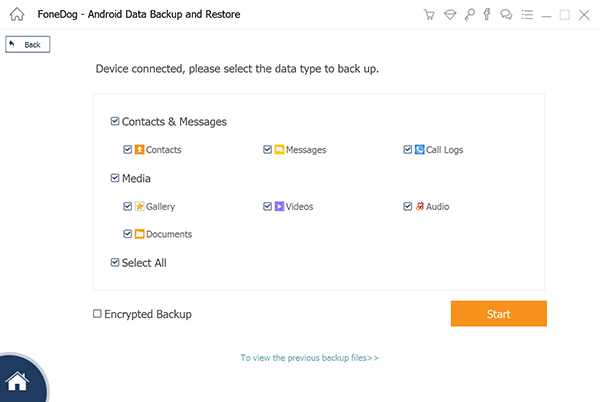
Step 08 - Press Start if you have already selected the different types of data you wish to back up. Now, the backing up process will start. Make sure you do not remove the connection between the Android device and the computer. Do not use the Android device as well. Also, do not delete data while the backup process is being done.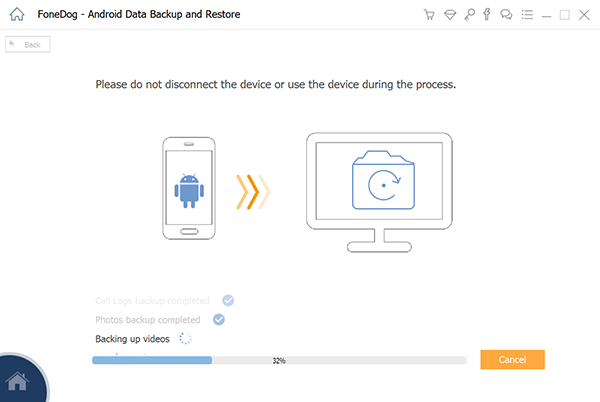
Step 09 - Press OK after the backup process is done. Now, you have the ability to check the backup files’ data or contents. Or, you can also restore these data you have backed up to that of another device.
Here’s how to do it (i.e. restore your data to another device):
Step 10 - Open FoneDog toolkit again.
Step 11 - Choose Android Data Backup & Restore.
Step 12 - Choose Device Data Restore.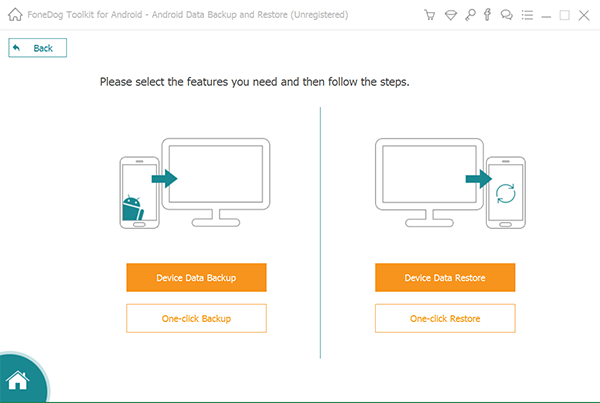
Step 13 - FoneDog will not show you the different backup files. Select a backup file that you want to restore.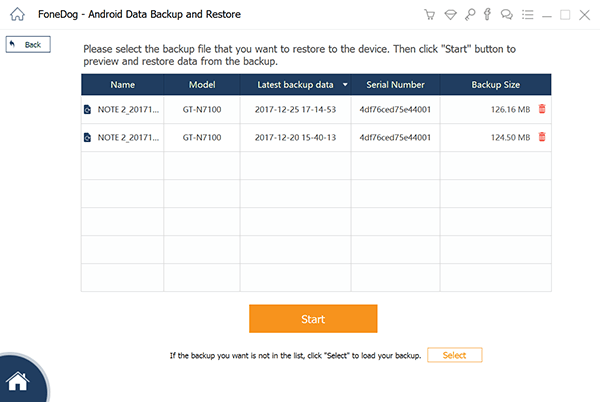
Step 14 - Select data types you wish to restore. After which, select the specific data you want to restore.
Step 15 - Click Restore to start the restore process.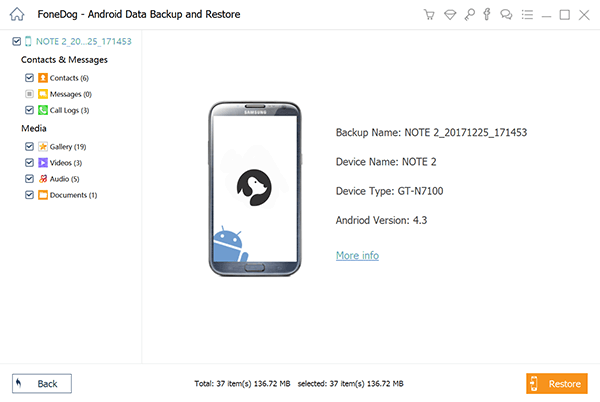
Step 16 - In order to start the process of restoring the files, press OK.
Step 17 - Wait for the restore process to be complete. Make sure you do not remove the connection between the Android device and the computer. Do not use the Android device as well. Also, do not delete data while the backup process is being done. Plus, do not use a phone or device management tool during the process.
Step 18 - Make sure the entire process is finished by checking if FoneDog has shown you a confirmation of the process completion.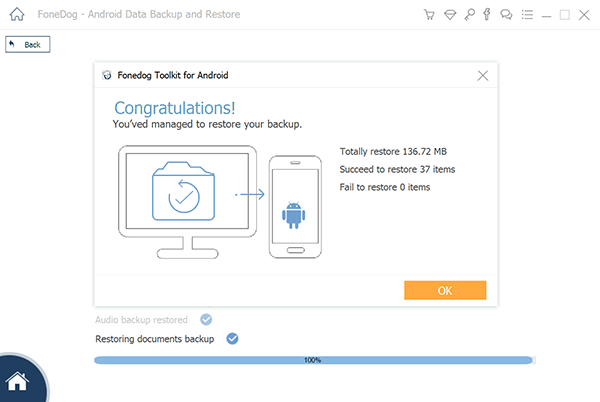
On the other hand, if you want to transfer from iOS to that of Android devices, you have to use FoneDog’s iOS Data Backup & Restore. The features of this are pretty much the same as that of the Android Data Backup & Restore tool of FoneDog. The steps to use it are almost the same as well.
Method 01: Cloud-Based Applications
Do you use applications that are cloud-based? These include Facebook, and Gmail. Well, that's a good thing. You don't have to transfer from one device to another.
You simply have to install these cloud-based applications. After which, you have to input your username and the password associated with it. This allows you to start or open where you actually left off before. Transferring files from one type of device to the other is a little bit tricky. But we'll cover that in the following sections.
Method 02: Transferring Contacts From iCloud To Android
First, you have to make sure that you have a Google account. Don't have one? Well, that's easy. You can simply sign up to create a free Google account. You actually need this Google account in order to do almost every single thing on your Android device.
After that what you should do is to back your iPhone up. After which, you should sign into your iCloud account through iCloud.com. Press Contacts. Select the specific contacts you wish to transfer. Or, you can select all contacts if you want.
Click up the icon that looks like a gear. This is located at the screens bottom left corner. Click the option that says Export vCard. When you click this option, the selected contacts will be exported as a Vcard format.
After which, sign into your Gmail Account. Press Gmail and then press Contacts. The option to actually Import Contacts will be displayed within the sidebar at the left. Press this option. Select the actual vCard file you exported a while ago.
Now, Google will do what you need. As you can see, both Google and iCloud makes it very easy to export and import contacts from one platform to another.
Method 03: Transferring The Calendar From iOS Device To Android Device
The process of transferring your calendar from an iOS device to that of an Android device is pretty complicated. However, it’s not rocket science and it can still be easily done by anybody. First, you have to visit iCloud within your iPhone device.
For the transfer to happen, you first have to launch the application called Calendar. On the left hand side of the screen, a sidebar will display various calendars you have on a list. Each calendar will have a small wireless icon located right next to it.
Press this small wireless icon in order to launch the sharing menu of the calendar. Your aim here is to make a public calendar. This will then be imported into that of Google Calendar. In order to achieve this, you have to press Public Calendar. After which a link will appear. Copy the link you see.
Launch a brand new browser tab or window. Paste the link you have just copied. Do not press Enter yet. Check out the entire link. Find the word “webcal” and change it to “http.” After you have done that, hit Enter.
By now, the computer you used will download a calendar file with the extension “.ics.” Plus, the file name you will see will be super long and not understandable. Repeat every single step you took until you have done it for each and every calendar you wish to transfer.
Go to your Android phone afterward. Then sign into your Google Calendar and then press Other Calendars. This is located in the sidebar at the left-hand section. Press the drop-down arrow that you see. Select the Import Calendar.
After you have done this, choose the ics file you have previously downloaded. Press Import. When you have done this, the events will. Then be added towards the Google Calendar you have actually selected.
This is true especially if you have multiple Google Calendars. You have to do the steps above over and over again till you import each calendar you have.
Method 04: Transferring SMS And WhatsApp Chat From iPhone Or iOS To Android
When it comes to transferring text messages from iMessage and/ or WhatsApp, you have to do it with a third party tool. In this way, you can move the text messages from iPhone to that of an Android device.
The tool that we recommend you use is FoneDog’s iOS Data Backup & Restore. You can use this tool to back up your messages from iPhone and then restore it to an Android device.
On the other hand, you can use FoneDog’s Android Data Backup & Restore tool to do the opposite. In this way, you can transfer messages from Android to that of iPhone devices.
Method 05: Transferring Your Email From iCloud To Android
The best way for managing iCloud emails within an Android device is through the mail app that is preinstalled within your Apple product. You do this by utilizing IMAP access from that of Apple. On the other hand, if you utilize SMTP access, sending email messages using your old Apple address is still possible.
Method 06: Transferring iCloud Documents
Do you store data such as files within your iCloud account? Well, you can easily access and get these documents by signing into your iCloud account on iCloud.com. After which, press iCloud Drive.
Then, select the particular app folder. However, you have to take note that there are file types (e.g. Pages documents) that don’t work or isn’t supported by programs not created by Apple.
These proprietary file type formats must be converted to that of RTF or even Microsoft Word format within the Pages application before they are actually transferred from iCloud to that of the Android device.
Method 07: Dealing With Bookmarks
Again, the best way to transfer bookmarks is through iCloud.
Step 01 - Use your iPhone.
Step 02 - Go to Settings.
Step 03 - Go to iCloud.
Step 04 - Make sure Safari is activated.
Step 05 - Go to your computer (whether it be a PC or a Mac device).
Step 06 - Launch iCloud for Windows (for Windows PCs) or launch System Preferences and then go to iCloud (for Mac devices). After which, do the actual same thing. BTW, you can get iCloud for Windows in this link here.
What we want to achieve at first is to make sure that are bookmarks within our iPhone device are actually synchronized to that of our Windows PC or Mac computers. On a Windows PC, the next thing you should do is to press Bookmark.
After which, press Options. Then, you have to select Firefox or Chrome. Press Apply and then press Merge. You will now be prompted to actually download the extension for iCloud Bookmarks for the browser you have chosen. This extension will be able to sync the bookmarks from your Safari to that of Chrome or Firefox.
What if you selected Chrome? Well, the actual next steps are not that complicated:
Step 01 - On your Windows PC, launch Chrome.
Step 02 - Sign in the Google account utilized for Android. After this, bookmarks are automatically synced.
What if you have a Mac device? Well, here’s what you should do:
Step 01 - Launch Chrome.
Step 02 - Press the chrome menu (hamburger icon). This is located within the screen’s right hand part.
Step 03 - Select Bookmarks.
Step 04 - Choose Import Bookmarks and Settings.
Step 05 - Choose Safari as the actual source.
People Also ReadBest Solution to Recover Your Deleted Contacts on Your Android DeviceHow to Recover Contacts from Android Device with Broken Screen
How about for Firefox? Well, it’s a little bit trickier for both Windows PC and Mac devices. Here’s what you should do for Mac devices:
Step 01 - Open Firefox.
Step 02 - Select Bookmarks.
Step 03 - Press Show All Bookmarks.
Step 04 - Press the toolbar’s star icon. This displays the options for importing as well as backup.
Step 05 - Choose Import Data From Another Browser.
Step 06 - Select Safari.
Step 07 - For both Windows PC and Mac devices, press Tools menu of Firefox.
Step 08 - Choose Set Up Sync.
Step 09 - Sign into your own Firefox account. This is if you already have your own account. If you don’t have one, create a new Firefox Account.
Step 10 - Launch Firefox within your smartphone.
Step 11 - Select Options.
Step 12 - Select Sync.
Step 13 - Select Pair A Device. This allows you to get your bookmarks onto that of Firefox within your phone.
Method 08: Transferring Images And Videos From iOS To Android Devices
In your iOS device, make sure you utilize the application called Google Photos. If you have done so, then everything will be easy especially if you have activated the automatic backups of Google.
You can get the Google Photos application (for Android) within Google Play Store. Or, it might actually be preinstalled within your new device as well. After you get the app, you have to initially undergo through the setup. After which, you will have everything you need.
There’s a manual way of doing these things. What you have to do is to transfer images from that of your iPhone to that of your Android device by dragging every single image and then dropping it. This is possible with a Windows PC. Here’s how to do it:
Step 01 - Connect your iPhone to the Windows PC through the USB cable.
Step 02 - Launch My Computer on your Windows PC.
Step 03 - Check for the icon labeled iPhone.
Step 04 - Open this iPhone folder.
Step 05 - Find the folder named DCIM.
Step 06 - Open this folder. This is where your pictures reside on your phone.
Step 07 - Select the pictures.
Step 08 - Drag them towards a folder within your Windows PC.
Step 10 - Disconnect the iPhone from the Windows PC.
Step 11 - Connect your device (Android).
Step 12 - Launch My Computer again.
Step 13 - Find the folder for your Android phone and open it.
Step 14 - Choose a folder where you want to put the images or you can create and rename a new folder.
Step 15 - Drag the photos from the computer to this new folder.
Step 16 - Wait until the process is complete.
It is also possible for you to connect both Android device and iPhone to that of the PC and then drag the files from one device to the other. But it is best to follow our advice above. For one thing, it gives you an entirely new backup of your pictures on your Windows PC.
What if you have a Mac device? Well, it’s kind of different. Although, the idea is identical. Instead of launching My Computer, you have to open Image Capture in order to import your various photos.
Once this is done, you can simply connect the Android device you have and drag the images from that of the Photos folder to that of the Android device. Or, you can drag it from where you have actually placed the pictures.
Method 09: Transferring Music From iOS To Android Devices
Transferring your music from one place to another (i.e. from iOS to Android devices) is a little bit tricky. What you need is to install both Google Music MAnager and Apple iTunes. Let’s get to iTunes first.
What you need at the moment is to ensure that every bit of your music file is located within your computer. Can you see a small cloud icon with an arrow pointing downwards in it?
Well, this means, this isn’t downloaded yet. Plus, you have to ensure that all the music you have purchased is included as well. You can see it probably by following the steps below:
Step 01 - Going to Preferences.
Step 02 - Going to Store.
Step 03 - Going to Show iTunes in the Cloud Purchases.
Do you have everything in place? Well, that’s good. Now, follow the steps below:
Step 01 - First, you have to launch Google Music Manager.
Step 02 - Go to the Setup page.
Step 03 - After the second step, you should choose Upload Songs to Google Play.
Step 04 - Choose the source as iTunes.
Step 05 - Wait until Google Music Manager finishes the entire process.
It’s very easy to transfer contacts from iCloud to that of Android devices. This goes for other types of files as well. You can either do some of them manually or you can use a tool called FoneDog’s iOS Data Backup & Restore OR FoneDog’s Android Data Backup & Restore. Hope we have answered your question on how to transfer contacts from iCloud to Android!FoneDog’s iOS Data Backup & Restore:
Apart from the software recommended above, we also recommend you to use FoneDog Phone Transfer which specializes in transferring data among different devices.
Leave a Comment
Comment

iPhone/Android Devices’ Maintenance Expert
Staying home, listening to music, writing tech articles
Many people asked me to repair their mobile phones so I have a lot of experience in mobile phone repair, and I know a lot about Android or Apple phones.
Android Data Backup & Restore
Back up your Android data and selectively restore to Android
Free Download Free DownloadHot Articles
 /
/
INTERESTINGDULL
/
SIMPLEDIFFICULT
Thank you! Here' re your choices:
Excellent
Rating: 4.6 / 5 (based on 73 ratings)
