FoneDog Screen Recorder
FoneDog Screen Recorder
Special Offer
Special Offer


By Adela D. Louie, Last updated: April 10, 2018
Backing up all your data from your iPad is one great way to keep all your data safe.
This way, whatever happens to your device, you will not worry about losing your data because you can just easily get them from your backup file. On an iOS device like your iPad, there are a lot of ways on how you can do backups.
Your iPad device can store all your videos, photos, documents, and more. To keep it short, you iPad device holds your memories and all your preferences. We all know that your data is very important because it contains a lot of things that you might need in your everyday life.
There are ways on how you can do backups on your iPad device like backing up all your data using your iCloud or using your iTunes. Always remember that whenever you attempt on downloading a software or doing something with your device, always backup up your data first so that you will not worry a thing when things come to its worst.
Part 1. What is A BackupPart 2. Why You Should Backup Your iPadPart 3. Backup iPad Using FoneDog ToolkitVideo Guide: Selectively Backup Your iPadPart 4. How to Backup iPad to iCloudPart 5. How to Backup iPad to iTunesPart 6. Conclusions
People Also ReadHow to Backup iPhone to Computer3 ways to Restore iPhone from iCloud or iTunes Backup
A backup usually refers to the copying of your virtual files or your database from your primary device to a secondary site for them to be preserved. Backing up your iPad device usually includes its settings, app data.A backup is having a copy of all your important data from your iOS device so that whatever happens to your device, you will not worry about losing them for good. If you do backups on your iOS device, once you lose any of your data, you can just simply get them from the backup you made.
It is very necessary that you should always backup your iPad device because it holds a lot of data that you need for your everyday living like a data you need for your presentation or a report that you need to present at school. Even your photos and videos which holds your memories with loved ones. Once you have a backup of all the data from your iPad device, you will not worry about anything even if you damage your device, mistakenly deleted your data or even if you lose it because if you have a backup, your data can be easily accessible and restored to a new device or to your P
FoneDog Toolkit - iPad Data Backup and Restore is actually a great program to use for your backup and as well as to restore your data from your iPad device. This program is actually a one-click way for you to back up your whole iPad device to your computer. It also allows you to preview and restore your data from your backup file to another device. The FoneDog Toolkit - iOS Data Backup and Restore also allows you to export the data you want from your backup file to your computer.
And, the good thing about the FoneDog Toolkit - iOS Data Backup and Restore is that you will not lose any of your data on your iPad device during the whole process of restoring your data from your backup file. One more thing, the FoneDog Toolkit - iOS Data Backup and Restore is 100% secure and it will not overwrite any of your data from your iPad device.
Below is the step by step guide on how you can backup the data from your iPad device and how you can restore them to your computer or to another device.
Download this free version toolkit to backup your iPad!!!
First thing on the list is to download the FoneDog Toolkit - iOS Data Backup and Restore from our official website and then have it installed on your computer.
Once the FoneDog Toolkit is successfully installed, launch the program and then connect your iPad device to your computer using your USB cable.
Wait until FoneDog Toolkit recognizes your device. Once the program successfully recognizes your iPad device, go ahead and click iOS Data Backup and Restore from the main page and then choose iOS Data Backup

In this next step, you have the option to choose between two backup modes.
One is the Standard Backup which allows you to backup your data from your iPad device without a password, and the second one is the Encrypted Backup, wherein you can put a password for your backup.
Using encrypted backup will make your backup data safe and secured. Once you have selected your desired backup method, just go ahead and click on the "Start" button.

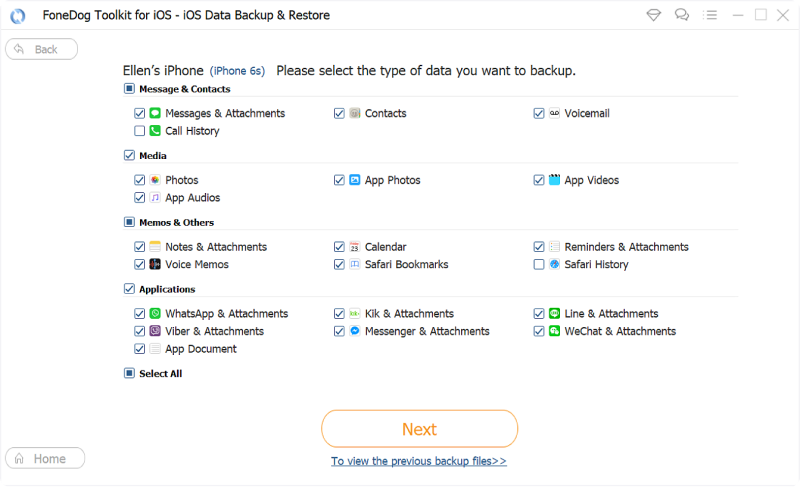
After selecting the backup mode, you can now choose all the data you wish to backup from your iPad device. You will be able to see on your screen the files that the FoneDog Toolkit - iOS Data Backup and restore supports like Messages, Contacts, Call History, WhatsApp, Photos, Videos, and more.
You can selectively choose one file or multiple files from the list shown on your screen. After selecting the data you wish to backup, just go ahead and click on the "Next" button.
After clicking on the Next button, FoneDog Toolkit - iOS Data Backup and Restore will now start backing up all your desired data from your iPad device. Wait until the process is complete.
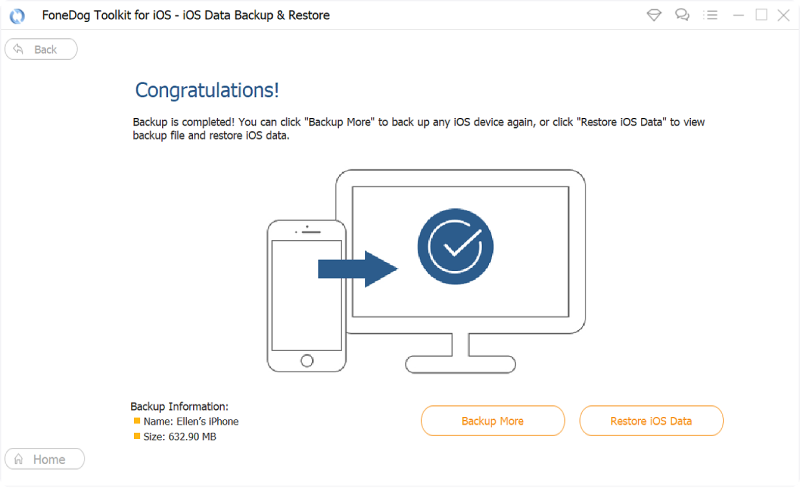
Once the backup is complete, FoneDog Toolkit - iOS Data Backup and Restore will show you the name and the size of your backup file.
In case that you want to backup more of your data from your iPad device, just go ahead and click "Backup More" or you can click "Restore iOS Data" if you want to restore your backup files to your computer or to another iOS device.
If you wish to restore your backup file using FoneDog Toolkit - iOS Data Backup and Restore, then here's how.
Make sure that your device is connected to your computer. And then go ahead and click on "iOS Data Restore" button from the main interference.
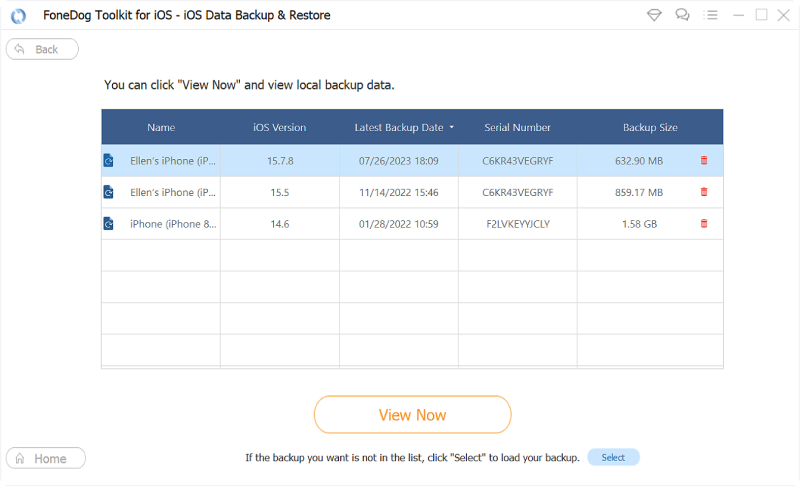
After that, FoneDog Toolkit- iOS Data Backup and Restore will then show you a lost of your backup file.
You can choose the backup file you want to restore according to the time and date that the backup file was made.
And then, once you have selected the backup file, go ahead and click on the "View Now" button.
FoneDog Toolkit - iOS Data Backup and Restore will the start scanning the backup file that you selected. You will be able to see the scanning process on your screen and you have the option to "Pause" the scanning processor to "Stop" the process.
Once the scanning process is complete, you have two options again on where you want to restore your backup file from your iPad device.
You can click on the "Restore to iDevice" if you wish to restore your backup to another iOS device like your iPhone, or you can select "Restore to PC" if you want to restore your backup file to your computer.
Once you have selected where to restore your backup file, wait until the FoneDog Toolkit - iOS Data Backup and Restore is done restoring your backup file and you are good to go.

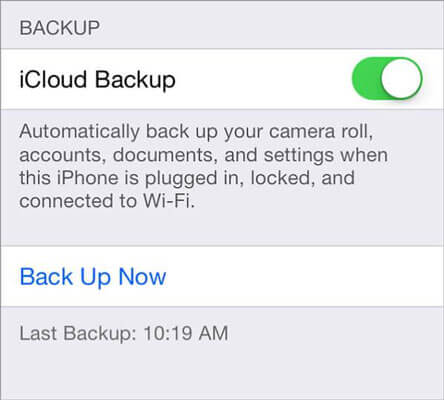
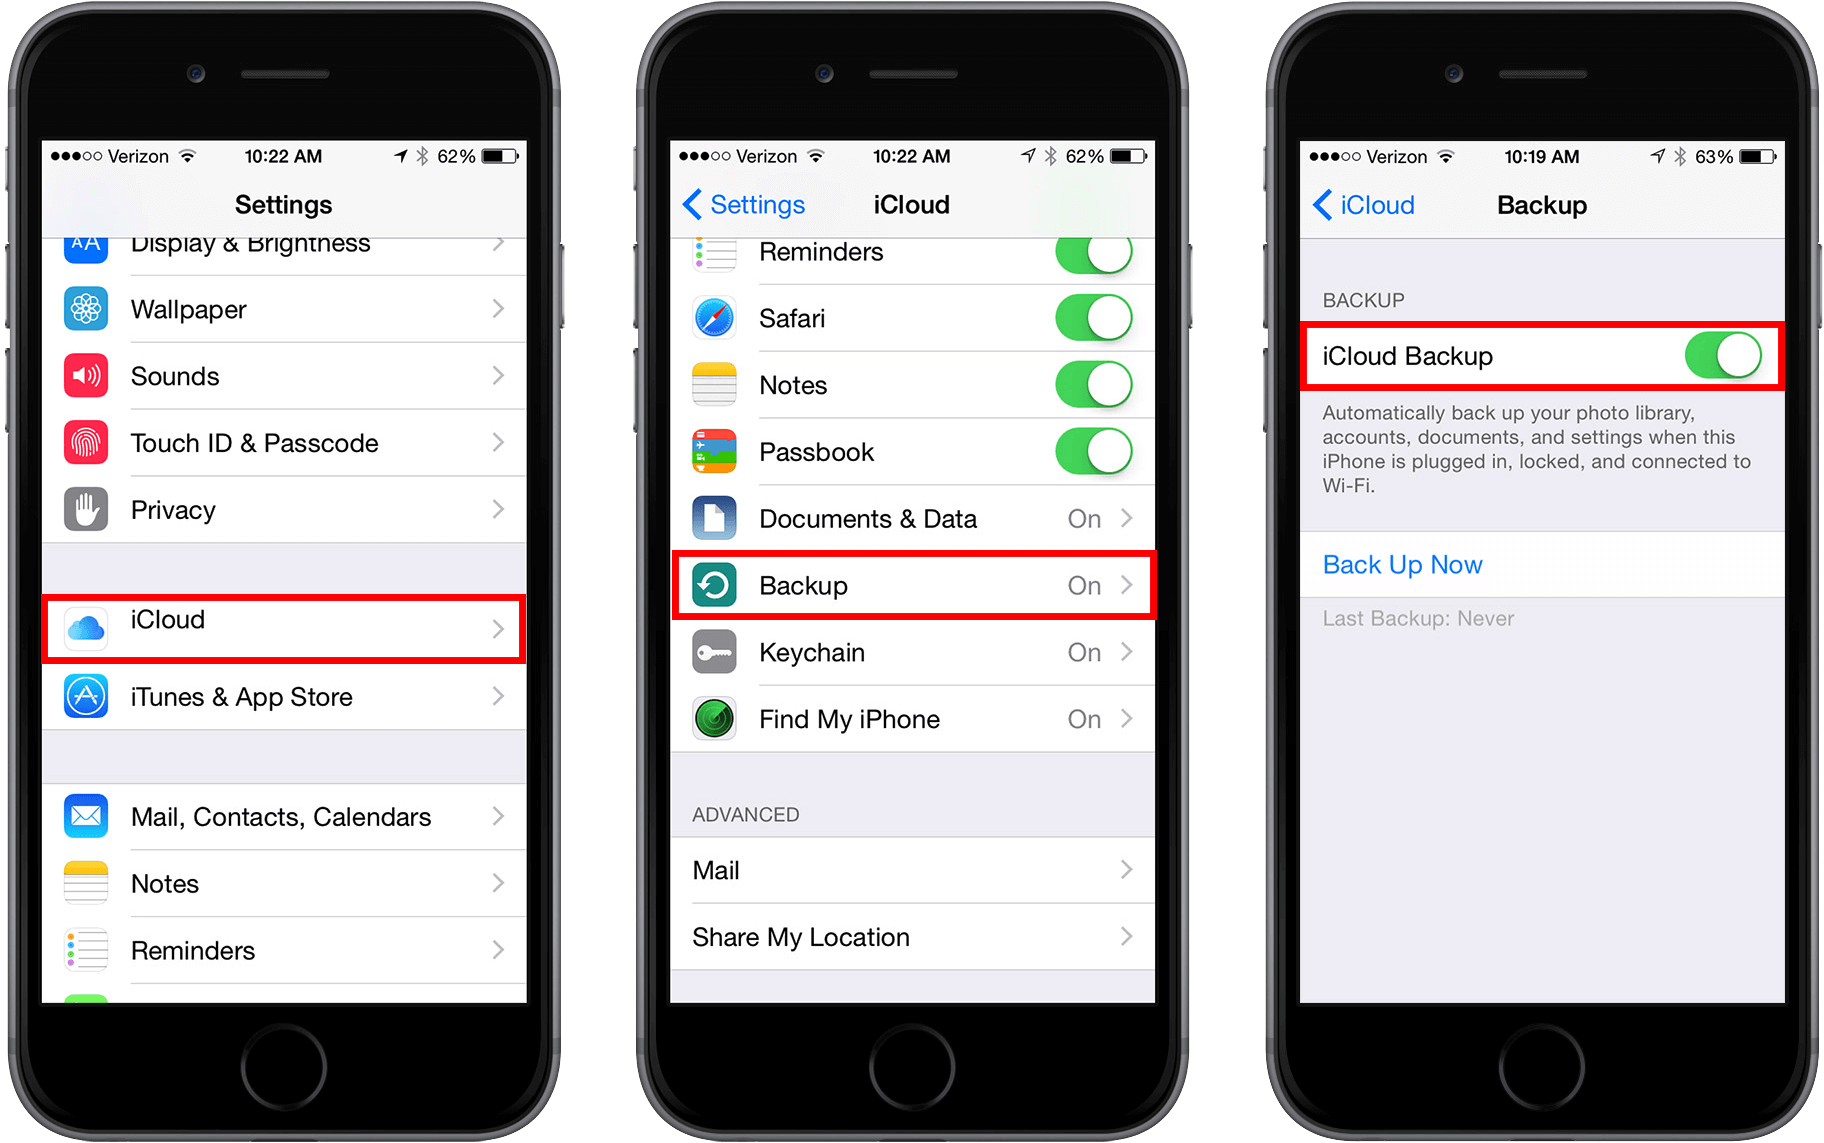
Step 1: Connect your iPad device to a Wi-Fi connection
Step 2: Go to your Settings, and then tap your Name
Step 3: After that, go ahead and tap iCloud (If you are using the old iOS version 10.2 or earlier, go to your Settings and then scroll down and tap iCloud)
Step 4: After that, go ahead and select iCloud Backup. (If you are using iOS 10.2 or earlier, just go and tap Backup. Make sure that iCloud Backup in on)
Step 5: After that, just tap "Backup Now". Make sure that you stay connected to Wi-Fi so that the process will go through.
For to allow iCloud to automatically backup your device on any day you want then you can do the following guide below:
Step 1: You have to make sure that your iCloud is turned on. To do this, follow the guide below:
- Go to Settings, and then tap on your name, select iCloud and then choose iCloud backup
Step 2: Have your iPad connected to a power source
Step 3: Make sure that you are connected to a Wi-Fi connection that is stable
Step 4: Have you iPad screen locked
Step 5: Check your storage if you have enough storage available in your iCloud. Once you have signed to iCloud the first time, you will be able to get a free 5GB storage space. If you want to upgrade and have more storage on your iCloud, you can just simply buy them. The cost for additional storage plan for your iCloud backup is $0.99USD for 50GB per month.
If you have decided not to use iCloud to backup your iPad device, you can use your iTunes for you to simply backup your iPad to your computer instead. Here is how you can use iTunes backup.
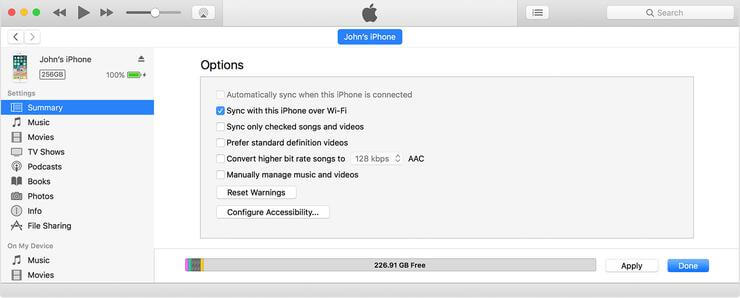
Step 1: Have your iPad device connected to your computer using your USB cable.
Step 2: Launch iTunes on your PC and make sure that you have the latest version of iTunes.
step 3: Select the device icon which is located next to the category drop-down menu at the left side of your screen.
Step 4: Choose "Summary" located on the sidebar.
Step 5: Choose "This Computer" found under Automatic Backup
Step 6: You can choose "Encrypt backup". This is to make sure that your data will be safe and as well as your privacy.
Step 7: Click DONE once you have completed the steps.
Once you have enabled iTunes backup, then your iPad device will be able to backup your data automatically once you connect it to your computer. You can also do a manual backup of your data and a new one while your iPad device is still connected to your computer.
Here is how to do a manual backup using iTunes.
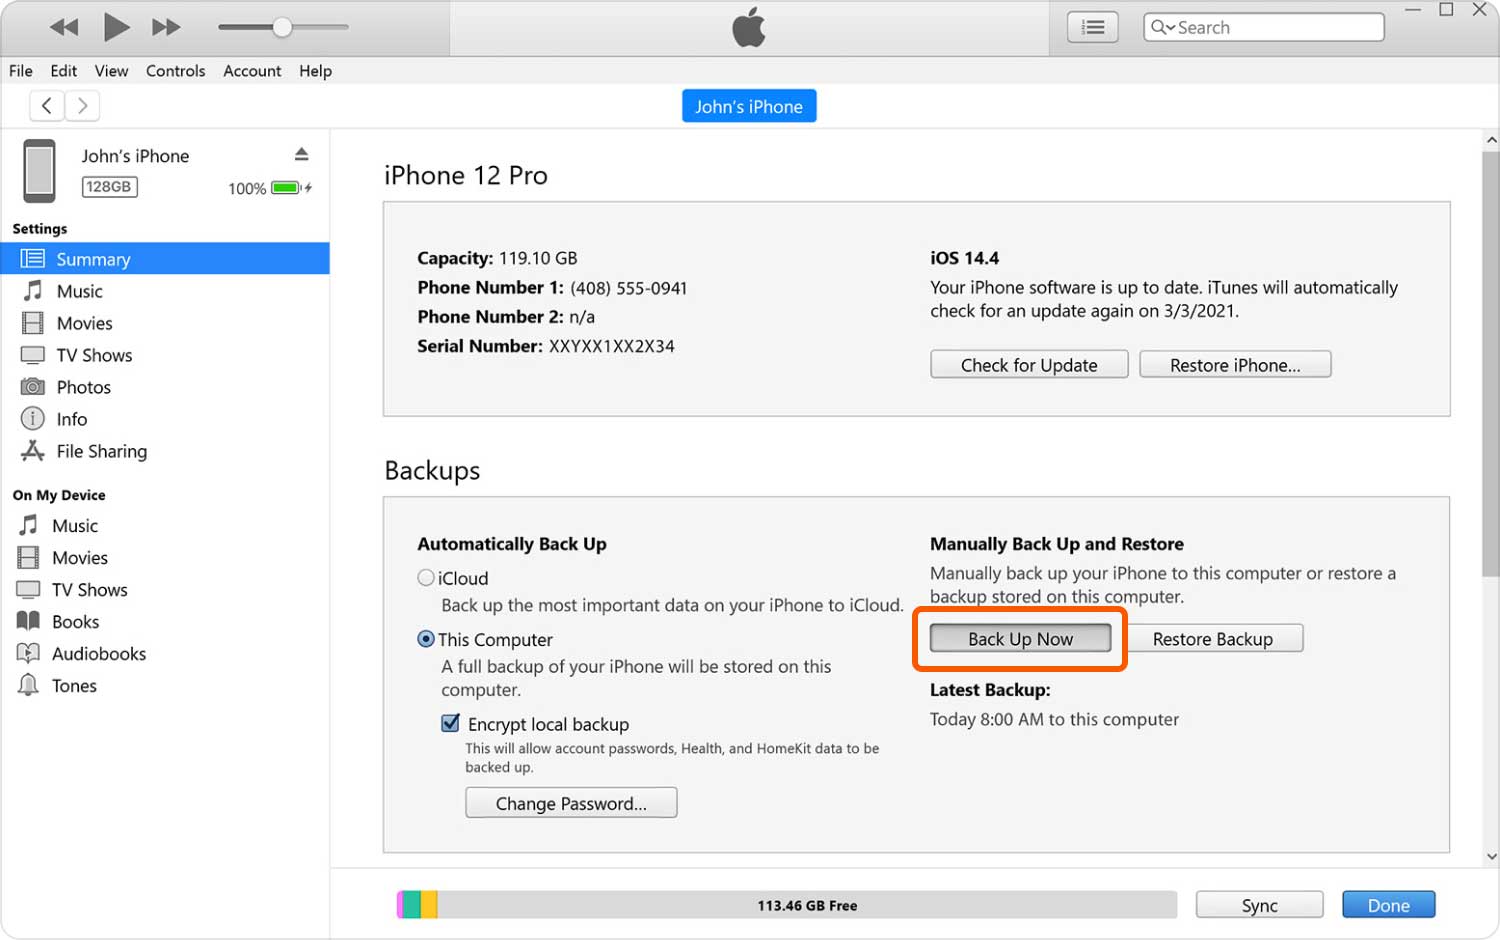
Step 1: Have your iPad device connected to your computer using your USB cable.
Step 2: Launch your iTunes program on your computer.
Step 3: After that, click on the device icon beside the category drop-down box found on the left side of your iTunes window.
Step 4: After that, click on the Summary button found on the sidebar.
Step 5: Choose Back Up Now which is found under Manual Backup and Restore
Step 6: After selecting that, click the Done button.
As you can see, the best way for you to backup and restore your data from your iPad is by using FoneDog Toolkit - iOS Data Backup and Restore. This is because this program allows you to backup and restore your data without overwriting or losing your other data saved on our iPad device.
You can also preview and restore any of your data from the backup to a specific device. You can also export all the data that you want to form your backup file to your computer. No doubt that FoneDog Toolkit - iOS Data Backup and Restore is a 100% guaranteed safe and efficient.
Leave a Comment
Comment

Tech Website Writing /Content Optimization
Singing, smiling, surprising every day!
So as a technical writer, it is my duty to gather effective and reliable solutions to answer questions on how to deal with the issues they are having with their devices.
iOS Data Backup & Restore
Back up your data to PC and selectively restore iOS data from backups.
Free Download Free DownloadHot Articles
 /
/
INTERESTINGDULL
/
SIMPLEDIFFICULT
Thank you! Here' re your choices:
Excellent
Rating: 4.7 / 5 (based on 61 ratings)
