FoneDog Screen Recorder
FoneDog Screen Recorder
Special Offer
Special Offer


By Adela D. Louie, Last updated: April 8, 2018
"Do you know how to backup iPad to iTunes?"
Well, you maybe can find an answer in this post. Here is how.
Part 1 : The Difference Between iCloud and iTunes BackupPart 2 : How to Backup iPad Using iTunes?Part 3 : The Best Way to Backup Your iPadVideo Guide : How to Backup and Restore iPad Data Via iTunesPart 4 : Conclusion
People Also ReadLet's Backup Text Messages on iPhoneSolved! How to Restore iPhone from iCloud or iTunes Backup
If you are an Apple device user, then not having a backup is completely unexcused. This is because for Apple users, whether you are having an iPhone, iTouch or an iPad, you can actually have your data backed up in two different ways. You can backup your iPad using your iCloud, iTunes and by using a third-party program.
For all Apple users, there is two common way on how you can backup the data from your iPad. You can use iCloud backup and iTunes backup. But what really is the difference between these two? Below is the difference between these two types of backup file.

BACKUP 1: iCloud Backup
iCloud backup is an iOS feature which lets your iPad, iPhone, and iTouch devices backup its content to the cloud. The iCloud backup usually takes place automatically once you are connected to a Wi-Fi connection and you have enabled it.It also works once your iOS device is getting powered or once your screen is locked. Once you were able to configure your iOS device for your iCloud Backup then you should and will be able to rely on it that the backups will happen. And of course, like any other things, iCloud backup has also its own pros and cons.

1、Pros:
Safe - this is one of the most reliable online backup options. Having iCloud backup can make you feel assured that your data will be stored.Sync Feature - It has the ability to sync your data in just one place. One great beauty of having a cloud storage is that you can get your data synced with your iCloud.Easy to Use - iCloud has a straightforward and a very short process of backing up your data from your iOS device. Free - Using iCloud as your mode of backup will give a free 5GB of storage. If you have consumed all your 5GB storage, you can simply subscribe to a monthly basis for more storage space. Selection - You have the option if you only want a 5GB of storage on your cloud because you will have the option for you to just select the data that you want to be backed up on your iCloud
2、Cons:Confidentiality - This negative idea about having your iCloud backup can really make you feel paranoid. This is because people from Apple have also the access to our data that is backed up to iCloud. Security - The security of data saved on iCloud is the main target for hackers. There are other users that always think that anytime a hacker wants to get into our iCloud, they can always do it. With all the things that are mentioned above, having iCloud as a form of backing up our data from our iOS devices can really be a good idea because you will never know what might happen to your device.But on the other side, there are also some risks in using it. It is always better to be aware of what can possibly go wrong. And always keep in mind that everything has its benefits and downfalls.
BACKUP 2: iTunes Backup
Using iTunes as your backup, the data from your iPad device will then all be stored on your computer. One amazing thing about using iTunes is that you do not actually need an internet connection to make a backup of all your data and most of all you do not need to buy any storage for your backup data.All you'll be needing is just your computer and the data will then be stored there and it will not also consume a lot in your computer storage. Also, iTunes is free to download from Apple that comes with OS X.Using iTunes is better than using iCloud because you do not have to worry about your storage being limited to a certain GB for your data. Using iTunes, even if you do not have access to any internet connection, you will still be able to backup your data.
Using iTunes is very easy. All you need is your iPad device, your USB cable and your computer to backup your data. Here is a step by step method for you on how to backup your iPad device using iTunes, just make sure that you have the latest version of iTunes to proceed.Step 1: Have your iPad connected to your computerStep 2: Once your iPad is connected, launch the iTunes program. Then your device will then appear as a small icon at the top of the iTunes program screen.Step 3: Select that small icon.Step 4: After that, in the left-hand menu under Summary, select the items you wish to backup. Step 5: After selecting the items you wish to backup, then go ahead and click Apply.

In backing up your iPad data using your iTunes, you get to back up your data one at a time so if you wish to backup all your data from your iPad device, you can do it one at a time. But using iTunes is better than using iCloud because you do not have to worry about your storage being limited to a certain GB for your data.
Both backup methods that are mentioned above are very useful and reliable at some point in terms of backing up your data. But aside from the two mentioned above, there is another way for you to backup your data from your iPad device. This program is none other than FoneDog Toolkit - iOS Data Backup and Restore.We can say that the FoneDog Toolkit - iOS Data Backup and Restore is the best way to restore or backup your data from your iPad device because of its amazing features. The FoneDog Toolkit - iOS Data Backup and Restore allows you to preview and restore any of the data that you backed up to your computer.Also, the iPad Data Backup and Restore by FoneDog allows you to export items that you want from your backup to your computer. This program also secure your data that you will not lose any of them upon using FoneDog Toolkit - iOS Data Backup and Restore and also it will not overwrite any of your data.It is one click to backup your data from your iPad device and a 100% guaranteed safe to use. Below is the step by step method on how you can backup your data from your iPad device to your computer and also on how you can restore your data from your computer to any of your iOS devices.
You are lucky enough have a chance to Download a free version of FoneDog - iOS Data Backup and Restore. Just Click Download Button.
Have the FoneDog Toolkit - iOS Data Backup and Restore downloaded from our official website and install it on your Mac or Windows computer.After you have successfully installed the program, to your computer and connect your iPad device using your USB cable and then wait until the program detects your device.Once the program had detected your device, choose iOS Backup and Restore from the main page of the program and then select iOS Data Backup.

On this screen, you have two options on how you can backup your data from your iPad to your computer. One option is the "Standard Backup" which allows you to backup your data without requiring a passcode, and the second option is the "Encrypted Backup" which allows you to set up a passcode for your backup. This way you can have your privacy for your data from your iPad device to your computer. Once you have selected the backup method you want, just go ahead and click on the "Start" button for you to proceed to the next step.

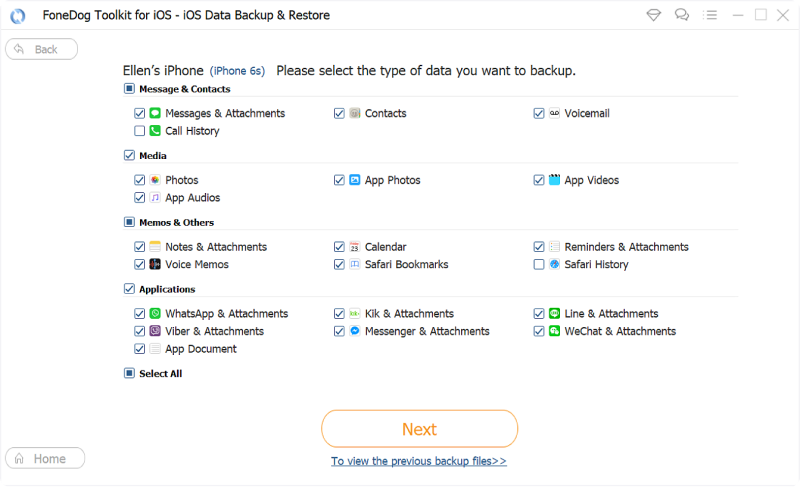
After you have clicked on the Start button, the FoneDog Toolkit - iOS Data Backup and Restore will then show you a list of files that the program supports and that you can back up.You will be able to see the files such as Messages, Contacts, Photos, Call Logs and more.You have the option to selectively choose all the data that you wish to backup.After selecting the desired files, just go ahead and click on the "Next" button.
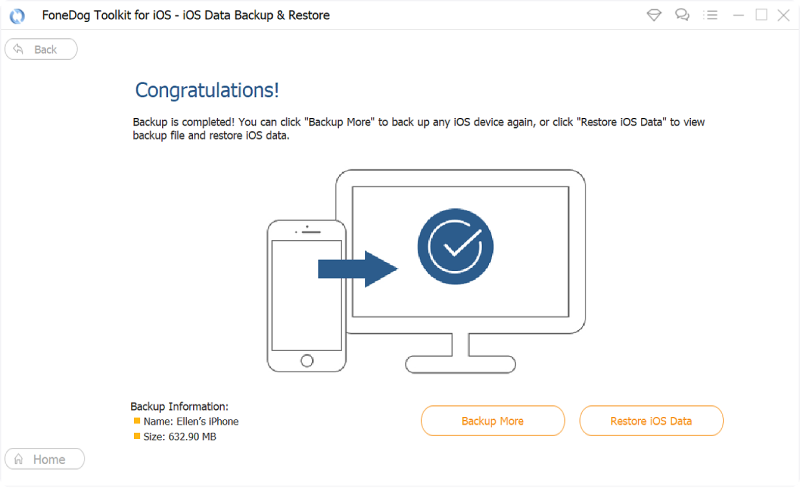
After selecting the files you wish to backup, the FoneDog Toolkit - iOS Data Backup and Restore will then start to backup your data from your iPad device.Wait for the program to finish the process. Once the FoneDog Toolkit - iOS Data Backup and Restore is done backing up your data from your iPad device.It will then display the name and the size of each backup file. You have the option to select "Backup More" if you have more data that you wish to backup.You can also select "Restore iOS Data" if you want to restore your backup file to your computer or to another iOS device.
Just download FoneDog and try it to backup and restore iPad data
Launch the FoneDog Toolkit - iOS Data Backup and Restore and make sure to connect your iPad device to your computer using your USB cable.After that, select iOS Data Restore from the iOS Data Backup and Restore.
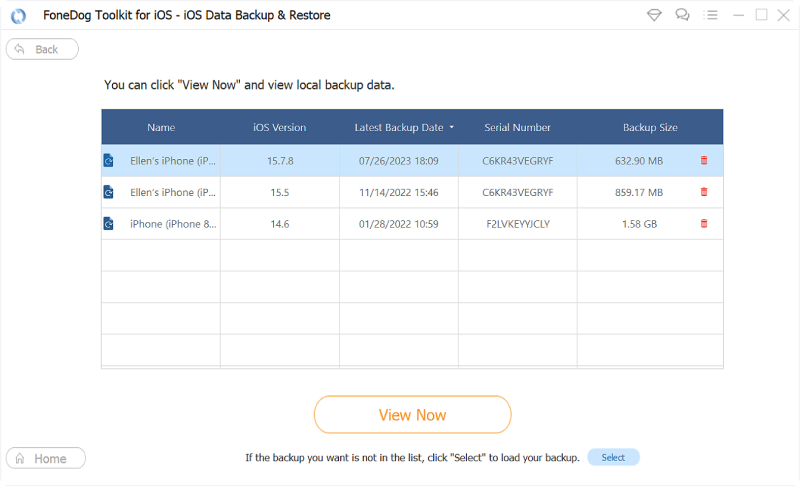
On the next screen, the FoneDog iOS Data Backup and Restore will then show you a list of your backup file.You will be able to see the time and the date the backup was made. Choose any backup file from the list shown and then click on "View Now" button.
Afte choosing the backup file you wish to restore, FoneDog Toolkit - iOS Data Backup and Restore will then start scanning your backup files.You will be able to see the scanning progress on your computer screen. You have the option for you to Pause the scanning process, or you can also click on the Stop button if you want to stop the process.

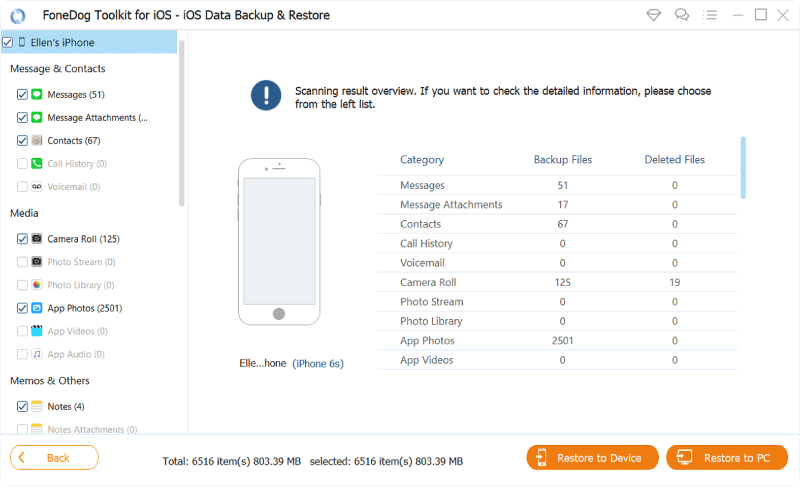
Once the scanning process is complete, you will then be able to preview all your backup files from the list shown on your screen.This is for you to make sure that you have the correct items that you want to restore.You can also selective choose the items you wish to restore or you can just simply select all the items shown on your screen.Once you are decided with the items you want to restore you can now go ahead and click on "Restore to Device".If you are going to restore your data to any iOS device, or you can click on "Restore to PC" if you wish to restore your data to your computer.
Read this Video and you will know how to backup iPad to iTunes, this is the best way for you backup iPad via watching the video.
From all the things mentioned above, all are suitable for backing up your data from your iPad device. You can use your iCloud backup but you will have just limited data that you can backup from your device because you are only given a 5GB storage and if you want to have more storage on your iCloud then you have to purchase more storage and pay for it monthly.You can also use your iTunes backup and get the convenience of backing up your data because you can get your data from your iPad device backed up even without an internet connection.And unlike iCloud, iTunes lets you backup your data without you worrying about the storage needed to backup all of your data.You only need your computer and its hard drive for you to get them all backed up. And of course, the best way to backup your data from your iPad device is by using FoneDog Toolkit - iOS Data Backup and Restore. Using this program will help you secure all your data and you will feel safe that you will not lose any of them during the whole process. In addition to this, you can also select all the data you want to backup and restore all at once or just selectively choose them one by one and you can also preview them first to make sure that you have the correct items.
Leave a Comment
Comment

Tech Website Writing /Content Optimization
Singing, smiling, surprising every day!
So as a technical writer, it is my duty to gather effective and reliable solutions to answer questions on how to deal with the issues they are having with their devices.
iOS Data Backup & Restore
Back up your data to PC and selectively restore iOS data from backups.
Free Download Free DownloadHot Articles
 /
/
INTERESTINGDULL
/
SIMPLEDIFFICULT
Thank you! Here' re your choices:
Excellent
Rating: 4.6 / 5 (based on 69 ratings)
