FoneDog Screen Recorder
FoneDog Screen Recorder
Special Offer
Special Offer


By Adela D. Louie, Last updated: May 22, 2018
If you lost your data suddenly, don't worry, it is also can restore iPhone from the previous backup. In backing up data on our iPhone device, there are two ways for you to choose from. One is by using the iTunes backup or by choosing iCloud backup. Every iPhone users know how to back up their data on their iPhone but not everybody knows how to restore iPhone from the previous backup?
Having a backup is easy for iPhone users because Apple made two ways on how you can backup your data on your iPhone device.One is by using your iCloud backup and the other is by using iTunes backup. But since you can back up your data on your iPhone device, then ideally, you can also restore them, right? You may be thinking about how you can restore your iPhone device using your previous backup. Do not worry because here we will show you how you can restore iPhone from the previous backup, in three ways.One way is by restoring them using your iCloud backup, the other one is by using your iTunes backup and the other one is by using an amazing third-party program that we will be introducing you in these articles.
Part 1. How to Retrieve iPhone from Previous Backup Using Fonedog ToolkitPart 2: More About Fonedog Toolkit- iOS Data Backup and RestoreVideo Guide: Backup iPhone and Restore iPhone from the Previous BackupPart 3. Restore iPhone from the Previous Backup Using iTunesPart 4. Recover iPhone from Previous Backup Using iCloudPart 5. Conclusion
People Also Read4 Easy Ways to Backup iPhone to Mac How Long Does it Take to Restore An iPhone?
Aside from the mentioned methods above on how you can restore your iPhone from your previous backup, there is another way on how you can restore them without worrying about anything. This is by using the most recommended third-party program which is called the FoneDog Toolkit - iOS Data Backup and Restore.The FoneDog Toolkit - iOS Data Backup and Restore will surely help you in restoring your iPhone using the previous backup that you have. If you have backed up your data on your iPhone using your iCloud backup or iTunes backup, then the FoneDog Toolkit - iOS Data Backup and Restore will do the trick for you in restoring your iPhone device.The FoneDog Toolkit - iOS Data Backup and Restore will allow you to preview and then restore any items or data from your backup file to any iOS device. This program can also let you export your backup file directly to your computer.
Unlike the iTunes and iCloud process, the FoneDog Toolkit - iOS Data backup and Restore will not delete any data on your iPhone device during the restore process and it will not overwrite any data on your iPhone device as well. The FoneDog Toolkit - iOS Data Backup and Restore will also let you selective choose all the items that you just need to restore on your iPhone.And of course, as what its name says, the FoneDog Toolkit - iOS Data Backup and Restore will also let you back up your data from your iPhone device and the best thing about it is that unlike iTunes and iCloud, the FoneDog Toolkit iOS Data Backup Data and Recovery program will let you to just back up the data that you want plus you will not have to worry about any limitations because you have full control on what to backup or not.And if you use this program to back up your data on your iPhone device, it will not overwrite any previous backup that you made. In short, you will still have your old backup be in a different file. The FoneDog Toolkit - iOS Data Backup and Restore is also compatible with any iOS device which includes the iPhone X, iPhone 8, iPhone 8 plus which were just released by Apple recently.This program is also compatible with any iOS version including the iOS 11 version.
Have this downloaded on either your Mac or Windows computer as well, no problem with that.
Here is the simple step by step methods on how you can restore your iPhone from your previous backup.
Get the Fonedog Toolkit - iOS Data Backup and Restore from our official website and then have it installed on your MAC or Windows computer.
Once you have successfully downloaded and installed the FoneDog Toolkit - iOS Data Backup and Restore on your PC, go ahead and let the program run. Have your iPhone be connected to your computer using your USB cable. Make sure that they are connected properly to avoid any interruptions. On the main interface of FoneDog Toolkit - iOS Data Backup and Restore, go ahead and choose iOS Data Restore.

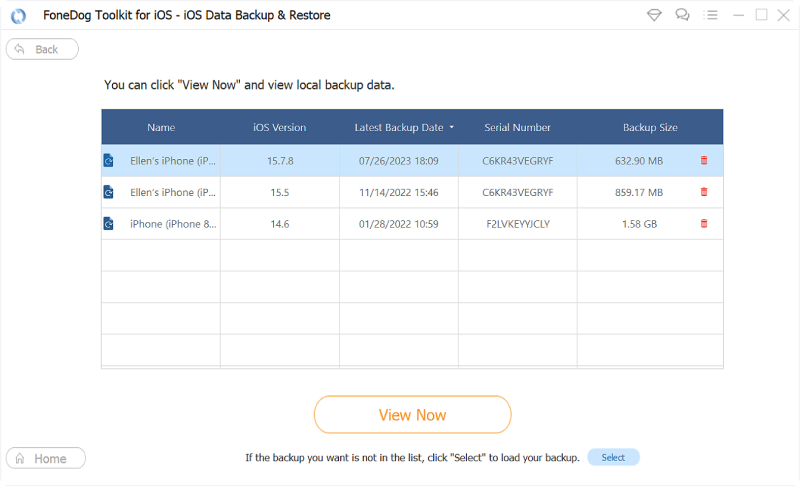
Once you have clicked the iOS Data Restore option, go ahead and choose the backup file from the list shown on your screen.
The FoneDog Toolkit - iOS Data Backup and Restore will then show you your backup file size, the date, and the time it was made.
Go ahead and click on the backup file and then click on the "View Now" button.
Once you have clicked on the View Now button, the FoneDog Toolkit - iOS Data Backup and Restore will then start scanning your selected backup file.
You will be able to see the progress of the scanning process on your screen. If you want to pause the scanning process, you can go ahead and click on the "Pause" button or if you want to stop the scanning process, just go ahead and click on the "Stop" button to force stop it.
However, if you want to see all the items in your backup file, why not wait for the scanning process to finish instead.

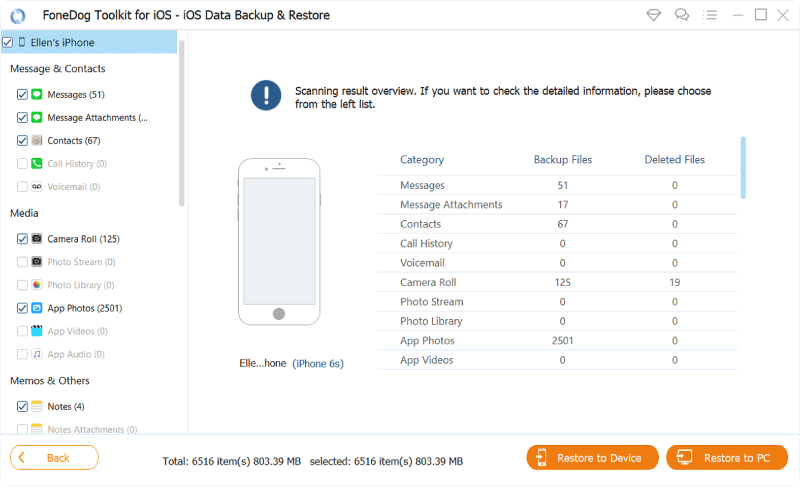
After the scanning process is complete and successful, the FoneDog Toolkit - iOS Data Backup and Restore will then show you all the items that are in your backup file.
You will be able to preview each item from your backup file just by clicking the files on the left side of your screen.
You have the option to selectively select all the items that you want to restore.
Once you have selected all the items that you want to restore, just go ahead and click on the "Restore to iDevice" button for you to restore all the items on your iPhone device.
Aside from the fact that the FoneDog Toolkit - iOS Data Backup and Recovery program can allow you to restore your previous backup file to your iPhone, it can also help you backup all your data from your iPhone device.
It can backup your messages, contacts, call history, photos, videos, and more. You will be able to backup either all of your data from your iPhone device or just some of them.
All data that is backed up by the FoneDog Toolkit - iOS Data Backup and Restore will all be stored on your computer so no need to worry about a limit on backing up your data.
iTunes is one of Apple's official backup and restores program for all its users. However, iTunes has its fair share of limitations. The iTunes program will only keep one backup file for one device and that is the newest backup you made.Any more new backup using the iTunes program will overwrite any old backup that you previously made. For you how to know how you can restore iPhone from the previous backup using iTunes, here are the simple steps that you can do.
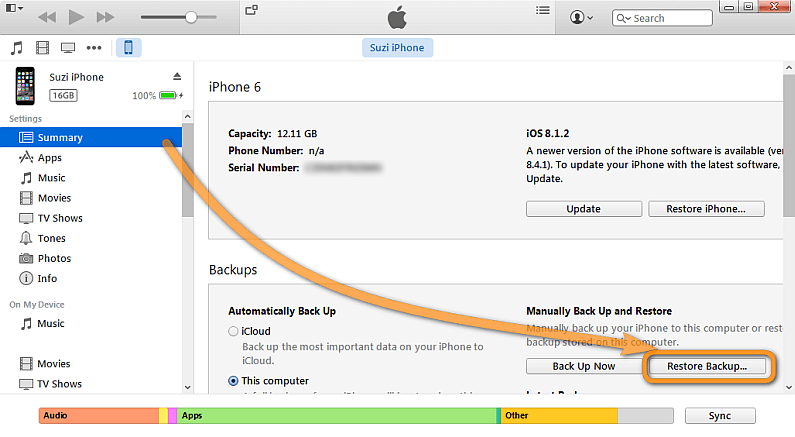
Step 1: Once you have turned on your new iPhone device the first time or you have performed a factory reset on your iPhone, you will be able to see the "Hello" screen. Once you that message, just go ahead and press the Home button. Step 2: Read and follow the instructions that appear on your screen until you reach the Apps and Data screen. Once you are on that screen where you can find the iTunes Backup message, just go ahead and tap on Next to continue.Step 3: After that, go ahead and plug in your iPhone device to the computer you used to backup your data using your USB cable. Launch your iTunes program and then click on the iPhone device icon located on the left side of your screen. Step 4: And then go ahead and click the Restore Backup button then select the desired backup.Step 5: Patiently wait for iTunes to restore your iPhone device. Do not disconnect your iPhone from your computer until the process is complete.
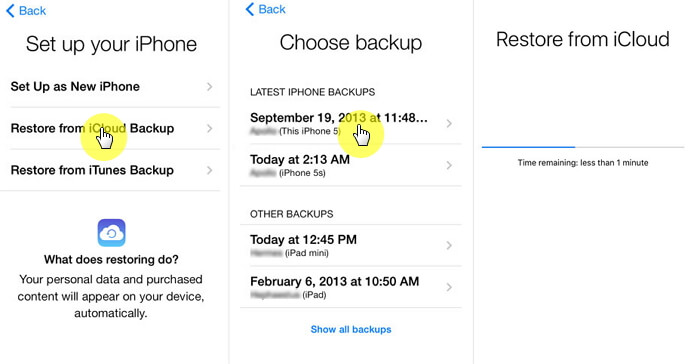
There is another Apple's official method on how you can backup and restore your iPhone from the previous backup. This is by using the iCloud backup system. When you try to restore your iPhone device using iCloud, you can actually select any from your previous backup.But, just like using iTunes to restore your iPhone, iCloud will also just let you restore the whole backup file that you have as a backup and doing this will overwrite the other data on your iPhone device. In short, you will not be able to selective choose as to what you want to extract from your backup file.Here is the step by step method on how you can restore your iPhone device from the previous backup using your iCloud.
1: Similar to the first step on how you restore your iPhone using your iTunes backup file, once you have turned on your iPhone device the first time, you will be able to see the "Hello" screen. Once you see that message, just go ahead and press your Home button.
2: Read and follow all the instructions shown on your screen until you reach the Wi-Fi screen. Connect your iPhone device to a searched Wi-Fi connection. Make sure that the connection is stable to avoid any interruptions.
3: Proceed to the other steps as well until you reach the Apps and Data screen. From there, just go ahead and tap on the Restore from the iCloud Backup button.
4: After that, you will be needing to enter your iCloud credentials. Just go ahead and log in to iCloud using your Apple ID and password and then choose from any backup shown on your list.
5: Wait until the restoring process on your iPhone device is complete. Make sure that there are no interruptions on your connection to avoid failure or going around in circles.
We know that it is very common that most iPhone users are capable of using their iCloud and iTunes backup in backing up or restoring their iPhone device from their previous backup. However, many also would want something that could give them freedom on what to backup and restore or not.
The answer to this is the FoneDog Toolkit - iOS Data Backup and Restore. All the things that the iTunes or iCloud cannot do are what this amazing program can do. In using the FoneDog Toolkit - iOS Data Backup and Restore you do not have to worry that you will overwrite the previous backup that you made because this program will certainly not overwrite any of your backup file or data on your iPhone.
It can also allow you to freely choose what items or data that you want to restore on your iPhone device.
Leave a Comment
Comment

Tech Website Writing /Content Optimization
Singing, smiling, surprising every day!
So as a technical writer, it is my duty to gather effective and reliable solutions to answer questions on how to deal with the issues they are having with their devices.
iOS Data Backup & Restore
Back up your data to PC and selectively restore iOS data from backups.
Free Download Free DownloadHot Articles
 /
/
INTERESTINGDULL
/
SIMPLEDIFFICULT
Thank you! Here' re your choices:
Excellent
Rating: 4.5 / 5 (based on 82 ratings)
