FoneDog Screen Recorder
FoneDog Screen Recorder
Special Offer
Special Offer


By Nathan E. Malpass, Last updated: March 27, 2018
According to the following user, I will talk about how to backup iPhone to Mac using 4 easy ways."
Part 1. How to Backup iPhone to Mac with iTunes Part 2. How to Backup iPhone to Mac with iTunes SyncPart 3. Via iCloud: How to Backup iPhone without iTunes to MacPart 4. How to Backup iPhone without iTunes on Mac SelectivelyVideo Guide: Selectively Backup iPhone to Mac without iCloud or iTunesPart 5. Conclusion
Backing up your iPhone to mac is very important, so it’s great that iTunes has a feature to help you with that.
If you want to backup iPhone to Mac using iTunes, Here’s how:
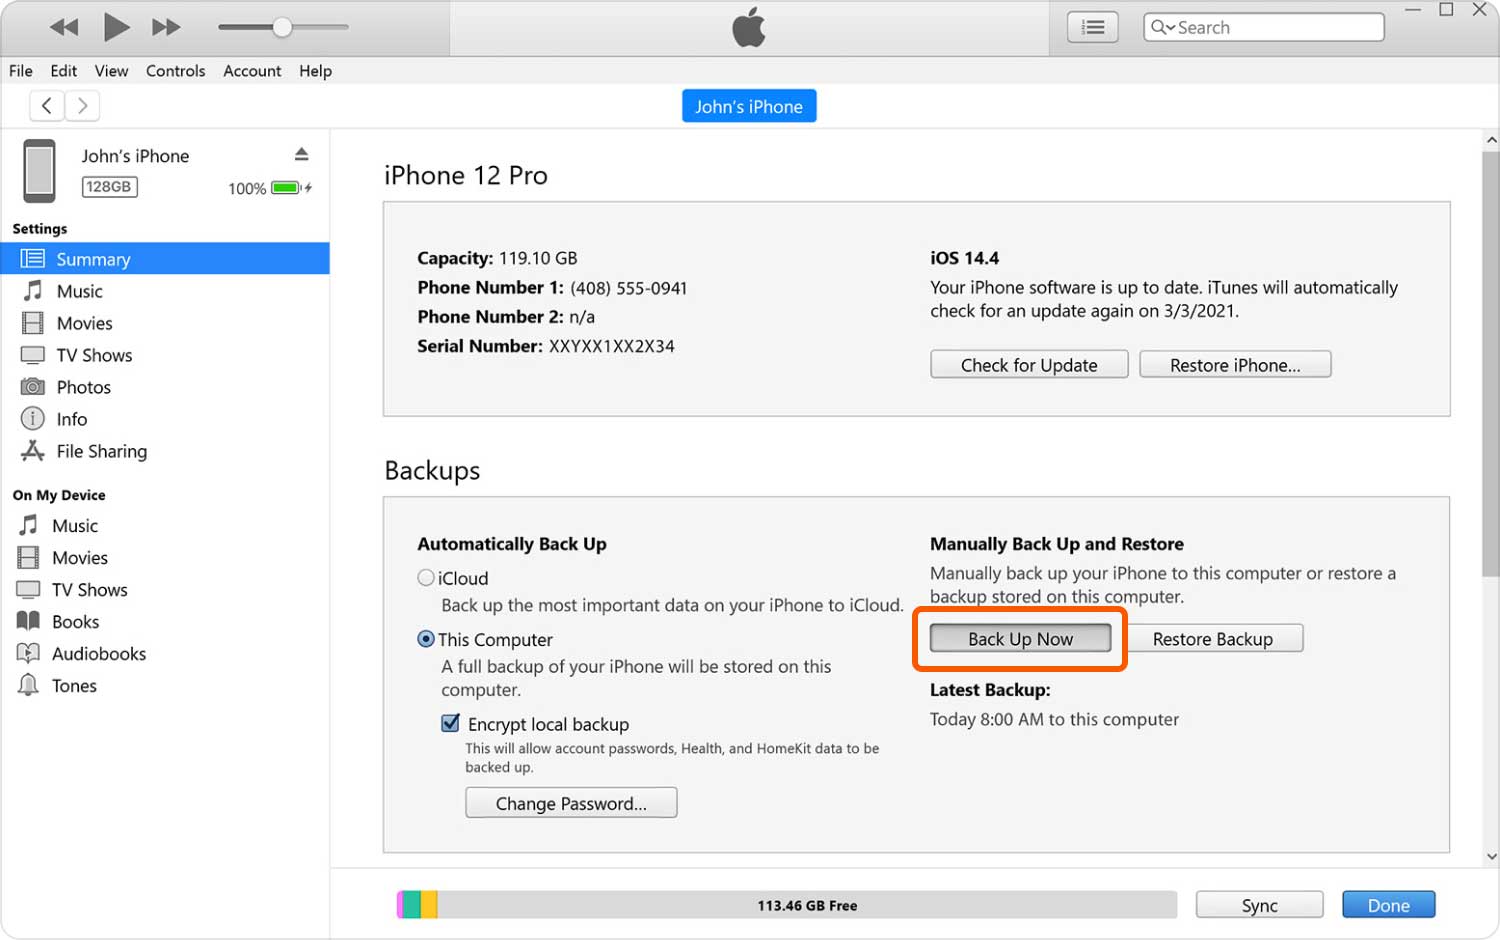
You will have to do this process regularly. For your reference, look at the details indicated under Latest Backup. You will see the time and date when a backup was last made.
It will help you determine if it’s time to back up again. If you don’t want the trouble of manually starting the backup, you can activate iTunes sync.
To learn more about that, proceed to the next part of this article.
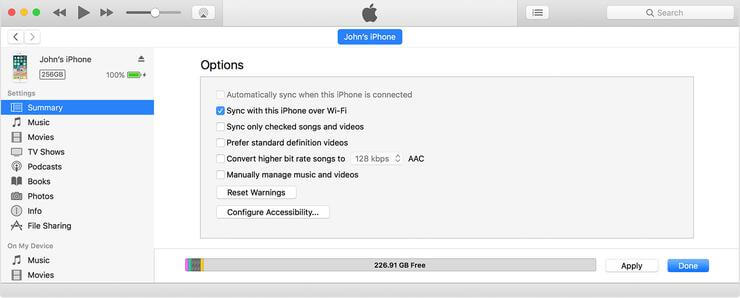
You might be wondering how iTunes sync work. This is a fantastic feature that enables you to perform automatic backups. When activated, your iPhone can wirelessly sync to your Mac whenever they are connected to the same Wi-Fi network and your phone is charging from a power source. All you need to do is to turn on this feature.
Refer to the steps below to backup iPhone to Mac.
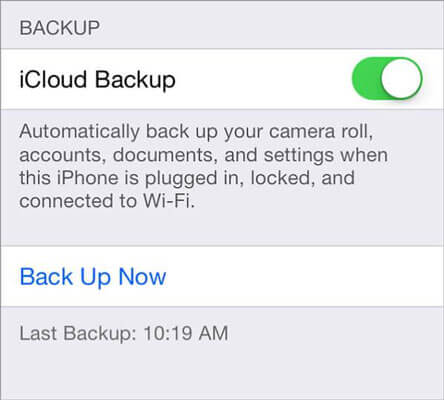
If you like the idea of auto backups, there is an alternative. Also, a service designed by Apple, iCloud is another useful backup tool that iPhone users can take advantage of. Like iTunes sync, the backup can only be automatically created if you meet a few requirements.
Your iPhone must be connected to Wi-Fi, connected to a power source, and locked. Nevertheless, you can also opt to start the backup iPhone to Mac.
To enable iCloud backup, do the following steps.
If you want to view your files after backing up via iCloud, head to iCloud Drive on your Mac. If it’s not enabled yet, simply click on the Apple icon in the upper left corner of your Mac > System Preferences > iCloud > Tick iCloud Drive. To open iCloud Drive, launch Finder and look for the program in the sidebar.
iCloud is easy to use, but it only provides you with 5GB of free storage. Once you have used up the available space, iCloud will no longer be able to back up your iPhone. You do have the option to subscribe to additional storage, but it comes with a monthly fee.
iTunes, on the other hand, does not allow you to view your backup’s content. You can only see your files if you restore the backup. In this case, existing files on your device will be overwritten by those in the backup.
Aside from that, you can’t choose the files that you want to back up. By default, iTunes performs a full backup of your iPhone.

If those drawbacks made you think twice about using iCloud or iTunes, the 4th backup method may just be the right fit for you.
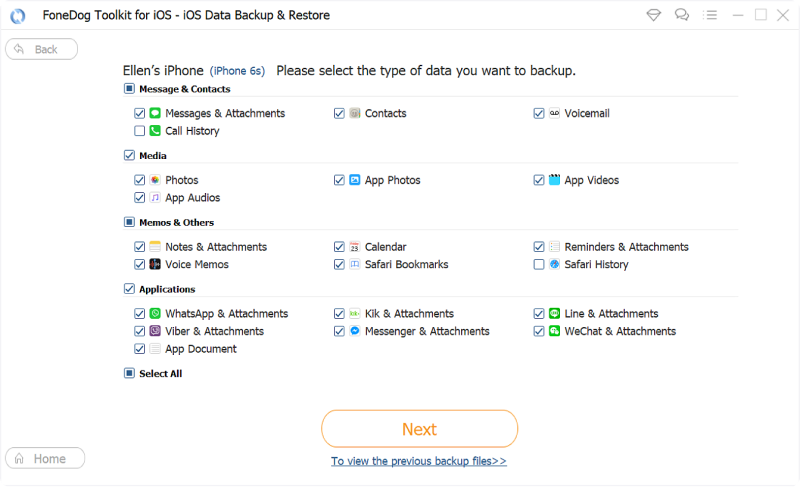
If you are looking for a reliable way to backup iPhone to Mac without iTunes, you may try FoneDog iOS Backup Toolkit. With FoneDog iOS BackupToolkit, you can do what you can’t with the mentioned services. You can select the files that you want to back up. You can also view the contents of your backup anytime on your Mac.
While this is a third-party software, FoneDog supports a wide range of file types. It can back up and restore Photos, Videos, Audio, Messages, Contacts, Call History, Voicemail, WhatsApp Messages and Attachments, Notes, Calendar, Reminders, Safari History & Bookmarks, and Documents.
Here are some steps to backup iPhone to Mac using Fonedog Toolkit
Download FoneDog iOS Toolkit for your Mac. Run the software once installation is complete. Connect your iPhone to your computer. Choose iOS Data Backup option.

Select iOS Data Backup & Restore from the main menu. Click iOS Data Backup. You will be asked to choose between Standard Backup and Encrypted Backup.
If you’re all for security, select Encrypted Backup to lock your backup with a password. If you’re fine with a regular backup then the Standard Backup would do. Click Start.

Mark the file types that you wish to include in your backup. Tick the boxes next to the applicable file types. Once you’re satisfied with your selection, hit Next.
The backup will begin immediately. Do not disconnect your iPhone from your Mac while the backup is ongoing. You will see a message once the process is complete.
Restoring your files is as convenient as backing up with FoneDog iOS Toolkit. Using the same software, you simply select iOS Data Restore and choose the backup file that you want to save to your iPhone.
You can even use this feature to transfer multiple files to a new device minus the stress!
People Also Read:
How to Selectively Backup iPhone to Computer
How to Backup iPhone to iTunes
How to Backup iPhone to iCloud
Backing up your iPhone to Mac is very simple as long as you use reliable and easy-to-use tools. One excellent example is FoneDog iOS Toolkit. With its user-friendly interface, any iPhone user can navigate it without issues.
See it for yourself with the 30-day free trial. The software surely won’t disappoint!
Leave a Comment
Comment

iPhone/Android Devices’ Maintenance Expert
Staying home, listening to music, writing tech articles
Many people asked me to repair their mobile phones so I have a lot of experience in mobile phone repair, and I know a lot about Android or Apple phones.
iOS Data Backup & Restore
Back up your data to PC and selectively restore iOS data from backups.
Free Download Free DownloadHot Articles
 /
/
INTERESTINGDULL
/
SIMPLEDIFFICULT
Thank you! Here' re your choices:
Excellent
Rating: 4.5 / 5 (based on 82 ratings)
