FoneDog Screen Recorder
FoneDog Screen Recorder
Special Offer
Special Offer


By Gina Barrow, Last updated: July 2, 2018
Are you having a hard time finding ways to transfer photos from iPhone to computer? Don’t worry, we’ll figure it out together!
There are several ways on how to transfer photos from iPhone to computer and today we will show you all the possible options. Let’s take a closer look at the following methods below:
People Also ReadHow to Transfer Photos from iPad to PC?6 Ways on How to Copy Photos from iPhone to Mac.
Part 1. Use iCloud Photo LibraryPart 2. Use FoneDog Toolkit- iOS Data Backup & RestoreVideo Guide: How to Move Pictures from iPhone to A ComputerPart 3. Transfer Photos from iPhone to MacPart 4. Transfer Photos from iPhone to ComputerPart 5. Summary
The very first thing you must do is to decide where you want to transfer the photos from the iPhone. You have 3 basic options for photo transfer; the first is to use iCloud Photo Library wherein it creates a collection of all media contents like photos and videos. Next is to transfer and saved them locally to the Mac or PC.
iCloud Photo Library is a seamless connection across all iOS devices such as iPhone, iPad, iPod Touch, Mac, Apple TV and even a Windows computer.
All you need is an iCloud account which will let you set up on all devices. You can do this by creating an iCloud account and turning on the iCloud Photo Library.
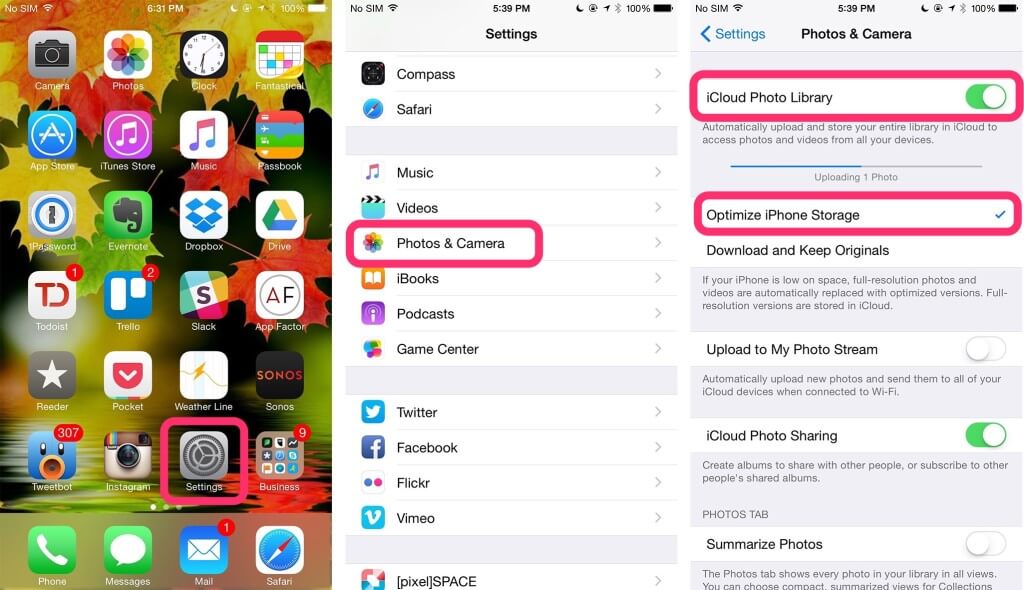
Turn on iCloud Photo Library on iPhone:
Turn on iCloud Photo Library on Mac:
Turn on iCloud Photo Library on PC:
Download and install iCloud for Windows
Once you have done the steps above, every photo you take on any iOS devices will be uploaded to iCloud and are now accessible to any of these devices.
The only downside that we see so far is that all the photos and videos you put in the iCloud Photo Library will consume iCloud space. Therefore you must ensure that you have enough space to cater the entire collection. You may also choose to upgrade your iCloud storage if needed.
Related article guide on How to Retrieve Lost or Missing Media Files, this is a complete tutorial shows you to get back lost data or media from iPhone devices. Why not click on and read more. Another useful tutorial is also here, How to do iCloud Text Messages Recovery, follow this post, you can recover SMS from the iCloud account.
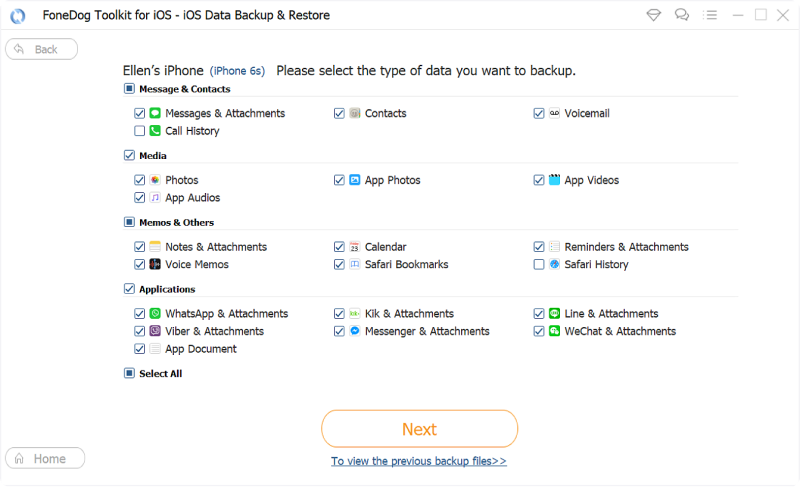
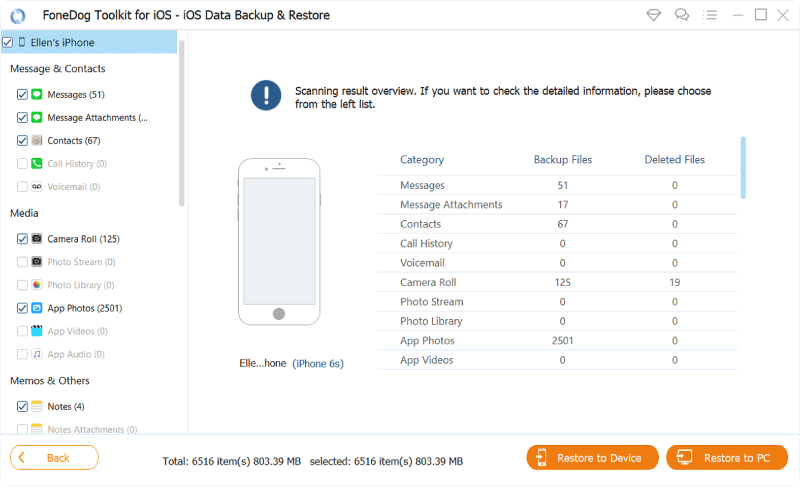
If you are looking for a great alternative for easy and smooth file transfer, we highly recommend that you use FoneDog Toolkit- iOS Data Backup & Restore.
It lets you backup everything from contacts to photos without the fear of losing any of them. You can restore the backup file selectively to any platform you wish to like an iOS device or the computer.This software is available for download to Windows and Mac.
Learn how to use FoneDog Toolkit- iOS Data Backup & Restore with these steps:
Click the player to learn how to transfer images from iPhone devices to PC. This FoneDog iOS Data Recovery is the perfect solution to your issue.
The next option to transfer photos from iPhone to the computer is by using the Photos app an import the media files to Mac. This method does not require iCloud Photo Library and can also work for digital cameras and even external cards.
To better understand how to transfer photos from iPhone to Mac, follow these simple guides below:
The first thing to do is to update the iTunes to its latest version.
That’s it! The process is so easy! You can at any time you wish to.

Lastly, you can transfer photos from iPhone to computer or PC by using similar steps like Mac. We will be using the Windows Photos app for the transfer together with iTunes. Follow the steps below on how to do it on Windows 10:
Again, make sure you have iTunes’s latest version of the PC
The process is so easy that you don’t even need to own a Mac. Your Windows computer is as competitive as it should be.
Use Autoplay on Windows:
Another option to transfer photos from iPhone to the computer is via the Autoplay. This is the easiest so far so check these methods:
This works for Windows 7 and 8. However, if the Autoplay does not pop up then you may perform basic troubleshooting like restarting the devices.
There you have it; you have just learned the different ways to transfer photos from iPhone to the computer. I hope you have discovered the easiest method for you. In any case, you want a long-term backup and restore option then choose FoneDog Toolkit- iOS Backup & Restore, which is also a Photos transfer tool for you to move images from iPhone to PC.
This program takes backup seriously and restores your file safely. It ensures that you get the optimum phone experience while taking care of the rest. Download the free version and tell your friends about it!
Leave a Comment
Comment

Technical/Creative Writer
Kitchen, my safe space; black, my favorite color
Was a Technical Specialist for a while, troubleshooting Smartphone and Software-related issues until a writing stint caught my attention.
iOS Data Backup & Restore
Back up your data to PC and selectively restore iOS data from backups.
Free Download Free DownloadHot Articles
 /
/
INTERESTINGDULL
/
SIMPLEDIFFICULT
Thank you! Here' re your choices:
Excellent
Rating: 4.6 / 5 (based on 70 ratings)
