FoneDog Screen Recorder
FoneDog Screen Recorder
Special Offer
Special Offer


By Gina Barrow, Last updated: August 10, 2018
Did you block someone on Facebook and finally decided to unblock them? Learn how to unblock Facebook friends in this new post!
There are certain situations and instances where we get irritated or frustrated with someone on social media sites like Facebook. As a result, we tend to get rid of them out of our timelines. You can easily block someone who does not agree with you in so many ways.
Blocking friends on Facebook means these people will no longer be able to see your posts on your timeline, tag you on photos, invite events, and even add you again as the friend.
However, they will not be notified that you blocked them anyway. At times when some friends are too overwhelming and annoying, we want to block them right away.
We block them out of impulsive reactions, and later on, realized that we can still be friends after all. How do you unblock Facebook friends? Find out below:
People Also Ask:
How to get back your deleted Facebook messages?
Part 1. How to Unblock Someone on Facebook on iPhone/iPad?Part 2. How to Unblock Facebook Friends on Desktop?Part 3. How to Control Your Friends and Followers on Facebook?Part 4. Bonus Tip: How to Unblock Facebook Site on Chrome?Video Guide: How to Transfer Data from iPhone to Computer?Part 5. Recommendation.
If Smartphone is the most convenient device for you, well you can easily unblock people by following these steps:
The catch though is that you won’t be automatically friends on Facebook again unless you send them requests. This is the latest update from Facebook.
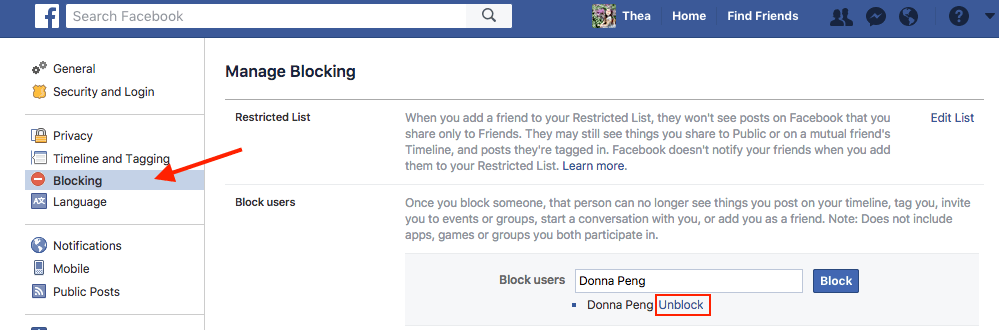
You may also perform the unblocking using your computer. If you are on a desktop and wanted to unblock Facebook friends, you can simply go over the methods below:
When you unblock someone on Facebook, you may not be able to block them again after 48 hours timeframe.
We have those friends we really cannot get rid of and there are others that are so annoying that we don’t want them to see our posts because they might just spoil it. Better yet, un-friend them and control the privacy settings of your own account. By controlling your own account, you can customize your post visibility, who can contact you, who can add you as friends, and even send you messages.
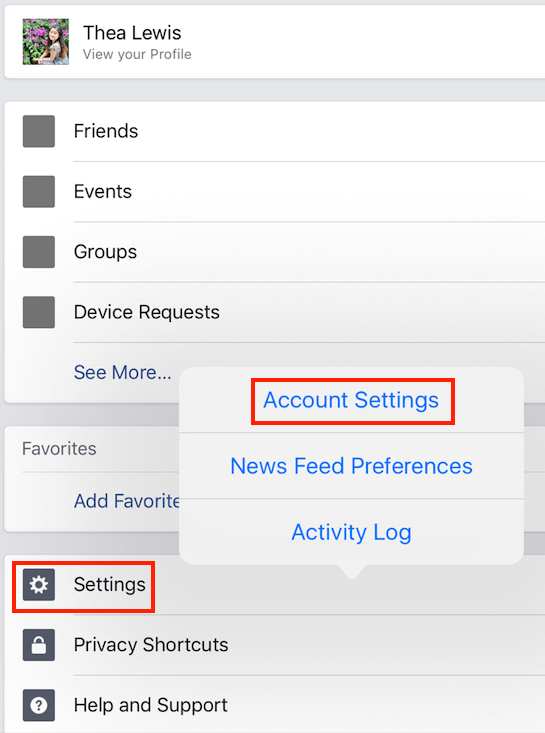
You can easily change and customize who can add your profile on Facebook, follow these steps:
That’s it! For more friend requests, you can try using names that are familiar with your circles.
Another good thing to do is to change the public posts on your Facebook Timeline. Follow the steps below:
This includes everything on your Activity logs, your post likes, reactions, and comments. You may also set an approval on who can post to your wall on Facebook and even review upon tagging photos and posts.
By turning this page, every time you are tagged in a post, you will receive a notification that asks you if you want to Show or Hide on your timeline. If you click Hide, then only the person/s who tagged you and their friends can see the post.
People Also ReadHow to Recover Deleted Facebook Messages on iOS Devices?[Solved] How to Find Hidden Conversations on Facebook
Do you have restricted sites on your computer and wanted to finally unblock it? If yes, maybe Facebook is on the list. We’ll give you some tips on how to unblock Facebook from Google Chrome restricted sites.
Remove or add the letter “S” to the site URL: HTTP/s to see which one is accessible. If without s works, then the https is blocked and vice versa.
If there is an error message “Due to Restrictions On This Account”, this could mean that there is a parental control set on the computer. If you are the admin then you may easily remove the restrictions on your own.
When there are no error messages, you can go to Control panel> Internet Options> Security> find and click on Restricted Websites> If Facebook is listed on the display you can simply highlight the site and click Remove. For family security, you can go to the Content Advisor or Family Safety under Internet Options and customize the settings. This option provides the user-level block for any URLs.
Use a proxy browser instead to view and access Facebook or you may use a different DNS. You may do this by going to Open Network and Sharing. Double click on your network name and then change the DNS under IPv4. You may use Google Public DNS.
This video guide shows you how to transfer data from iPhone devices to Computer without effort, just watch this video on how to work for you.
Now that you have learned how to unblock Facebook friends and even the site, you can now confidently enjoy browsing your own timeline without having to worry at all. If in case you might need to back up your Facebook photos on your iOS device.
You may opt for a complete mobile solution software called FoneDog Toolkit- iOS Data Backup & Restore. This product lets you export and backup all files from the iPhone/iPad conveniently to the computer and extracts it at any time. Finally, you are now all set and ready to explore the wide web!

Download and Try this Application before you Buy! Try it by clicking the download button below.
Leave a Comment
Comment

Technical/Creative Writer
Kitchen, my safe space; black, my favorite color
Was a Technical Specialist for a while, troubleshooting Smartphone and Software-related issues until a writing stint caught my attention.
iOS Data Backup & Restore
Back up your data to PC and selectively restore iOS data from backups.
Free Download Free DownloadHot Articles
 /
/
INTERESTINGDULL
/
SIMPLEDIFFICULT
Thank you! Here' re your choices:
Excellent
Rating: 4.6 / 5 (based on 64 ratings)
