FoneDog Screen Recorder
FoneDog Screen Recorder
Special Offer
Special Offer


By Adela D. Louie, Last updated: August 21, 2018
"Why is my phone not reading my SIM card?"
Have you ever experienced that you wake up one morning and then when you look at your iPhone it says “No Sim Card”? You tried opening your sim tray but your sim card is there.
Because of this, you will not be able to make any phone calls. You also won’t be able to receive nor send out text messaged or use your mobile data.
This situation is really alarming and for sure you would do what it takes for you to resolve this issue. Here, we are going to show you below some method with how you can possibly fix your iPhone not detecting SIM Card.
Having concentrated on software development for some years, we have created an easy-to-use and powerful iOS tool.
Here is a tip for you: Download FoneDog iOS Data Recovery to easily recover your data back from your iOS devices when factory reset or any other situation cause data loss. If you don't need help from third-party software, we have collected some basic solutions below to fix the problems.
iOS Data Recovery
Recover photos, videos, contacts, messages, call logs, WhatsApp data, and more.
Recover data from iPhone, iTunes and iCloud.
Compatible with latest iPhone and iOS.
Free Download
Free Download

Part 1. What is a SIM Card and How Does it Work?Part 2. Why Do We Need SIM Card and What are the Advantages?Part 3. Seven Ways on How to Fix iPhone Not Detecting Sim CardPart 4. How to Restore Lost Data From iPhone After Factory Reset?Video Guide : Fix iPhone not detecting SIM Card by FoneDog's ToolkitPart 5. Conclusion
People Also Read[Solved!] How to Access iCloud from iPhone?Top Tricks on How to Forward Calls on iPhone!
SIM or the Subscribers Identity Module actually stored a bit of data that will make you notice from all other iPhone users. It is the one who is responsible for you in making and receiving calls, receiving and sending out text messages, and using mobile data. The SIM Card is one of the parts of your iPhone which holds your phone number so that other people can contact you.
A SIM card is the easiest way for us to transfer a phone number from your old phone to another. This also makes it easy for you to change your carrier when you travel as long as your iPhone is unlocked. It can also help you to store contacts of other people and text messages.
These are what you can do to fix your iPhone that is not detecting your SiM Card.
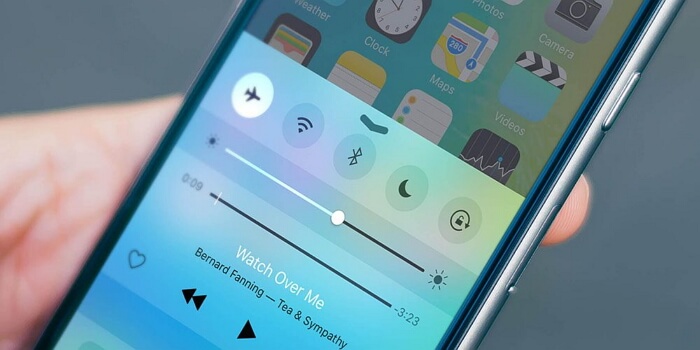
1. Turn on and off Airplane Mode
This is actually a very simple thing that you can do. All you need to do is to go to your Control Center and then tap the Airplane icon. Wait for about fifteen seconds. Then, tap the Airplane icon again and see if your SIM Card is getting detected.
2. Clean Your SIM Card Slot
Make sure that your SIM card tray is always clean and dust free. This is because if there is dust in your SIM tray, then it can be the reason as to why your SIM card is not detected by your iPhone. You can go ahead and eject your SIM tray then try to clean it using a soft-bristled toothbrush. You can also try to clean it using a paper clip. Then, put your SIM card back in and then place it back on your iPhone.
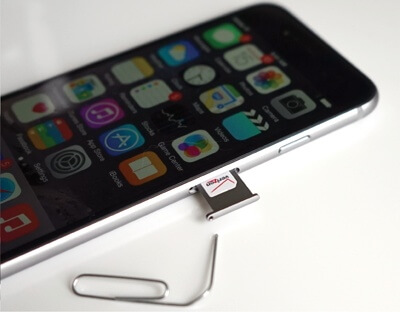
3. Check Your SIM Tray
Your iPhone SIM tray can be ejected from its slot by using a paper clip. Just go ahead and insert the paper clip in the small hole and then lightly press it. This will make the SIM tray pop-out. Once that it is out, pull it and then check if it is disfigured or if it has a damage. You also have to make sure that your SIM tray is holding your SIM card firmly and in place.
If you have figured out that your SIM tray is a bit loose, then this could be the reason why your SIM card is not detected by your iPhone. In this situation, you must go to the nearest Apple center and have it fixed. Do not use any other SIM tray because this could get the situation worst. This is because it has the possibility to damage your SIM or your iPhone permanently.
4. Try Another SIM Card
Try to use another SIM card and have it inserted in your iPhone. Doing this can be really helpful for you to determine if the problem is with your SIM card or not. If your SIM card seems to be damaged, just go ahead and contact your Carrier’s retail store and make a request for you to get another SIM card. You can also just simply replace your old SIM card with a new SIM.
5. Update Your Carrier Settings
One of the simplest and effective things to do when you are experiencing that your SIM card is not detected by your iPhone is to check if your carrier setting is updated or not. You can do this by following the steps below.
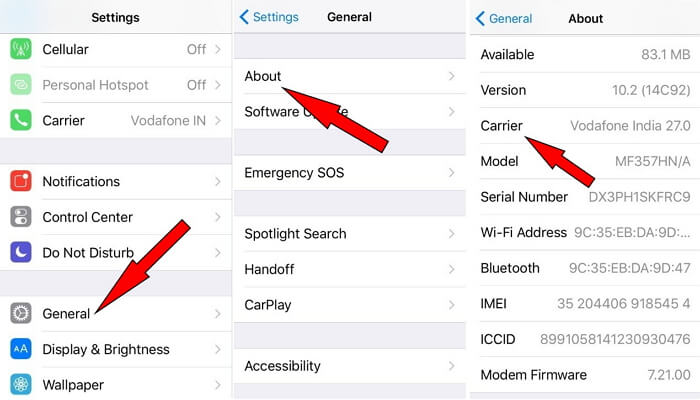
(1) Go to Settings> General> About
(2) From here, you might get a prompt if there is a need to update. If so, just tap OK. Doing this will ensure that any changes that are done by your carrier will be updated on your iPhone.
6. Have Your iOS Updated
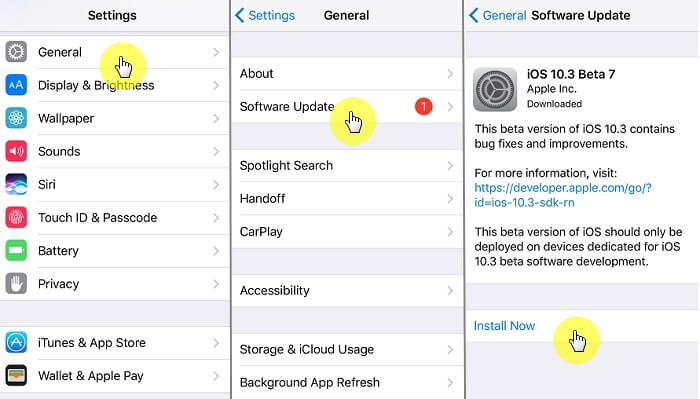
It is also one great way to try and update your iPhone with the latest version. With this, try to make it a habit on checking if there are any available updates in your Settings and have them installed on your iPhone. Doing this will make sure that your iPhone will be free from any software issues and can also fix the problem with your SIM card that is not detected by your iPhone.For you to check any updates on your iPhone, here is what you need to do.
(1) Got to Settings> General> Software Update
(4) It will then show on your screen if there is an update. If there is an available update, just go ahead and tap on Install Now.
7. Restore iPhone To Its Factory Setting
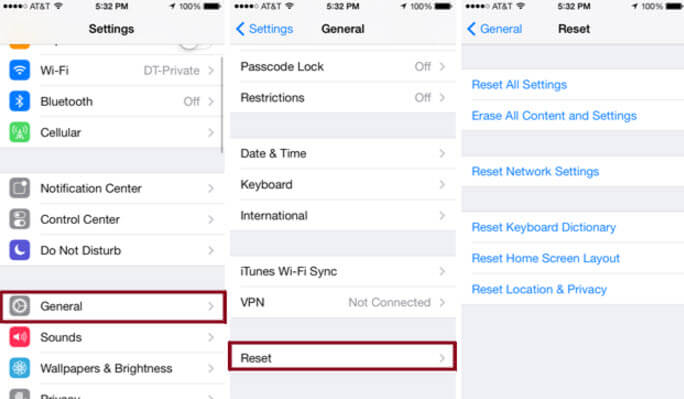
Now, if the problem still persists after doing all the methods above, then there might be a need for you to reset your iPhone’s factory settings. However, before doing this step, make sure that you have made a backup of all your data on your iPhone. You can use your iTunes or iCloud to backup your important data. Now, here is what you need to do to reset your iPhone to its factory settings.(1) Go to Settings> General> Reset
(2) Choose to Erase All Content and Settings.Doing this method will erase all of the data and the content of your iPhone device. This will actually remove all of the information that you have and as well as your settings from your iPhone. This method will make your iPhone good as new.
NOTE:
However, trying to restore your backup using your iTunes or iCloud can have a problem after resetting your iPhone to its factory setting.
But, you do not need to worry because we are going to introduce to you a tool that you can use for you to restore your backup or for you to restore deleted data from your iPhone device.
Since that we have mentioned that performing a factory reset will cause your iPhone to have a problem restoring your backup, we have here the right solution for you. All you need to have is the FoneDog Toolkit – iOS Data Recovery software. This program will allow you to recover any lost data from your iPhone device in three ways. It can recover your data using your iTunes Backup File, from your iCloud Backup File, or directly from your iPhone without a backup.The FoneDog Toolkit – iOS Data Recovery program has, of course, its key features that you can be sure of.
1. It is compatible with both a Windows or a Mac computer.
2. It is also compatible with any iOS device like iPhone, iPod Touch, and iPad.
3. It can help you recover your deleted photos, text messages, contacts, call logs, WhatsApp, Notes, and more.
4. It will allow you to preview your items first before you proceed with the recovery process.
5. It also provides a selective recovery for you to have a better result.Now, here is the guide with how you can use the FoneDog Toolkit – iOS Data Recovery program to recover your data.
Have the software downloaded from our website and then install it on your Mac or Windows PC. After that, go ahead and run the program and then choose iOS Data Recovery from the main interface of the program. Then, choose to Recover from iOS Device option.Make use of your USB cable and have your iPhone connected to your PC. Then, wait for the program to detect your iPhone device. Once that your iPhone has been detected, go ahead and click on the Start Scan button to continue.
Once that the scanning process is complete, the FoneDog Toolkit – iOS Data Recovery program will then show you all the recovered items from your iPhone device. On the left side of your screen, you will be able to choose the category such as text messages, contacts, photos, videos, and more. You can select from those categories one by one.
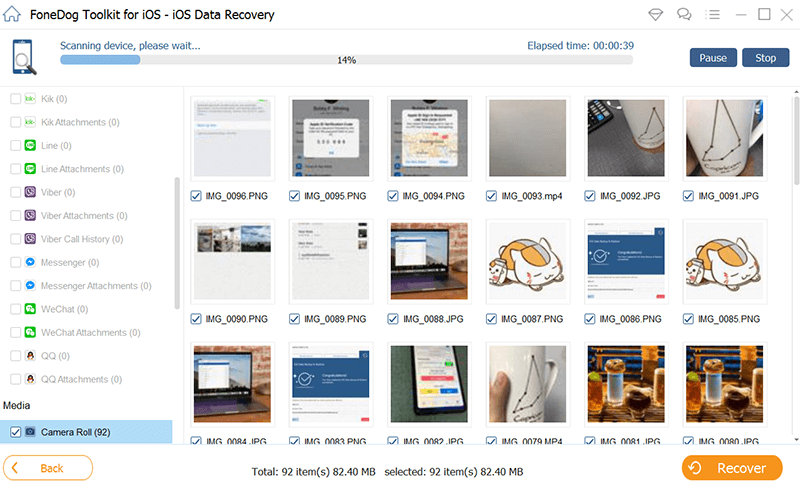
Scan and Preview Deleted Data from iPhone--Step2
You will be able to preview all the items that are in each category on the right side of your screen. You can choose the items that you want per category by marking them down. Once that you are satisfied with the items, go ahead and click on the Recovery button. All recovered items will be saved on a folder in your computer.
Recover Deleted Data from iPhone to Computer--Step3
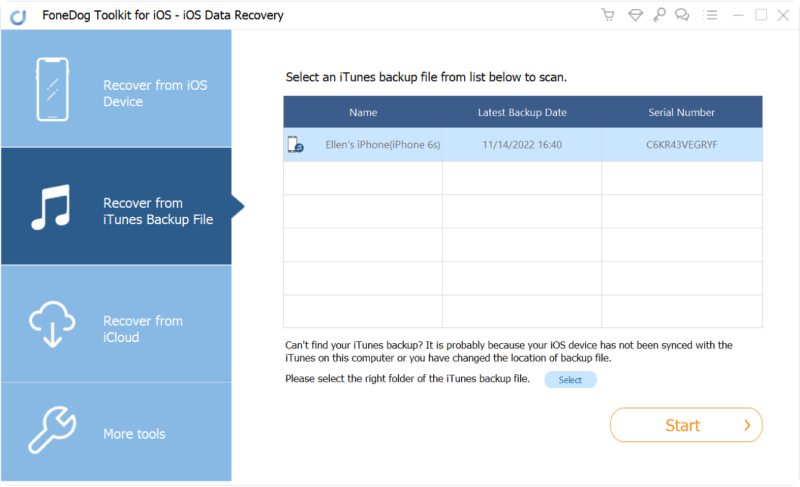
Just like the first one, go ahead and launch the program and then choose Recover from iTunes Backup File. Here, you have to make sure that you are using the same computer that you are using to back up your data to your iTunes. After that, connect your iPhone device using your USB cable.Once that you have connected your iPhone to your PC, you will then be able to see all your iTunes Backup File. Here, you just have to click on the desired backup file and then click on the Start Scan button.
Choose iTunes Backup and Begin Scanning--Step1
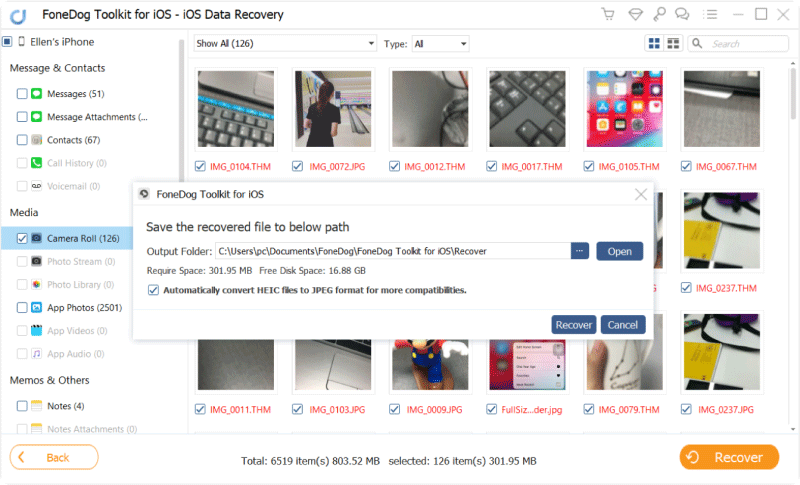
Once that the scanning, extracting, and the downloading process is done, the program will then show you your iTunes backup file. They will be displayed in a category. Choose the category from the left side of your screen and then choose the items that are in it from the right side of your screen.Once that you are sure of all the items that you want to get back, just go ahead and click on the Recover button.
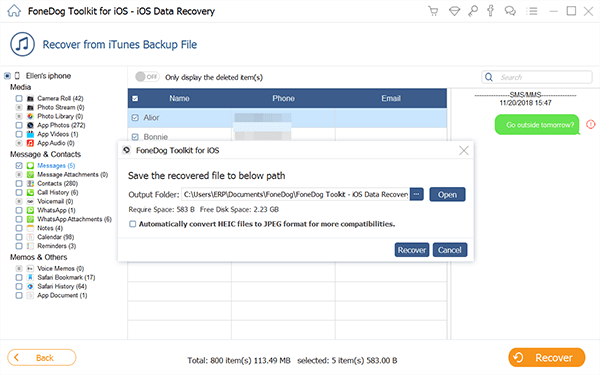
Preview and Retrieve Deleted Data from iTunes Backup--Step2
Go ahead and launch the program on your PC and then choose Recover from iCloud Backup File After that, it will ask you to sign in to your iCloud. All you have to do is enter your Apple ID and your password.
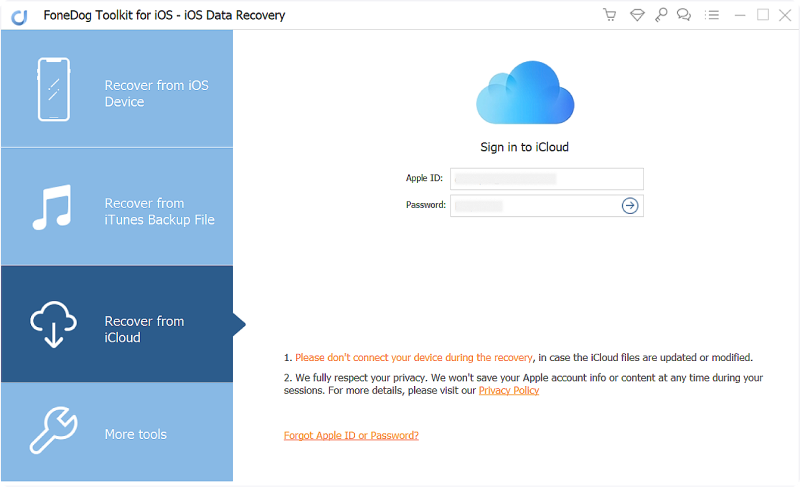
Choose iCloud Option and Sign in iCloud--Step1
Once that you are already logged in, the program will then show you a list of your iCloud backup file. All you have to do is to choose the desired backup file and then click on the Download button.Once that the download is done, you will then be able to see a pop-up window containing all the categories that the FoneDog Toolkit supports for recovery. All you have to do is to choose all the category that you want and then click on the Next button.
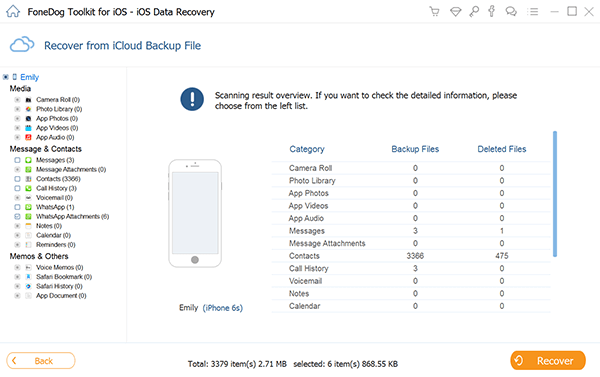
Select File Types and Download iCloud Backup--Step2
Then, after clicking on the Next button, the program will start scanning and extracting your iCloud backup. After scanning, it will then show you all the items that contain each category that you choose. Preview all the items and then have them restored to your computer.
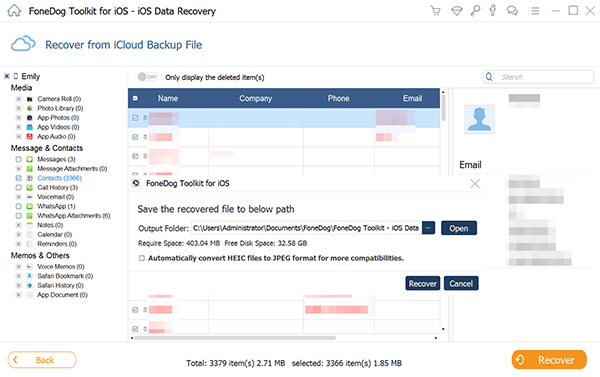
Preview and Recover Deleted Files to PC--Step3
Now, we have shown you here how you can fix the problem with your Sim card that is not detected by your iPhone. We have also shown you the best and effective way for you to recover your data from your iPhone in case that you have accidentally deleted them from your iPhone device. Make sure that you have the FoneDog Toolkit – iOS Data Recovery installed on your PC to ensure that you can always recover any items that are lost from your iPhone device.
Leave a Comment
Comment

Tech Website Writing /Content Optimization
Singing, smiling, surprising every day!
So as a technical writer, it is my duty to gather effective and reliable solutions to answer questions on how to deal with the issues they are having with their devices.
iOS Data Recovery
3 Methods to recover your deleted data from iPhone or iPad.
Free Download Free DownloadHot Articles
 /
/
INTERESTINGDULL
/
SIMPLEDIFFICULT
Thank you! Here' re your choices:
Excellent
Rating: 4.5 / 5 (based on 71 ratings)
