FoneDog Screen Recorder
FoneDog Screen Recorder
Special Offer
Special Offer


By Nathan E. Malpass, Last updated: September 11, 2018
I love using my iPhone to communicate with my family, friends, and co-workers. I use it to send text and email messages. But I’m having problems with the AutoCorrect feature of iPhone. It bothers me sending the right message. I want to turn off the AutoCorrect feature on my iPhone. How do I do this?
~iPhone User
In theory, the AutoCorrect feature is supposed to help users with sending the right messages.The AutoCorrect feature helps prevent typographical errors that make your message look unprofessional.It also makes it readable and understandable by eliminating these typos.However, the AutoCorrect feature sometimes causes more problems compared to solutions.It is common for people to send messages that are filled with unknown words due to this feature. This can cause embarrassing situations that no one wants to face.The AutoCorrect feature sometimes formulates words or phrases that don’t make any sense.So, how do you fix this? It’s simple. You just have to disable the AutoCorrect feature on your iPhone. Here’s how to do it.
Part I: Disable AutoCorrect Feature On Your iPhone.Part II: Recover Deleted Messages From Your iPhone.Part III: Conclusion.
People Also Read:
iPhone Photos Disappeared from Camera Roll.
How to Recover Deleted Text Messages on iPhone X
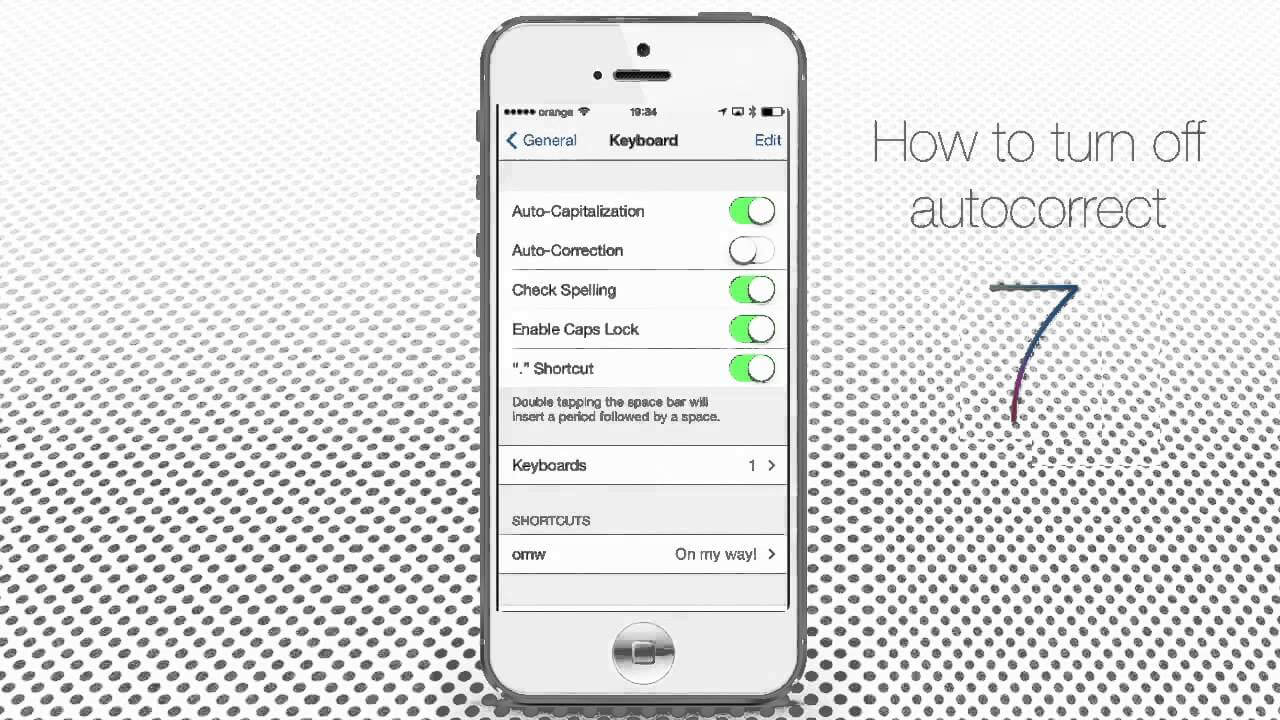
Step 1 - Go to iPhone’s Settings
Step 2 - Select General
Step 3 - From the options that you will see, select Keyboard
Step 4 - Find the slider named AutoCorrection and turn it off.
So, that’s how to disable the AutoCorrect feature on your iPhone. If you want to use it again, you can turn it on using the same steps above.
So, what do you do when some of your important messages suddenly get deleted? This usually happens. That’s why it would be helpful if you have backups of all the data you have on your iPhone.
But sometimes, you lose important messages you haven’t backed up before. What do you do in this case? Well, you have to use a data recovery tool.
One such tool we recommend is FoneDog’s iOS Data Recovery software. This helps you get your data back without causing any issues on your iPhone.
There are three ways to help you recover your deleted files. Let’s start with the first one.
You should download the FoneDog - iOS Data Recovery and install it afterwards. Open the software in your computer. Then, connect your iPhone to your computer. Choose “Recover from iOS Device.” Ater which, click “Start Scan.”
Here’s An Important Note: You should download iTunes latest version before you run FoneDog. Do not open iTunes when you are running FoneDog Toolkit to avoid automatic syncing. Or, you can actually disable automatic syncing in iTunes. Here’s how to do it:
-Launch iTunes
-Go To Preferences
-Go To Devices
-Then, check out “Prevent iPods, iPhones, and iPads from syncing automatically”
After you have pressed the “Start Scan” button, the software will start to scan your iPhone for lost or deleted files. The process might take a few minutes depending on the number of files in your Apple device.
After the scanning process is complete, the data found will be listed on the left side of the interface. You can preview these files one by one.
Note that if you have already found the file you’re searching for while the scanning process is ongoing, you can actually click the button named Pause to pause the process.
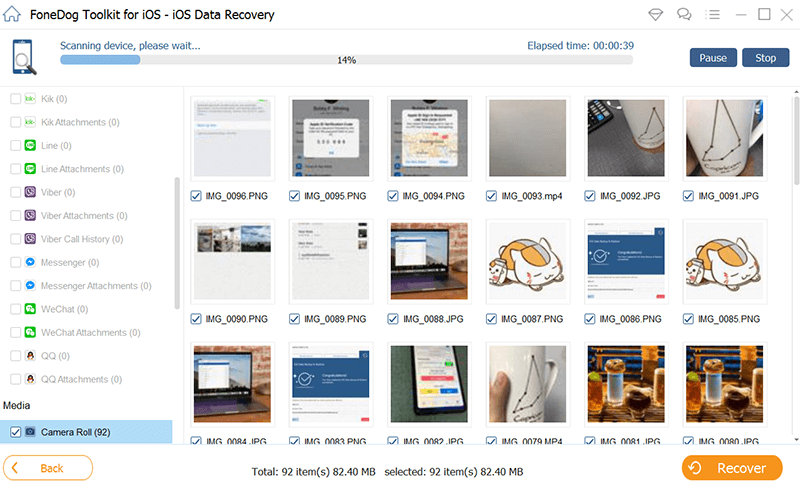
Scan and Preview Deleted Data from iPhone--Step2
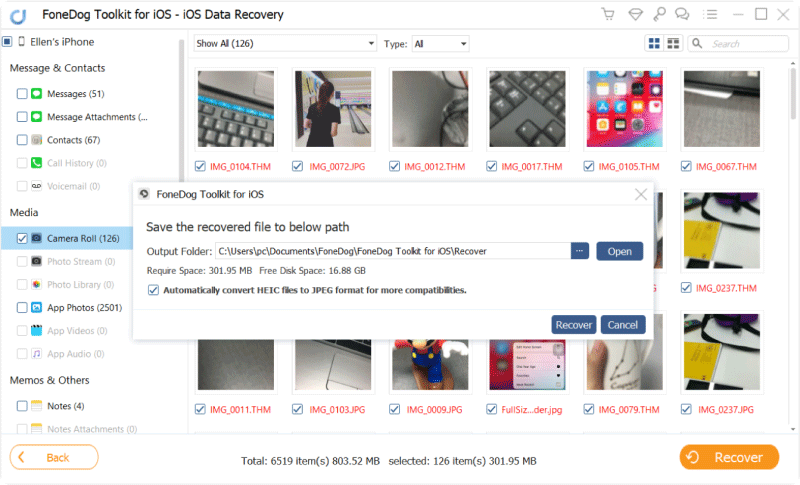
Now, you can select the specific files you want to restore. You can select all data or you can choose a few ones. Then, click Rthe ecover button. After which, select a path where you want the data to be placed. Then, select Recover again.
Recover Deleted Data from iPhone to Computer--Step3
Open FoneDog - iOS Data Recovery on your device. Select the option that states “Recover from iTunes Backup File.” The software will then detect every iTunes backup you have on your computer.
It will then be displayed on the screen. Choose the backup you need and then click Start Scan.
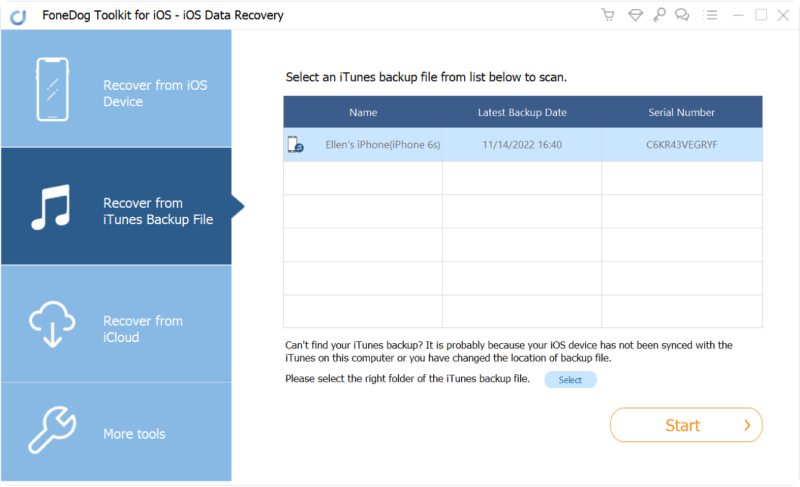
Choose iTunes Backup and Begin Scanning--Step1
The scanning process will take a few minutes of your time. Once it is complete, all scanned data will be shown in the left-hand side of the interface.
You can preview each of the data before you recover them. You can selectively choose or mark the data you want to recover or select all of them. Finally, click the Recover button located at the bottom of the screen.
You should select the path where you want the data to be placed. Then, click Recover again. Take note that there is also a search box in the results window. You can use this search box to type in a file name and search for it immediately.
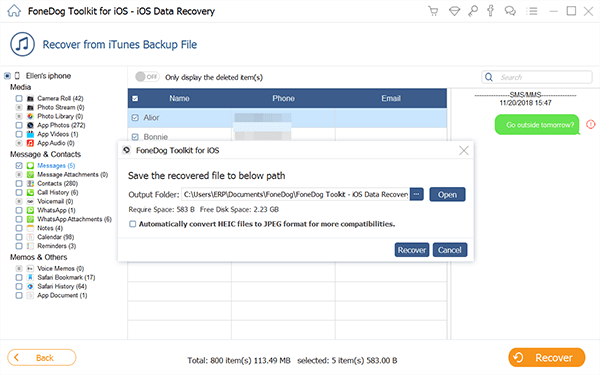
Preview and Retrieve Deleted Data from iTunes Backup--Step2
Open FoneDog - iOS Data Recovery. Then, select the mode “Recover from iCloud Backup File.” You will then see iCloud’s login interface.
Enter your Apple ID and your password. FoneDog ensures that your information is kept private. Your security is FoneDog’s main concern.
Important Note: If two-factor authentication or two-step verification is enabled on your Apple device, you have to turn it off so you can access iCloud with FoneDog.
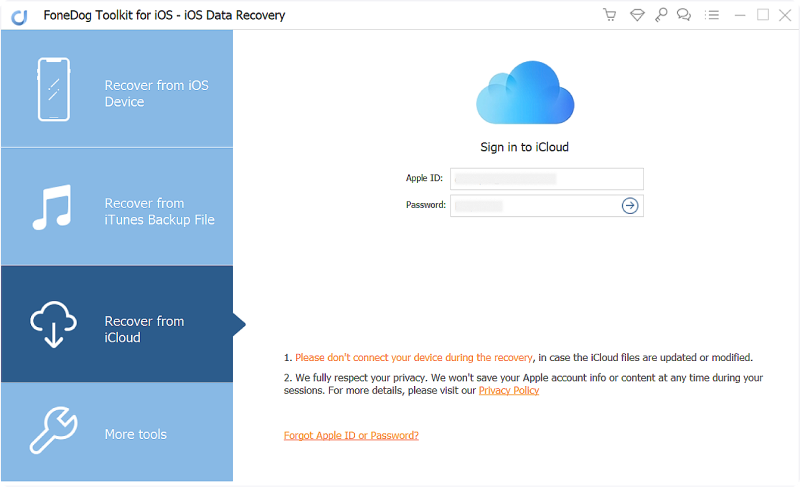
Choose iCloud Option and Sign in iCloud--Step1
After you have logged into iCloud, the software will now find every iCloud backup file located in your account. Choose the backup you wish to recover data from and then click the Download button.
Take note that in the pop-up window, you can actually select the file types you wish to download. This reduces the time necessary to download the iCloud backup file.
Click Next to begin the iCloud data scanning process. It takes a few minutes for the process to be complete. Just wait for it.
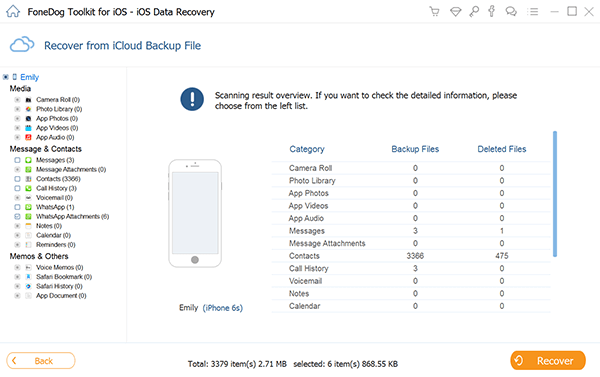
Select File Types and Download iCloud Backup--Step2
Once the scanning process is completed, you should preview the data within your iCloud’s backup file. Select some or all of the data you want to recover. Then, click the Recover button. Select the path where you want it to be restored. Then click Recover again.
Note: In the option named “Recover iCloud Backup File,” connecting your Apple device to your computer is not necessary. However, you have to keep your Internet connection open to be able to download the backup files.
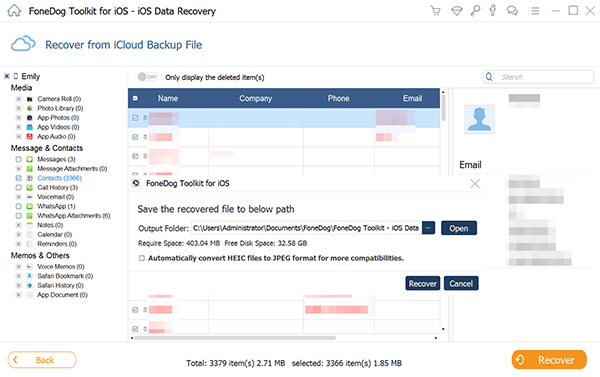
Preview and Recover Deleted Files to PC--Step3
The AutoCorrect feature can be useful. But most of the time, it just leads to messages that doesn’t make sense. Turning it off is one way to disable it.
You can easily do it through your iPhone’s interface. Sometimes though messages get deleted. Once this happens, you can use a tool such as FoneDog’s iOS Data Recovery to recover your messages in three different ways.
Leave a Comment
Comment

iPhone/Android Devices’ Maintenance Expert
Staying home, listening to music, writing tech articles
Many people asked me to repair their mobile phones so I have a lot of experience in mobile phone repair, and I know a lot about Android or Apple phones.
iOS Data Recovery
3 Methods to recover your deleted data from iPhone or iPad.
Free Download Free DownloadHot Articles
 /
/
INTERESTINGDULL
/
SIMPLEDIFFICULT
Thank you! Here' re your choices:
Excellent
Rating: 4.6 / 5 (based on 74 ratings)
