FoneDog Screen Recorder
FoneDog Screen Recorder
Special Offer
Special Offer


By Adela D. Louie, Last updated: November 8, 2021
Does your iPhone won’t turn on after you have updated your device? If so, then read this as we are going to show you how you can fix it when iPhone won’t turn on after the update.
So read this post and you will be able to know more on how you can fix it when iPhone won’t turn on after update. And also some other things that you need to know regarding this concern. Read through this and you will never go wrong, and you will not regret a single thing.
Part 1. Reasons Why iPhone Won’t Turn On After Update Part 2. What To Do When iPhone Won’t Turn On After Update Part 3. The Best Way to Fix When iPhone Won’t Turn On After Update Part 4. Conclusion
Of course, there are some reasons as to why this happens to your iPhone device. And with that, here are some of the possible reasons.
Now, if you are having trouble with your iPhone won’t turn on after update, then here are the simplest ways on how you can fix it. All you have to do is to follow try them one by one and see which one will work on your iPhone.
The first thing that you should try when iPhone won’t turn on after update is to try to plug your device into a power source. This is because as we have mentioned earlier when your iPhone is doing an update, it tends to also use the battery life of your iPhone. This is the reason why you might want to try to plug it into a power source and see if it will charge. Then try to turn it on if it will work. If not, then you can move to the other solutions below.
Another way on how you can solve when iPhone won’t turn on after update is by doing a force restart on your iPhone. And this depends on the model of your iPhone. And with that, here are the steps on how you can force restart your iPhone when it won’t open after an update.
However, force restart can sometimes cause data during the process, you might want to click here if that happens.
Force restart on iPhone 7 and iPhone 7 Plus
What you only need to do is to press and hold the power button and the volume down at the same time. And then, release both buttons once that you see the Apple logo on your screen.
Force Restart on iPhone 8 and Later with Face ID
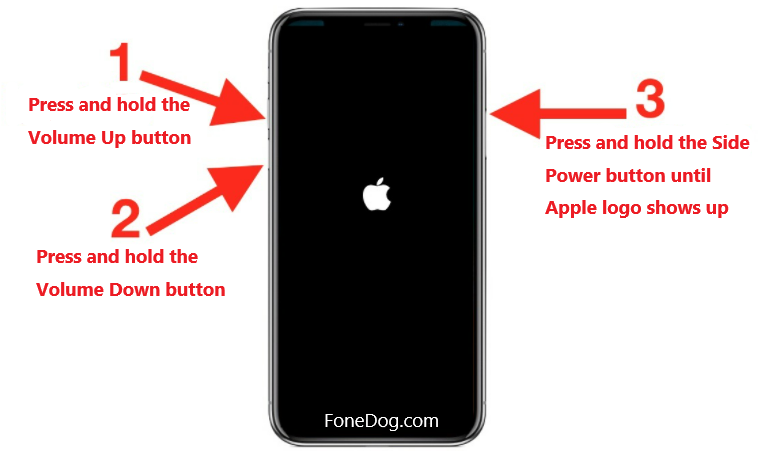
Press the Volume Up button and then press the Volume Down button. After that, go ahead and press and hold the Power or Side button. And once that you see the Apple logo on your screen, release the buttons.
Force Restart on iPhone 6s, SE and earlier and iPad with Home Button
Press and hold the Home and the Top button at the same time. And then release both buttons once that you see the Apple logo on your screen.
Once that the firmware of your iPhone is unfortunately corrupted, then what you will be needing to do is to have your iPhone be restored for you to fix when your iPhone won’t turn on after update. And with that, here is what you will be needing to do.
If the three solutions above did not work out and your iPhone still won’t turn on after update, then there is still one way on how you can fix it. And this is by doing a restore on iPhone using the DFU Mode of your iPhone. This is somehow the same as the recovery mode but this one processes deeper and has the advantage to solve some difficult problems on your iPhone. But before you go ahead and try this method, there are things that you also need to make sure of.
Once that you have already ensured the above requirements, go ahead and follow the steps below depending on what type of iPhone you are using.
For iPhone 6, iPhone 6S, iPhone 6 Plus, and Earlier with Home Button
For iPhone 8, iPhone 8 Plus, iPhone X, iPhone XS, XS Max, XR, 11, and 12 with Face ID
For iPhone 7, and iPhone 7 Plus
The solutions that we have given you above can be done one after the other. If the first one will not work for you, then you can try the others. This can be said as a trial and error. So you can do any of the solutions so you would know which one can help you fix the iPhone won’t turn on after update issue.
Now that you are able to know some of the basic solutions that you can apply when your iPhone won’t turn on after update, here we are going to show you one more way on how you can fix this. And this is actually the most convenient way and the most effective way on how you can do so. And this is done by using the FoneDog iOS System Recovery.
iOS System Recovery
Fix with various iOS system issues like recovery mode, DFU mode, white screen looping on start, etc.
Fix your iOS device to normal from white Apple logo, black screen, blue screen, red screen.
Only fix your iOS to normal, no data loss at all.
Fix iTunes Error 3600, Error 9, Error 14 and various iPhone Error codes
Unfrozen your iPhone, iPad and iPod touch.
Free Download
Free Download

The FoneDog iOS System Recovery is one of the most reliable tools that iOS users go to when they are trying to fix some problems on their iPhone. It is because the FoneDog iOS System Recovery tool can help you bring back your iPhone into the normal state without the fear of losing any of your data saved on your device. This includes when your iPhone gets errors such as iTunes error code, and even when your iPhone is stuck on recovery mode.
The FoneDog iOS System Recovery is also an easy-to-use tool because it comes with an easy-to-follow interface. This makes every user able to finish their task easily. And also, this is a very safe-to-use tool as this will not delete any of your existing data on your iPhone. And with that, here are the steps that you need to follow for you to be able to solve your problem with your iPhone.
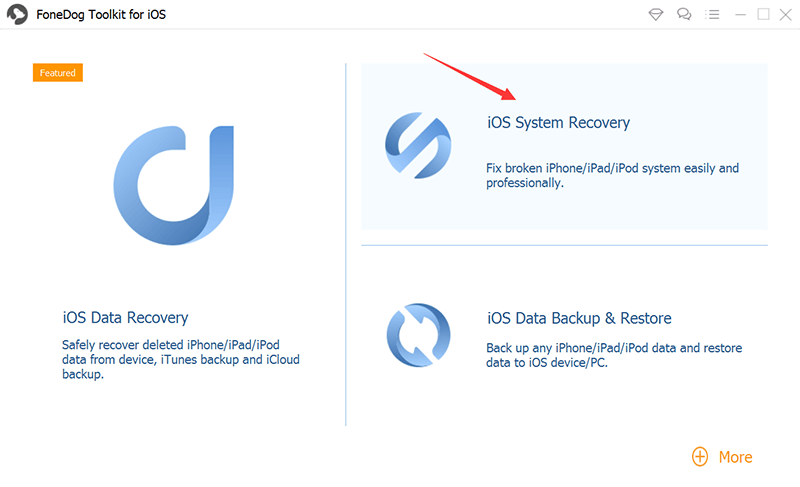
Step 1. Open FoneDog iOS System Recovery and Select an Option
After you have downloaded and installed the FoneDog iOS System Recovery on your computer, go ahead and launch it. And then, have your iPhone be connected to your computer using your USB cable. And then, on your screen please choose iOS System Recovery.
Step 2. Choose iPhone Problem
After you have chosen an option, you will be able to see other categories on your screen. And from there, go ahead and choose the problem you are having with your iPhone. And after choosing the problem of your iPhone, go ahead and click on the Start button below your screen.
Step 3. Confirm the Firmware Download
For you to be able to fix the problem of your iPhone, you will then be prompted to download the firmware. And this is a must for you to do as this is the main requirement needed to fix your iPhone. The FoneDog iOS System Recovery will also provide you with the latest iOS version of your device that you can download. All you have to do from here is to click on the Download button and wait for the process to complete.
Step 4. Process Complete
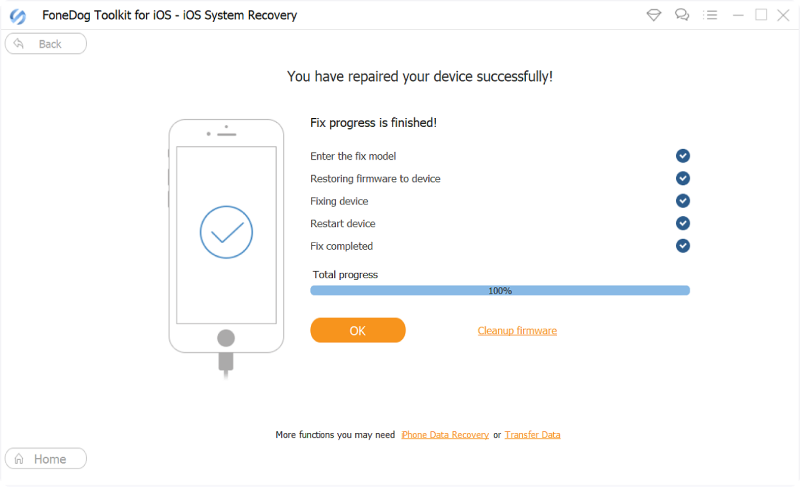
After that the pairing is all done, the FoneDog iOS System Recovery will then give you a notification when the process is complete. However, you cannot still unplug your iPhone from your computer. You have to wait for your iPhone first to reboot and turn back on. And once that your iPhone is up and running, then that will be the only time that you can disconnect your iPhone from your computer.
We all know that there are indeed a lot of iPhone users that are suffering from the problem when the iPhone won’t turn on after the update. That is why we have come up with some solutions that you can apply on your end for you to fix this problem. And as you can see, the solutions that we have for you above are pretty much easy to follow, and that you can do it on your own without any hassle.
And of course, aside from the solutions that we have shown you, there is also one tool that you can use to fix any problems that you have on your iPhone and that includes when your iPhone won’t turn after update. And that is by using the FoneDog iOS System Recovery. This tool, it can help you fix your iPhone without any hassle. And that you will not have to worry about the data that you have on your iPhone because they will not be deleted in any way. And that your data will be kept safe no matter what.
People Also ReadTroubleshooting 101: How to Fix Errors in iTunes When Update or Restore iPhone[Fixed] How to Unlock Disabled iPhone Without iTunes in 2020
Leave a Comment
Comment

Tech Website Writing /Content Optimization
Singing, smiling, surprising every day!
So as a technical writer, it is my duty to gather effective and reliable solutions to answer questions on how to deal with the issues they are having with their devices.
iOS System Recovery
Repair various iOS system errors back to normal status.
Free Download Free DownloadHot Articles
 /
/
INTERESTINGDULL
/
SIMPLEDIFFICULT
Thank you! Here' re your choices:
Excellent
Rating: 4.5 / 5 (based on 86 ratings)
