FoneDog Screen Recorder
FoneDog Screen Recorder
Special Offer
Special Offer


By Gina Barrow, Last updated: August 16, 2022
Who’s not excited to use a new iPhone? If this is the first time you use an iOS, navigating through this device might seem confusing at a first glance. You might end up more confused about how to get started with it.
Your first step is to pack everything up on the old device, regardless of the operating system, and create a backup. Once you have created a backup, you can restore it anytime.
Fortunately, there are many helpful posts and videos that you can follow on how to transfer backup to new iPhone including migration from Android to iOS. Also, you can learn how to transfer your contacts from your iPhone to iPad.
Let this article be your guide!
Part #1: Use Quick Start to Transfer Data to a New iPhonePart #2: Restore Your iCloud Backup to The New iPhonePart #3: Make Use of iTunes or Finder Backup and RestorePart #4: The Most Recommended Method on How to Transfer Backup to New iPhonePart #5: Summary
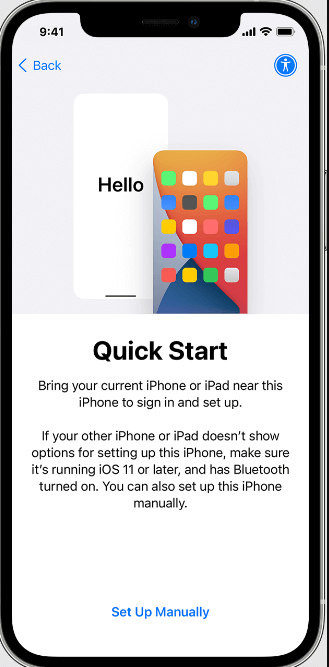
Whether you like to know how to transfer backup to new iPhone, Quick Start is your ultimate choice. This is a built-in feature that you can utilize in iOS 11 and up. You simply need to have both phones ready for the Quick Start to work.
Follow this guide on how to use Quick Start:
The transfer times range on the network conditions and the total amount of data being transmitted.
There is another wireless option on how to transfer backup to new iPhone, and that is to use iCloud. If you don’t have a computer to use for backup, iCloud is the most feasible option for you.
But before you can restore your iCloud backup to the new iPhone, you first need to create a backup on the current device. If you have turned on the iCloud on your current device, it will automatically back up all your data or features you have turned on.
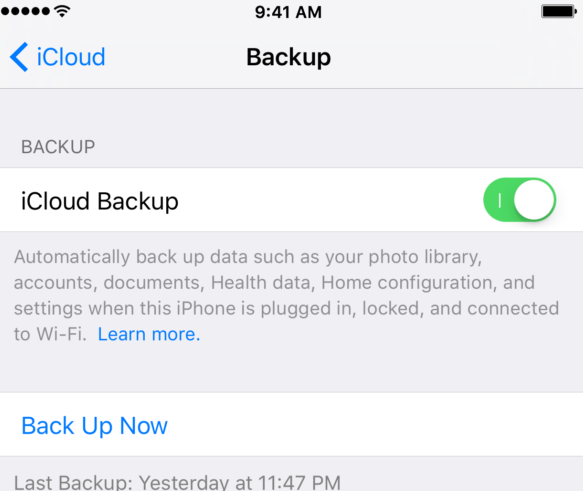
iCloud will then back up your phone once it is plugged into a power source, the screen is locked, and connected to Wi-Fi.
Now that you have an iCloud backup, it’s time to restore it to the new iPhone to start using.
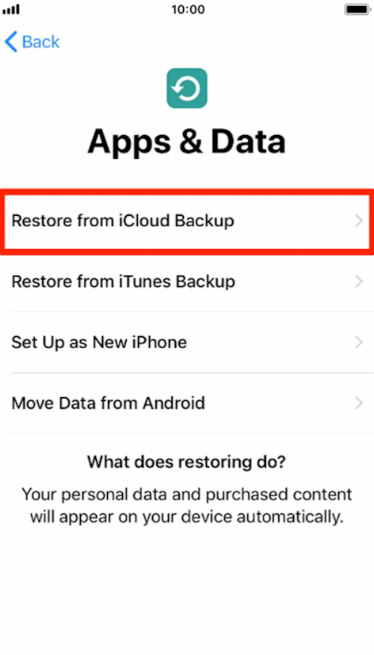
Keep your new phone connected to the internet until the restoration is complete. All your purchased items and downloads will be restored on the new iPhone. If needed, plug your new iPhone into a power source.
Since iCloud has limited storage, you might have issues with deleting old backups to free up some space, unless you purchase an upgrade. However, iTunes, on the other hand, lets you back up your data without having to worry about storage issues.
It’s the only kind of messy to work around but iTunes, which has been replaced recently by Finder is still a better content management tool in iOS.
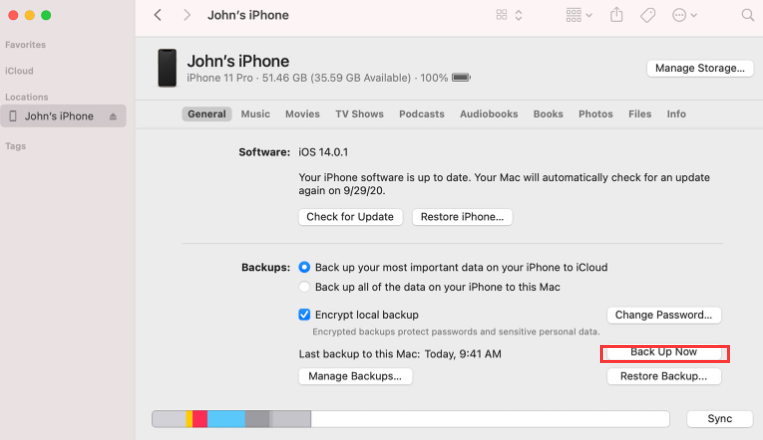
Both options, iTunes or Finder let you back up with encryption if you prefer to set a password. Just click the option Encrypt Backup and provide your password.
Now that you have backed up your old iPhone to iTunes/Finder, follow this guide on how to transfer backup to new iPhone:
Do not disconnect your new iPhone yet until the restoration is complete.
iCloud and iTunes are excellent backup storage but, you need to restore the entire backup content to the new iPhone. There is no option to choose which files to restore only.
You see, not everything in the backup is important and in most cases, you will only end up accumulating more unnecessary data on the new iPhone. We recommend that you use FoneDog Phone Transfer.
Phone Transfer
Transfer files among iOS, Android and Windows PC.
Transfer and backup text messages, contacts, photos, video, music on computer easily.
Fully compatible with the latest iOS and Android.
Free Download

This is a comprehensive transfer and content management software that lets you take control of the data you want to carry over on your new device. FoneDog Phone Transfer has a variety of features to use:
Here’s how to transfer backup to new iPhone using FoneDog Phone Transfer.
Other features of FoneDog Phone Transfer include one-click Contacts backup and restore, uninstall unwanted files, HEIC converter, ringtone maker, and more. Make sure to register for our FoneDog Phone Transfer!
People Also ReadBest Guide On How To Transfer GoPro Videos To iPhoneThe Best Guide On How To Transfer MP4 To iPhone
Now that you have learned how to transfer backup to new iPhone, you can complete setting up your device and use it right away.
We have listed 4 quick and easy methods that you can use to make your transfer smoother; it’s all up to you what methods you wish to try.
Among these options, FoneDog Phone Transfer is so far the most efficient since it provides you with better transfer options.
Leave a Comment
Comment

Technical/Creative Writer
Kitchen, my safe space; black, my favorite color
Was a Technical Specialist for a while, troubleshooting Smartphone and Software-related issues until a writing stint caught my attention.
Phone Transfer
Transfer data from iPhone, Android, iOS, and Computer to Anywhere without any loss with FoneDog Phone Transfer. Such as photo, messages, contacts, music, etc.
Free DownloadHot Articles
 /
/
INTERESTINGDULL
/
SIMPLEDIFFICULT
Thank you! Here' re your choices:
Excellent
Rating: 4.7 / 5 (based on 97 ratings)
