FoneDog Screen Recorder
FoneDog Screen Recorder
Special Offer
Special Offer


By Gina Barrow, Last updated: October 26, 2021
“My entire iTunes music library did not transfer over from my iPhone 13. Any idea why my music is not transferring to iPhone? I need to move them ASAP. Thanks”
Who doesn’t love to hear their favorite songs on their phone? Of cause it is frustrating when you cannot move your favorite songs to your iPhone.
If you are using iTunes and you are stuck with music not transferring to iPhone, then this article is for you. In this guide, we will show you some tips on how you can rectify this issue. Find out the different solutions we offer!
Tip# 1 Updating iTunesTip# 2 Disabling iCloud Music LibraryTip# 3 Turning Off iTunes MatchTip# 4 Checking your Device StorageTip# 5 Turning on Manually Manage Music and Videos in iTunesTip# 6 Using iTunes Alternative to Transfer your Music to iPhoneSummary
If you have just opened your iTunes for manual music transfer then it could be that your iTunes is outdated. Sometimes, iTunes fails to execute your requests due to incompatible software versions.
What you can do is simply check for updates and if there is an available version, follow the steps to download and install it.
Here’s how you can check for the latest iTunes Update:
You need to manually update your iTunes on your Mac to ensure that it is running at its optimum. If you are using iTunes for Windows and have downloaded it from the Microsoft Store, then it will automatically check for updates and install them once it is available.
After updating iTunes, retry transferring your music to the iPhone and see if your music still not transferring to your iPhone.
iOS users can only choose iTunes or iCloud music library and not both. If your music is not transferring to your iPhone while using iTunes or if you are subscribed to Apple Music, it could be because your iCloud Music Library is on.

Do the following to disable iCloud Music Library:
Pro Tip: If you disable the iCloud Music Library, your Apple Music songs will be deleted from the device. If you want to keep your songs, then turn off the iTunes Match instead. See the steps on the next tip.
iTunes Match gives you access to all of your music on all iDevices and even those songs that you have transferred from other sources. However, sometimes it is the reason why your music not transferring to your iPhone.
This feature uploads your Music Library from Apple Music on Mac or iTunes on Windows on your PC. You can turn off iTunes Match using the following:
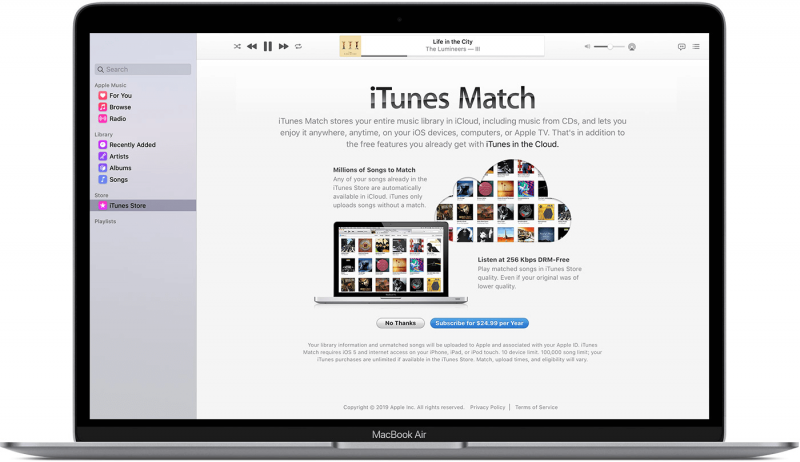
You can also cancel your iTunes Match subscription on your iPhone, by doing these steps:
iPhones are designed to have bigger internal storage than most Smartphones out today. However, if you are a music lover, that high-resolution music will take all of your device storage before you know it. Learn how to manage device storage is very essential for keeping your iPhone run smoothly.
Perhaps another reason why your music is not transferring to iPhone from iTunes is that you have not turned on the option “Manually Manage Music and Videos”.
Simply open your iTunes and connect your iPhone via USB. From the Summary pane, scroll down to the bottom part and choose Options. Tick the box beside Manually manage music and videos.
There is a better alternative in case your music is still not transferring to iPhone. There are plenty of third-party tools out there that can help you move these songs at a glance.
Phone Transfer
Transfer files among iOS, Android and Windows PC.
Transfer and backup text messages, contacts, photos, video, music on computer easily.
Fully compatible with the latest iOS and Android.
Free Download

The most recommended software so far is FoneDog Phone Transfer. This is an all-in-one solution when it comes to moving music, messages, pictures, contacts, and more.
FoneDog Phone Transfer gives you access to all your media files without restrictions. It lets you move files between iOS devices to another platform. Let’s say that you have downloaded and saved your new songs on the computer and wanted to transfer them to your iPhone, you can use this program to save you from more frustrations.
To learn more about FoneDog Phone Transfer, follow these steps:
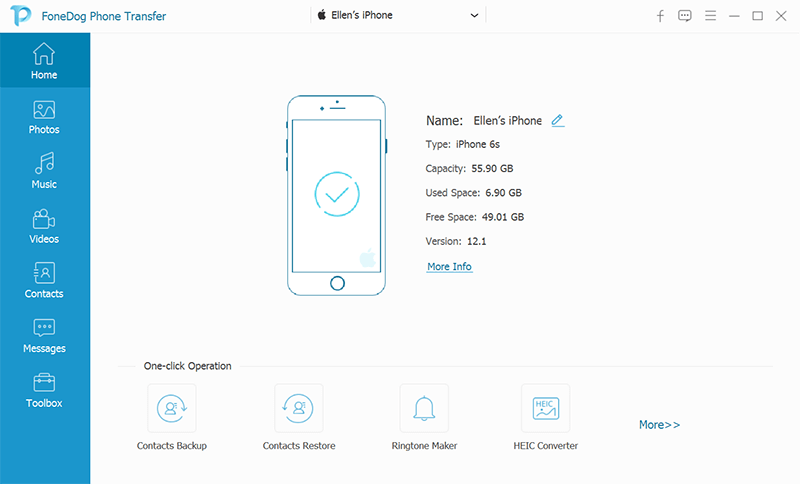
FoneDog Phone Transfer lets you safely move your music from different sources to your iPhone. It features the following:
There you have it; in this article, we delved into the various ways on how to fix the music not transferring to iPhone issue. If you notice, the key to successful transfers is understanding your music source and ensuring that all the settings are correct.
You can use Apple Music, iTunes Match, and other music platforms, however, each of these sources has its own steps and configuration for you to be able to enjoy listening online or offline. We have dedicated 5 tips on how to rectify the music transfer problem. Any of these solutions can already resolve the issue.
The best solution you can use is FoneDog Phone Transfer. This software provides all the necessary media transfers needed for iOS user to enjoy their devices to the fullest! Have you resolved this issue yet? What steps have you taken so far? Let us know in the comments below.
People Also ReadA Comprehensive Guide on Free iPod Music DownloadsA Complete Guide On How To Fix Corrupted Music Files
Leave a Comment
Comment

Technical/Creative Writer
Kitchen, my safe space; black, my favorite color
Was a Technical Specialist for a while, troubleshooting Smartphone and Software-related issues until a writing stint caught my attention.
Phone Transfer
Transfer data from iPhone, Android, iOS, and Computer to Anywhere without any loss with FoneDog Phone Transfer. Such as photo, messages, contacts, music, etc.
Free DownloadHot Articles
 /
/
INTERESTINGDULL
/
SIMPLEDIFFICULT
Thank you! Here' re your choices:
Excellent
Rating: 4.6 / 5 (based on 104 ratings)
