FoneDog Screen Recorder
FoneDog Screen Recorder
Special Offer
Special Offer


By Gina Barrow, Last updated: September 8, 2021
“My iPod is handy when it comes to playing my favorite songs. I want to listen to them even when working. I wonder how I can transfer iPod Music to Mac so I can listen any time.”
You know someone is a hardcore music lover when they carry an iPod anywhere. Music has a special part in our lives and it does change or set the mood to get through a rough week. Over time, we have created the playlists that we play on and on.
These songs can be played on your iPod, iPhone, and even Mac. But if you wanted to share your favorite beats across your iOS devices, then perfect! You can share playlists from your iPod to another device like Mac.
Let this article be your guide on how to transfer iPod Music to Mac in 5 different ways.
Part 1. Transfer Music from iPod to Mac without iTunesPart 2. How to Transfer Music from iPod to Mac via iCloud Music LibraryPart 3. Transfer Music from iPod to Mac with iTunesPart 4. How to Transfer Music from iPod to Mac by AirDropPart 5. How to Transfer Songs from iPod to Mac with Finder
Newer macOS does not recognize iPod as a storage device so you might have a hard time transferring your iPod music to Mac. The latest macOS Catalina does not have iTunes so your iPod does not even show up on Finder as a storage device.
This can be confusing if you have been using iTunes for content management. Luckily, you still have other means to move your playlists from the iPod.
If you own a recently upgraded Mac, then your next option to transfer iPod music to Mac is by using third-party applications.
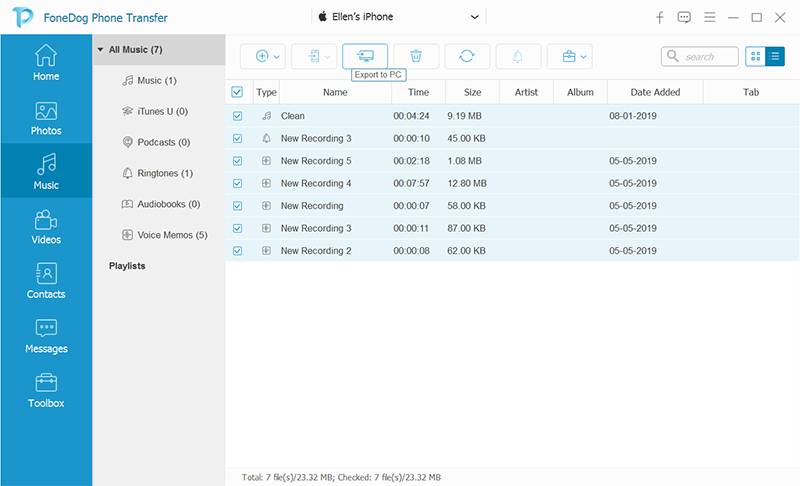
FoneDog Phone Transfer provides a seamless transfer from your iPod down to Mac without the need for your iPod to be recognized as a storage device. It automatically detects the music player and lets you do content management.
Phone Transfer
Transfer files among iOS, Android and Windows PC.
Transfer and backup text messages, contacts, photos, video, music on computer easily.
Fully compatible with the latest iOS and Android.
Free Download

Here is how you can use FoneDog Phone Transfer to get the groove on your Mac:
Apart from music, you can also utilize this software to transfer other files including photos, videos, contacts, and many more. What’s even greater is that FoneDog Phone Transfer is able to transfer files across different operating systems. That means it can help you transfer music from Windows or Mac computer to iPhone, or from Android to iOS, and so on.
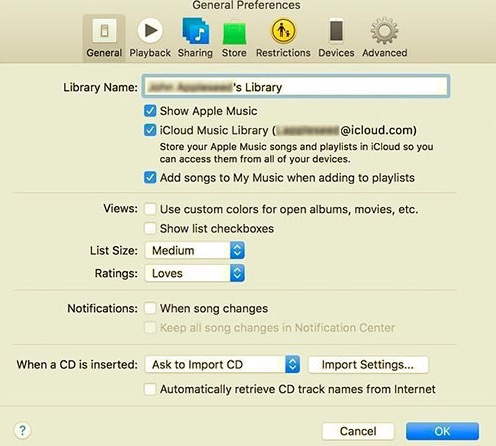
The iCloud Music Library is another way to transfer iPod music to Mac if you are an Apple Music subscriber. By paying $9.99 monthly, you will be able to download songs, playlists, albums, and video content from the Apple Music catalog to your own music library.
You can enjoy seamless music streaming across devices once you turn on the iCloud Music Library. It only needs one Apple ID to sign in on iDevices. This feature, however, is only feasible if you are subscribed to Apple Music.
Follow the steps below on how to transfer your iPod Music to your Mac via the iCloud Music Library:
All your playlists and songs from the iPod will be synced automatically with your Mac.
Old school methods never grow old, or so they say and iTunes is here to prove that. iTunes has played a huge part in data migration since I knew about Apple.
Today, iTunes is still going strong and has been competitive with offering its latest updates. If you own a Mac with iTunes, then for sure, you know the drill.
Here’s a refresher on how you can transfer iPod music to Mac using iTunes:
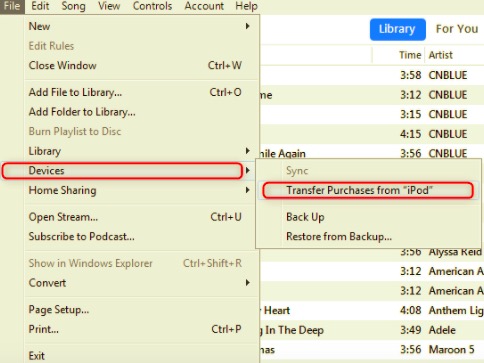
Your purchased songs will be merged automatically from your iPod to iTunes. If you encounter errors during the transfer such as iPod not syncing with iTunes, you can look through these possible causes:
If first time connecting the iPod to Mac, then make sure that you have clicked or tapped “Trust” on both devices.
You might wonder how do I transfer music from iPod to Mac without software? Then Airdrop is a good choice. Airdrop is the easiest way when transferring just a few beats from iPod to Mac. You don’t have to do a lot of stuff on both devices. This option is available on iDevices running on iOS 7 or later and OS X Yosemite on Mac.
Now apart from the software version, you should also consider the range of both devices. They should at least be near each other to be able to use Airdrop. Another thing is that they should be connected to the same network. (This may not be true to all instances but better be sure)
Follow these steps to airdrop some songs:
Although Airdrop is quick and easy, there are still a few limitations that you should consider.
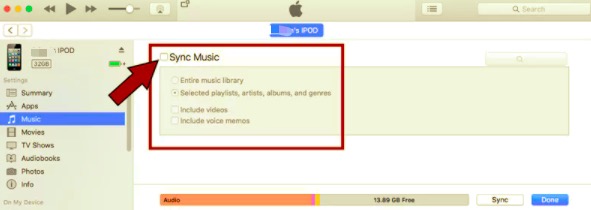
Lastly, you can transfer iPod music to Mac with Finder. Finder is the latest content management of macOS that lets you organize everything from docs to photos, and down to the music.
It’s basically the one-stop place on your Mac in case you are searching for something. In case your iPod is not recognized in Finder, you can connect your iPod to Mac and go to your Mac’s Preferences, click Sidebar at the top. Confirm if the "CDs, DVDs, and iOS Devices" box is checked.
Go to System Information from the Apple menu, open the list and select USB. Verify if your iPod is listed on the USB Device Tree.
Once good to go, check out these steps on how to use Finder to transfer music from the iPod:
People Also Read3 Ways on How to Transfer Music from iPhone to ComputerHow to Transfer Music from iTunes to iPhone
Based on the options above, you can easily transfer iPod music to Mac even if you don’t have any technical experience. Simply choose the method that seems easiest to you and follow the instructions.
FoneDog Phone Transfer is perhaps the easiest, safest, and flexible when it comes to transferring files in between devices such as your iPod and Smartphone. All you need is to download and install the software on your computer. It does a lot more than you expect!
Leave a Comment
Comment

Technical/Creative Writer
Kitchen, my safe space; black, my favorite color
Was a Technical Specialist for a while, troubleshooting Smartphone and Software-related issues until a writing stint caught my attention.
Phone Transfer
Transfer data from iPhone, Android, iOS, and Computer to Anywhere without any loss with FoneDog Phone Transfer. Such as photo, messages, contacts, music, etc.
Free DownloadHot Articles
 /
/
INTERESTINGDULL
/
SIMPLEDIFFICULT
Thank you! Here' re your choices:
Excellent
Rating: 4.8 / 5 (based on 85 ratings)
