FoneDog Screen Recorder FoneDog Screen Recorder
Special Offer Special Offer
Only Only
$4.49 $4.49
to get a ONE-month license to get a ONE-month license
Sale ends in xx days Sale ends in xx days
Buy Now
sale

Effortless Ways to Transfer iPhone Photos to iPad

By Nathan E. Malpass, Last updated: May 7, 2024

From spontaneous snapshots to meticulously composed shots, images hold stories that deserve to be shared and enjoyed across all our devices. If you're an avid iPhone photographer who also owns an iPad, you might find yourself wondering how to effortlessly transfer iPhone photos to iPad.

Whether it's to showcase your latest creations on a larger screen or to keep your memories in sync, this article is your ultimate guide to achieving seamless photo transfers between these two Apple devices.

Gone are the days of manually emailing photos or using third-party apps with complex interfaces. Apple's ecosystem offers a range of convenient methods that ensure your photos are securely and rapidly transferred without compromising quality.

In the sections below, we'll explore various techniques, each catering to different preferences and situations. Whether you're a fan of wireless solutions or prefer a wired approach, there's a method that suits your needs perfectly. Join us as we dive into the world of effortless photo transfers, enabling you to enjoy your snapshots on the stunning display of your iPad in no time.

Part #1: How to Transfer iPhone Photos to iPadPart #2: The Best Tool to Transfer iPhone Photos to iPad: FoneDog Phone TransferConclusion

Part #1: How to Transfer iPhone Photos to iPad

Method #1: Using AirDrop

When it comes to seamless and wireless photo transfers between Apple devices, AirDrop takes center stage. This built-in feature lets you effortlessly send photos from your iPhone to your iPad with just a few taps. Here's how to make use of AirDrop to transfer iPhone photos to iPad:

  1. Enable Bluetooth and Wi-Fi: Ensure that both your iPhone and iPad have Bluetooth and Wi-Fi turned on. AirDrop uses a combination of these technologies to establish a secure connection between devices.
  2. Access Control Center: On your iPhone, swipe down from the top-right corner to open the Control Center. Here, you’ll find the AirDrop icon nestled within the connectivity options.
  3. Choose Recipients: Tap the AirDrop icon to reveal a menu with visibility options. You can choose to make your device discoverable to everyone nearby or only to your contacts. Select “Contacts Only” for added privacy.
  4. Select Photos: Navigate to the Photos app on your iPhone and open the album containing the photos you want to transfer.
  5. Tap “Select”: In the top-right corner of the album, tap “Select” and choose the photos you wish to send to your iPad. Selected photos will have a blue checkmark.
  6. Tap “Share” and AirDrop: With the photos selected, tap the “Share” button (it looks like an upward-pointing arrow) and a list of sharing options will appear. Select the iPad’s name from the AirDrop section.
  7. Accept on iPad: A notification will appear on your iPad, showing the photos being sent. Accept the incoming request, and the selected photos will be transferred to your iPad.
  8. Check Photos: Once the transfer is complete, open the Photos app on your iPad to find the received images in your “Recently Added” album.

Transfer iPhone Photos to iPad Using AirDrop

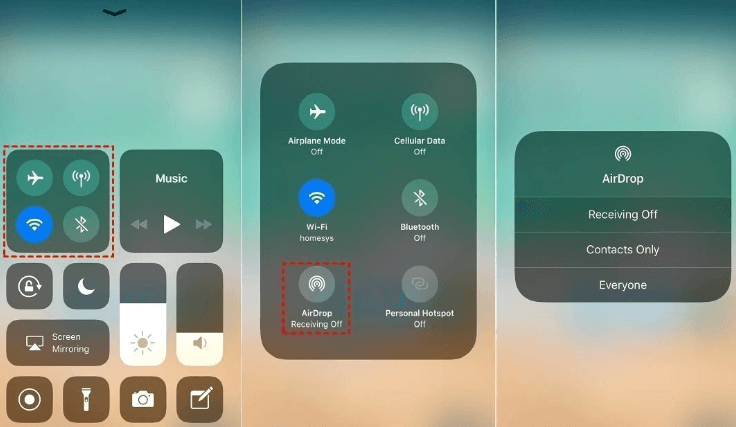
AirDrop not only simplifies the process but also ensures that your photos are transferred in their original quality. This method is particularly useful for transferring a handful of photos quickly without the need for cables or additional apps. Keep reading to explore more methods for transferring your iPhone photos to your iPad.

Method #2: Using iCloud Photo Library

The iCloud Photo Library is a fantastic solution for those who want their entire photo collection to be seamlessly available across all their Apple devices. With this method, you'll have access to your iPhone photos on your iPad without the hassle of manual transfers. Here's how to set up and use iCloud Photo Library for photo transfers:

  1. Enable iCloud Photo Library: On your iPhone, go to “Settings” and tap on your name at the top. Select “iCloud” and then “Photos”. Toggle on “iCloud Photos”.
  2. Wait for Syncing: Your iPhone will now start uploading your photos to your iCloud storage. Make sure you’re connected to Wi-Fi and have sufficient storage in your iCloud account for your entire photo collection.
  3. Enable iCloud Photo Library on iPad: On your iPad, follow the same steps to enable iCloud Photo Library (Settings > [Your Name] > iCloud > Photos > iCloud Photos).
  4. Wait for Download: Your iPad will start downloading the photos from your iCloud account. The time this takes depends on the size of your photo library and your internet speed.
  5. Access Your Photos: Once the download is complete, open the Photos app on your iPad. You’ll find all your iPhone photos neatly organized into albums and moments, just like on your iPhone.

Transfer iPhone Photos to iPad Using iCloud Photo Library

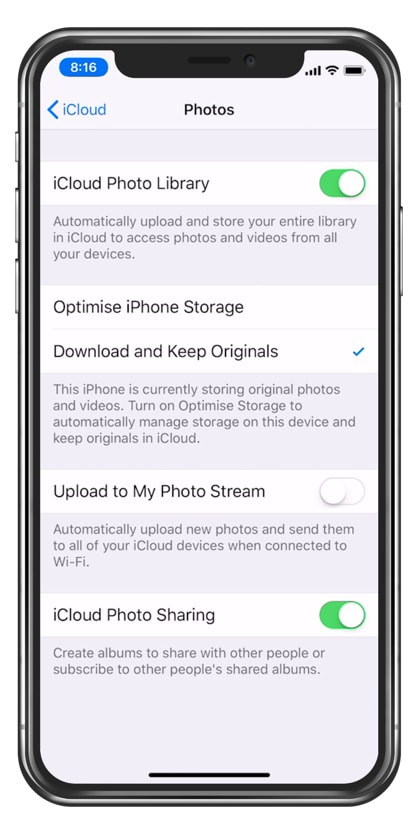
The iCloud Photo Library ensures that any changes you make to your photos (edits, deletions, additions) are reflected across all your devices. It's a seamless way to keep your photo collection up-to-date and readily available. However, keep in mind that you might need to manage your iCloud storage if you have a large collection of photos and videos.

This method is particularly useful for those who want a hands-free approach to photo transfers and want all their photos accessible across devices without any manual intervention. However, do ensure you have a reliable internet connection and sufficient iCloud storage to move your photos from your iPhone to the iCloud storage.

Method #3: Using iTunes

If you prefer a more direct and wired approach to transferring specific albums of photos from your iPhone to your iPad, using iTunes can be a suitable option. Here's how to transfer iPhone photos to iPad using iTunes:

  1. Connect your iPhone: Use a USB cable to connect your iPhone to your computer.
  2. Open iTunes: If iTunes doesn’t launch automatically, open it on your computer.
  3. Trust This Computer: If prompted on your iPhone, tap “Trust This Computer” and enter your passcode.
  4. Navigate to Device: Click on the iPhone icon that appears in iTunes.
  5. Access Photos Settings: In the left sidebar, select “Photos” under “Settings”.
  6. Sync Selected Albums: Choose “Sync Photos” and select “Selected albums, events, and faces”. Check the albums you want to transfer.
  7. Apply Changes: Click “Apply” or “Sync” in the bottom-right corner of iTunes. The selected albums will begin transferring to your computer.
  8. Connect your iPad: Disconnect your iPhone and connect your iPad to the computer using the same USB cable.
  9. Navigate to iPad: In iTunes, click on the iPad icon.
  10. Access Photos Settings: Similarly, select “Photos” under “Settings”.
  11. Choose Albums to Sync: Choose “Sync Photos” and opt for “Selected albums, events, and faces”. Check the same albums you transferred from your iPhone.
  12. Apply Changes Again: Click “Apply” or “Sync” to initiate the transfer of selected albums to your iPad.
  13. Access Photos on iPad: Once the sync is complete, open the Photos app on your iPad to find the transferred albums.

Transfer iPhone Photos to iPad Using iTunes

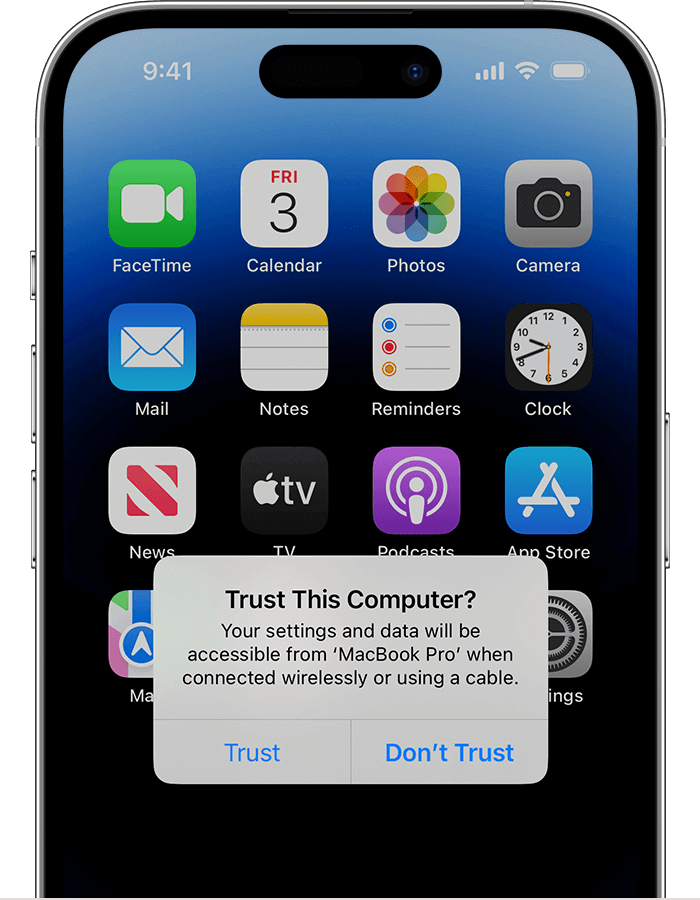
This method is useful when you want to transfer specific albums and have more control over what gets transferred. However, it requires a computer with iTunes installed, and the process involves a wired connection. Keep in mind that iTunes may not be as actively maintained by Apple as it used to be, so you might consider other methods for long-term use.

Method #4: Using Email

While not the most efficient method for transferring a large number of photos, using email can be a quick solution to send a few pictures from your iPhone to your iPad. Here's how you can use email for photo transfers:

  1. Select Photos: Open the Photos app on your iPhone and navigate to the album containing the photos you want to transfer.
  2. Choose Photos: Tap on each photo you want to transfer to select it. Selected photos will have a blue checkmark.
  3. Share via Email: Tap the "Share" button (upward-pointing arrow) and select the option to "Mail".
  4. Compose Email: A new email composition window will open with the selected photos attached. Enter your own email address as the recipient.
  5. Send Email: Send the email to yourself.
  6. Access Email on iPad: Open the email app on your iPad and find the email you sent.
  7. Download Photos: Open the email and download the attached photos to your iPad's Photos app.

Transfer iPhone Photos to iPad via Email

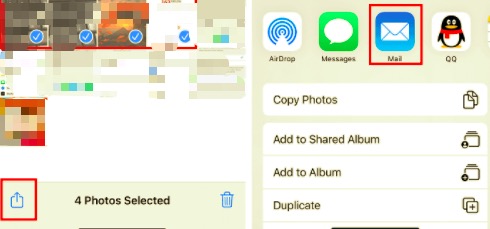
While this method is easy to use, it's best suited for sending a small number of photos due to email attachment size limits. Additionally, the photos might lose some quality during the email transfer process. If you're looking to transfer a large number of photos or maintain high-quality images, consider using one of the other methods mentioned earlier.

Method #5: Using Messaging Apps

Another simple way to transfer photos from your iPhone to your iPad is through messaging apps like iMessage or third-party messaging platforms. Here's how you can transfer iPhone photos to iPad via messaging apps:

Using iMessage:

  1. Open iMessage: Launch the iMessage app on your iPhone.
  2. Start a Conversation: Create a new conversation or select an existing one with yourself. To do this, type in your own phone number or email address in the “To” field.
  3. Attach Photos: Tap the camera icon or the “+” button in the iMessage conversation window. Choose “Photo Library” to access your photos.
  4. Select Photos: Browse your photo library and select the photos you want to transfer.
  5. Send Photos: Tap the “Send” button to send the selected photos to your iMessage conversation.
  6. Access on iPad: Open the iMessage app on your iPad and navigate to the same conversation. The photos will be available there.

Using Third-Party Messaging Apps:

  1. Choose an App: If you prefer using a third-party messaging app like WhatsApp, Telegram, or Facebook Messenger, open the app on your iPhone.
  2. Start a Chat: Start a new chat with yourself or a specific contact.
  3. Attach Photos: Depending on the app, look for the option to attach or send photos. This is usually represented by a camera or attachment icon.
  4. Select Photos: Browse your photo library and select the photos you want to transfer.
  5. Send Photos: Use the appropriate button to send the photos to the chat.
  6. Access on iPad: Open the same messaging app on your iPad and access the conversation with the transferred photos.

Transfer iPhone Photos to iPad Using Messaging Apps

While messaging apps are user-friendly and readily available, this method might not be suitable for transferring a large number of photos due to file size limitations within the apps. Additionally, the quality of the photos might be slightly reduced during the transfer process. If you're looking to transfer a significant number of high-quality photos, consider using other methods mentioned earlier.

Part #2: The Best Tool to Transfer iPhone Photos to iPad: FoneDog Phone Transfer

In the digital era, where our memories are often captured through the lens of our iPhones, the need to seamlessly transfer these cherished photos to other devices becomes paramount. While built-in methods like AirDrop and iCloud Photo Library offer convenience, sometimes a dedicated tool can provide a more comprehensive and efficient solution. This is where FoneDog Phone Transfer steps in as a powerful ally for transferring iPhone photos to iPad.

Phone Transfer Transfer files among iOS, Android and Windows PC. Transfer and backup text messages, contacts, photos, video, music on computer easily. Fully compatible with the latest iOS and Android. Free Download FoneDog Phone Transfer

FoneDog Phone Transfer is an iPhone 15-supported tool and professional software designed to simplify the process of transferring data between different devices. Its user-friendly interface, coupled with a range of features, makes it an exceptional choice for those seeking a way to transfer iPhone photos to iPad.

Let's delve into the features that set this best iOS transfer tool apart:


  • Photos Transfers: FoneDog Phone Transfer enables you to effortlessly transfer photos from your iPhone to your iPad with just a few clicks. Its intuitive interface guides you through the process, ensuring a smooth experience even for those who aren’t tech-savvy.
  • High-Quality Transfers: Unlike some methods that may compromise photo quality during the transfer, FoneDog Phone Transfer ensures that your images are transferred in their original resolution, preserving every detail and memory.
  • Bulk Transfer: Whether you have a handful of photos or an extensive collection, FoneDog Phone Transfer allows you to transfer multiple photos at once, saving you time and effort.
  • Cross-Platform Compatibility: FoneDog Phone Transfer goes beyond just transferring photos between iPhones and iPads. It supports transfers between a wide range of devices, including Android phones, making it a versatile tool for all your data migration needs.
  • Selective Transfer: With FoneDog Phone Transfer, you have the flexibility to choose which specific photos you want to transfer. This feature is particularly useful when you don’t need to transfer your entire photo library.
  • No Data Loss: The software ensures that none of your existing data is overwritten during the transfer process, guaranteeing that your valuable information remains intact.
  • User-Friendly Interface: FoneDog Phone Transfer’s simple and intuitive interface makes it accessible to users of all skill levels. You don’t need to be a tech expert to navigate and utilize its features effectively.

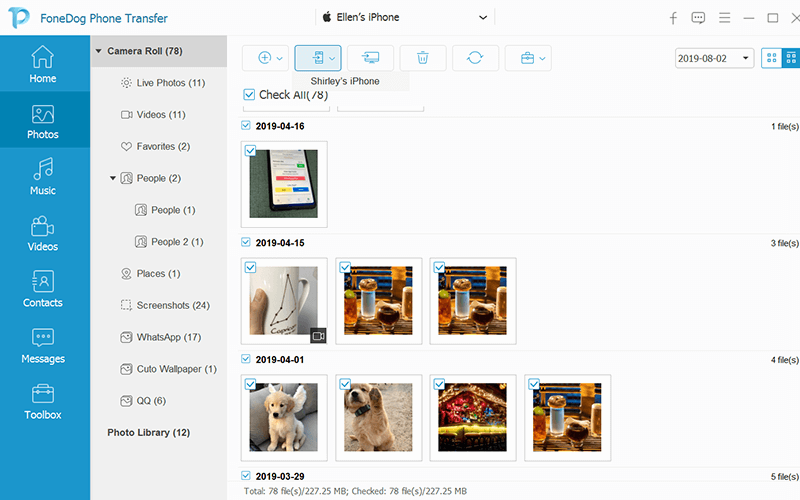
How to Use FoneDog Phone Transfer:

  1. Download and Install: Download and install FoneDog Phone Transfer on your computer.
  2. Connect Devices: Connect both your iPhone and iPad to the computer using USB cables.
  3. Select Photos: Launch the software and select the photos you want to transfer from your iPhone to your iPad.
  4. Initiate Transfer: Click the “Start Transfer” button to initiate the photo transfer process.
  5. Complete the Transfer: Once the transfer is complete, disconnect your devices and check your iPad’s Photos app for the newly transferred images.

Transfer iPhone Photos to iPad: FoneDog Phone Transfer

In a world where our memories are captured and cherished through photos, having a reliable and efficient tool to transfer these memories between devices is invaluable. FoneDog Phone Transfer stands out as a dependable solution that ensures your photos are seamlessly transferred, maintaining their quality and significance.

With its array of features and user-friendly interface, it's a must-have companion for anyone seeking a hassle-free way to transfer iPhone photos to their iPad and beyond.

People Also Read3 Best iPod Music Transfer Softwares in 2024!Top 5 Best WhatsApp Transfer Software

Conclusion

In the end, the best method to transfer iPhone photos to iPad depends on your individual needs, preferences, and the quantity of photos you're dealing with. Whether you opt for the built-in convenience of Apple's ecosystem or explore third-party tools (such as FoneDog Phone Transfer), the goal remains the same: to keep your cherished memories within easy reach and enjoy them on the captivating screen of your iPad.

Whichever method you choose, the digital journey of your memories continues, creating a seamless bridge between your devices and enriching your everyday experiences.

Leave a Comment

Comment

Comment ()
author image

Nathan E. Malpass

iPhone/Android Devices’ Maintenance Expert

Staying home, listening to music, writing tech articles

Many people asked me to repair their mobile phones so I have a lot of experience in mobile phone repair, and I know a lot about Android or Apple phones.

Phone Transfer logo

Phone Transfer

Transfer data from iPhone, Android, iOS, and Computer to Anywhere without any loss with FoneDog Phone Transfer. Such as photo, messages, contacts, music, etc.

Free Download

How Do You Like This Article?

Check icon/ Check icon

INTERESTINGDULL

Check icon/ Check icon

SIMPLEDIFFICULT

Thank you! Here' re your choices:

Rate This Article: Excellent

Rating: 4.6 / 5 (based on 70 ratings)

Phone Transfer logo

Phone Transfer

Transfer data from iPhone, Android, iOS, and Computer to Anywhere without any loss with FoneDog Phone Transfer. Such as photo, messages, contacts, music, etc.

Free Download

FoneDog uses cookies to ensure you get the best experience on our website. Click here to learn more.