FoneDog Screen Recorder
FoneDog Screen Recorder
Special Offer
Special Offer


By Vernon Roderick, Last updated: March 15, 2021
There are many types of iOS devices. An iPod is not exactly what you will think of when talking about this topic. This is because there are many other iOS products that are superior to them, though there’s no denying that they’re great for music.
However, in other aspects, iPods don’t do very well. That’s why it’s only natural if a user wants to switch from iPod to iPhone, but what about your songs? This article will show you how you can transfer iPod music to iPhone so you can still retain your love of music while at the same time switch to a better iOS device.
Part 1. Transfer iPod Music to iPhone with SoftwarePart 2. Transfer iPod Music to iPhone with iTunesPart 3. Transfer iPod Music to iPhone from Apple's Built-in Music AppPart 4. Transfer iPod Music to iPhone from AirDrop
There are different variations of software out there that are worth mentioning, but this time, I believe FoneDog Phone Transfer would be the most ideal.
FoneDog Phone Transfer is a tool capable of transferring files such as messages, photos, videos, and most importantly, music. It supports the latest version of iOS and Android and can be run on Windows PC.
It can not only realize the transfer of iPod music to iPhone mentioned in the article but also can realize other transmissions about music, such as transfer music from computer to iPhone. Below are the steps on how you can transfer iPod music to iPhone:
Phone Transfer
Transfer files among iOS, Android and Windows PC.
Transfer and backup text messages, contacts, photos, video, music on computer easily.
Fully compatible with iOS 17 and Android 14.
Free Download

Connect the iPod and iPhone device to the computer with their respective USB cords. If you want to transfer music between iPod and computer, you just need to connect the iPod and computer, the specific operation can be referred to this link.
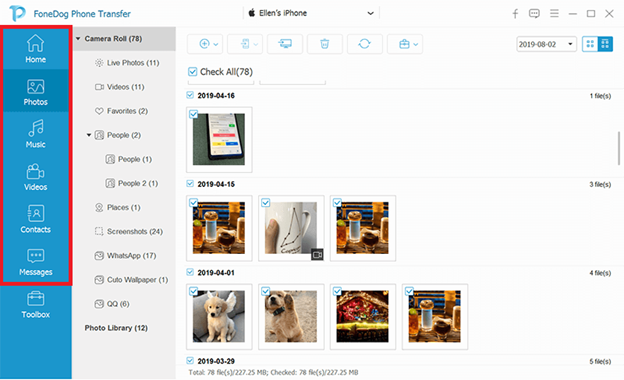
Make sure the FoneDog Phone Transfer is already open. On the main page of the software, click on the dropdown menu from the top and select the sending device which is the iPod. It should display some info about the iPod.

Once the iPod is recognized, select a file type from the left side of the window. Select Music, this should scan for files that belong to the selected category.
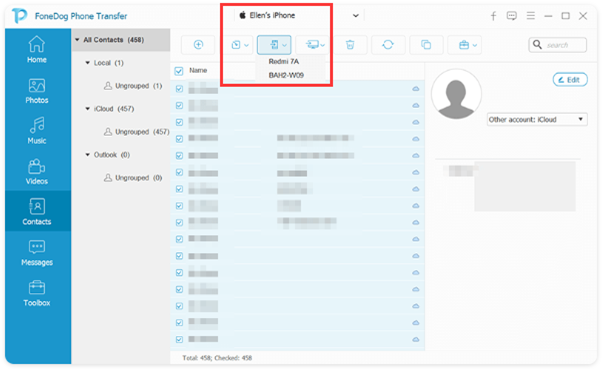
Select the music files from the left side of the window by clicking on them. Once you are done selecting, click on the third button from the top bar and select your iPhone device. This will transfer the selected files into the iPhone.
You have now learned how to using FoneDog Phone Transfer to realize transmissionn what you need. Of course, there are tons of tools out there that you can use instead.Now if you’re not fond of using third-party software, especially those that aren’t very popular and reliable, proceed to the next section.
If you haven’t heard of the software that we used earlier, that’s fine, but you must have heard of iTunes at least once in your life.
iTunes is a built-in app on Mac that has a lot of functions, and in your case, you might want to use its ability to establish a connection between several Apple devices. This means there’s hope in using it to do the transmission we want.
There are several ways to do this. Some methods can transfer all music files at once, and others can transfer only the purchased music. Let’s start with the method for transferring all at once.
There are two methods that are capable to transfer iPod music to iPhone all at once. One is by syncing and the other is by creating a backup.
Below are the steps on each of those two ways:
• Sync Music.
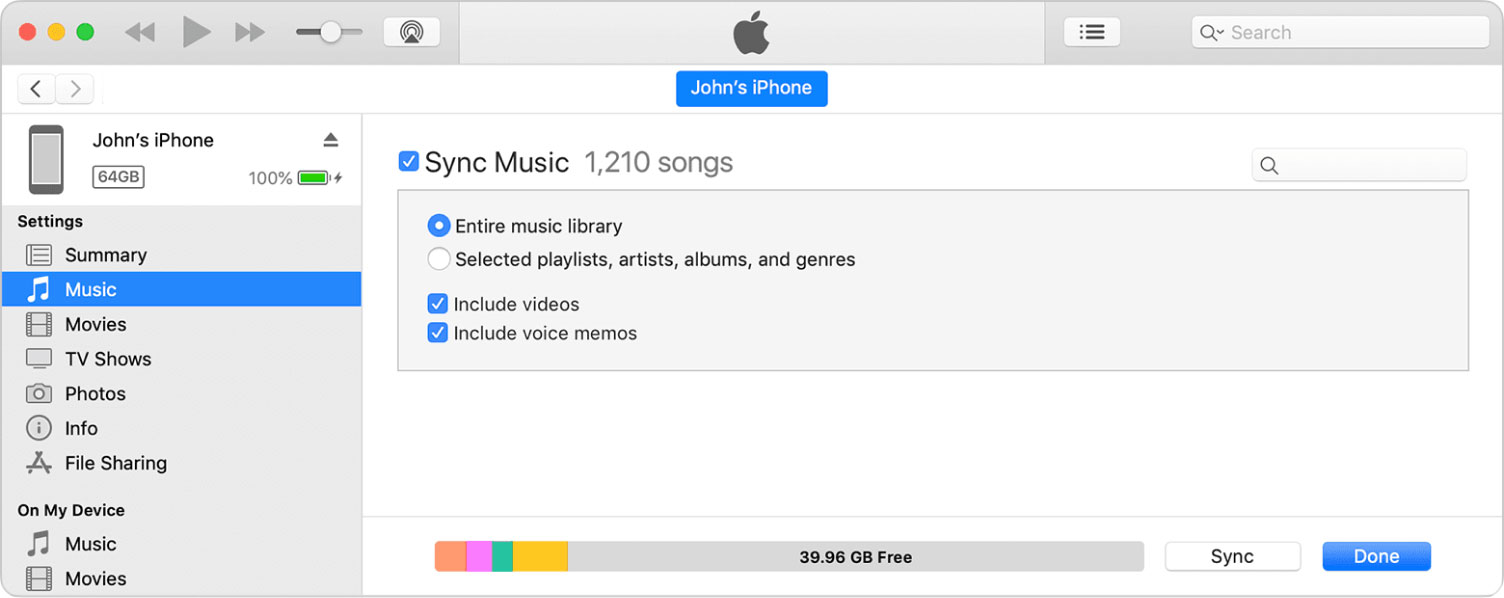
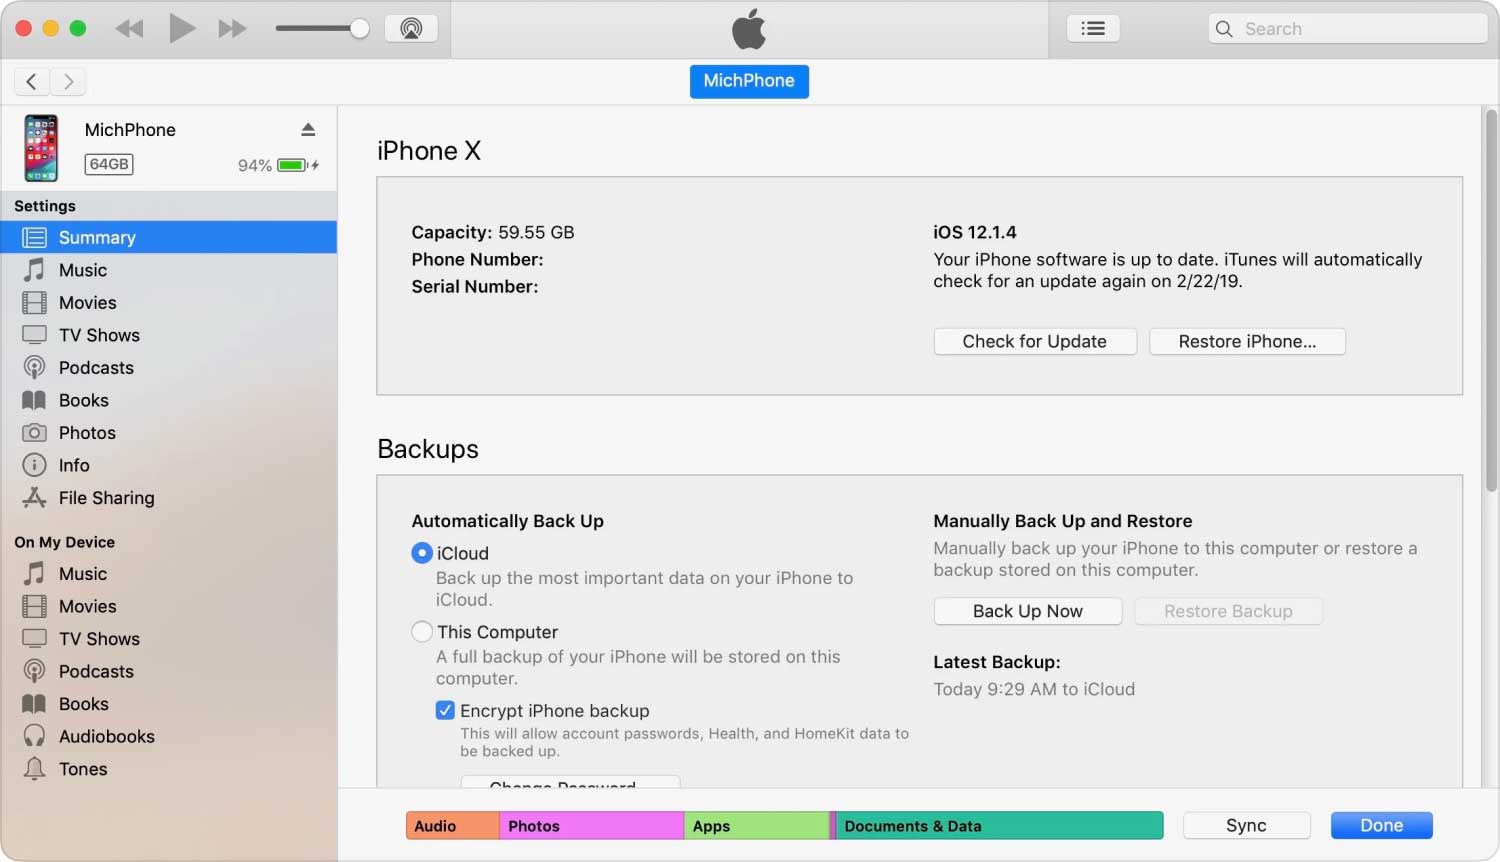
1. Connect the iPod to the computer with a USB cable. Make sure iTunes is already open.
2. Click on the device icon on the upper-left area of iTunes and from the list, select your iPod.
3. On the left side of the window, click Music and check the box for Sync Music and click Apply and Sync. Wait until the syncing is finished.
4. Disconnect the iPod and connect the iPhone to the computer.
5. Click on the Device icon and select your iPhone.
6. Click on Summary and select Sync with this iPhone over Wi-Fi. Click on Apply.
• Backup.
1. Connect your iPod to the computer. Click on the Device icon and select your iPod.
2. Go to Summary.
3. Under the Backups section, click on Back Up Now. Wait for the backup to complete.
4. Disconnect the iPod and connect the iPhone. Select your iPhone from Devices.
5. Go to Summary and this time, select Restore Backup.
The advantage of syncing music is that it’s a one-time process while creating a backup is not. However, there may be music files left out when you sync, while with backup, you will get all music files.
Although a lot of people will prefer free music rather than paid ones, there are simply people who want to pay for music. If you’re one of them, this is more suitable for you.
Below are the steps to realize transmission if you are a paid user:
1. Starting from the menu bar, go to Account > Authorizations > Authorize This Computer. Click on Authorize so your computer will always be recognized.
2. Now connect the iPod to the computer. Ensure that the iTunes app is open.
3. Again, from the menu bar, go to File > Devices > Transfer Purchases From iPod.
4. Disconnect the iPod and connect your iPhone. Now do what you did before where you used the function Sync with this iPhone over Wi-Fi.
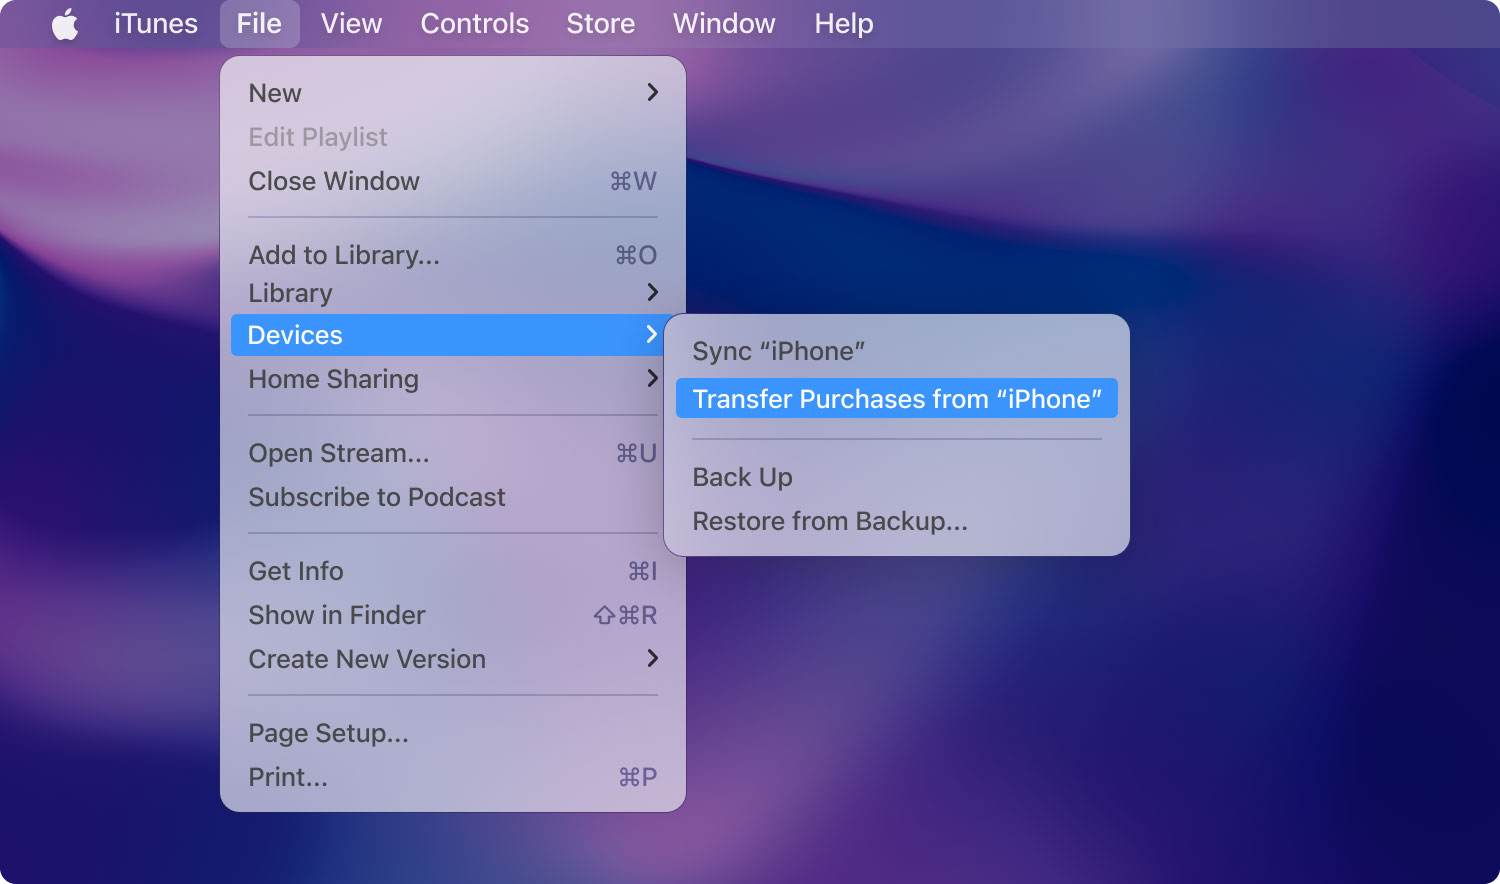
This will transfer all purchased music files into the iPhone. Of course, this is only assuming that you have paid for your music.
If you’ve heard of iTunes, then it’s only natural that you’ve heard of Apple's Built-in Music App as well.
If iTunes is a file management platform, Apple's Built-in Music App is a music management platform. Basically, it stores your music so that you may access them on any device you’re using. So in other words, you can transfer music through this platform.
If you want to transfer your music from your iPod to your iPhone, follow the steps below:
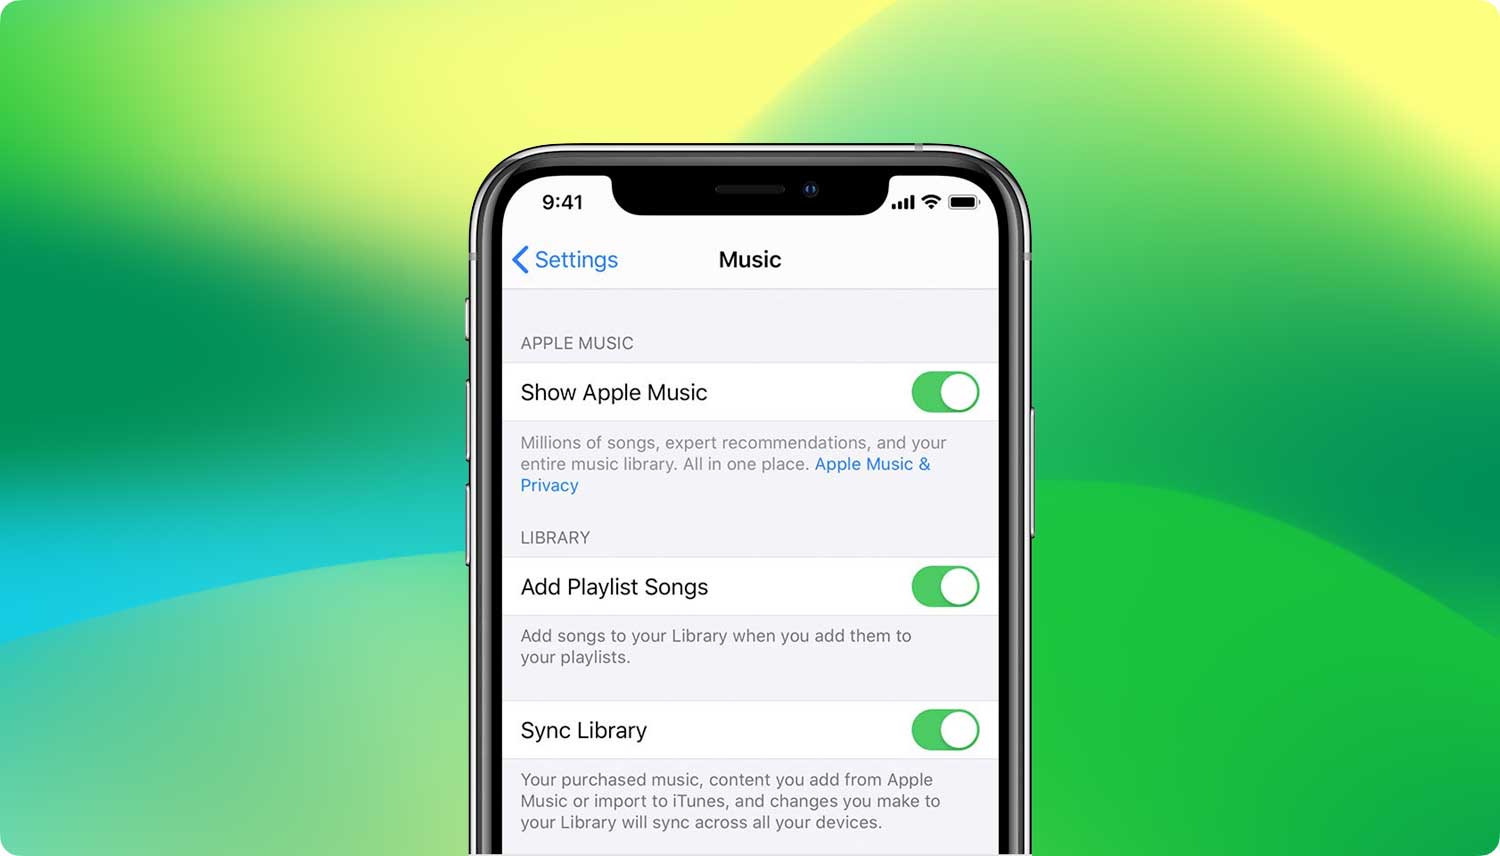
What this does is it basically synchronizes everything from your iPod to iPhone and vice versa. So, if a song is added to your iPod, the same will be added to your iPhone, and the same can happen in the opposite. This will make all transferred songs can be seen on your library through the default Music app.
Our last method involves AirDrop, a built-in function on Mac and iOS devices that are similar to Bluetooth in a way that it can wirelessly transfer files without the internet.
Below are the steps to realize transmission by using AirDrop:
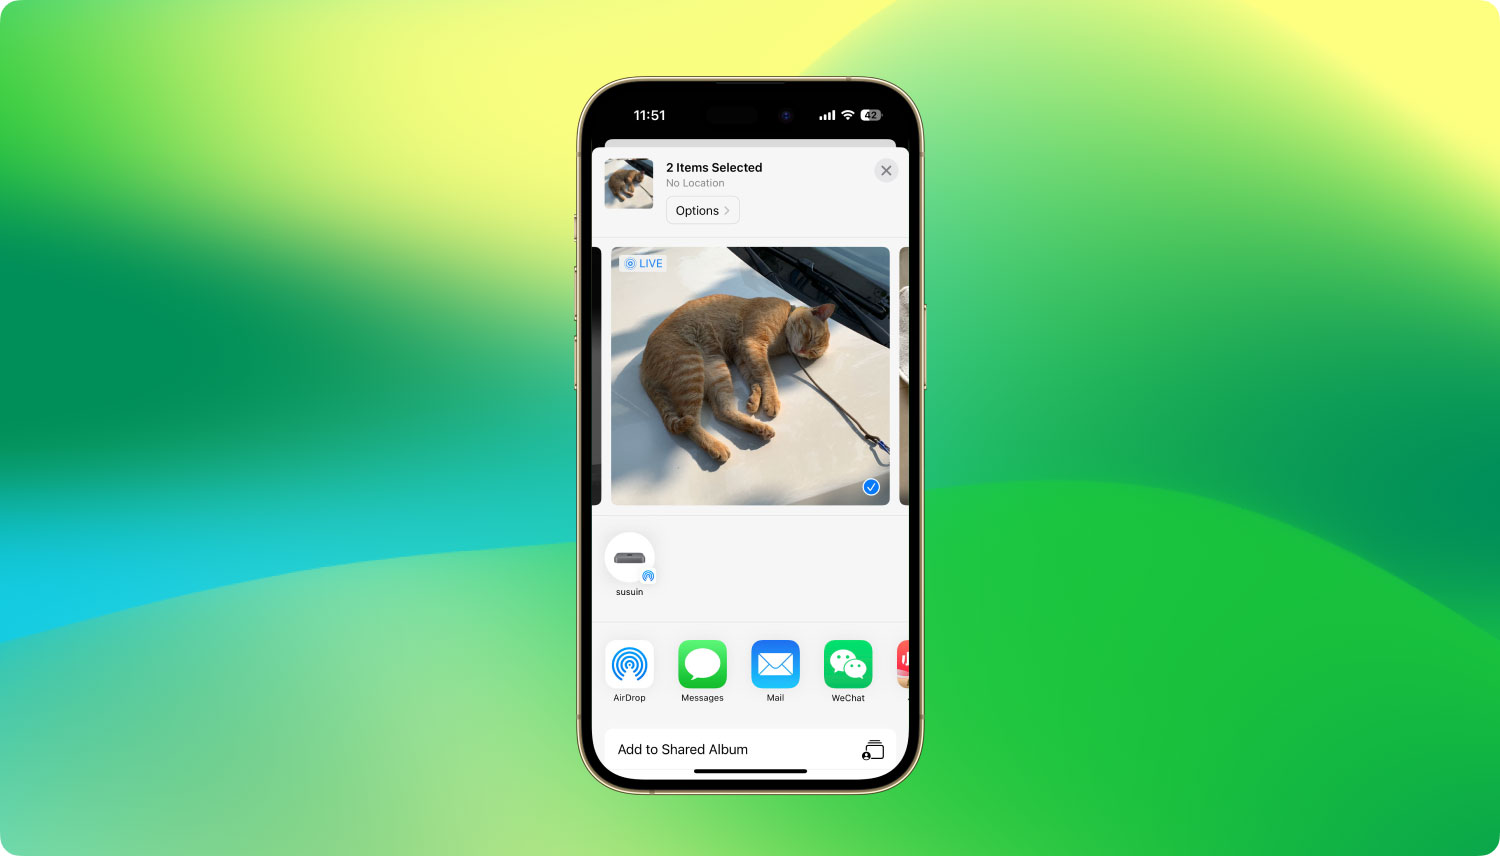
1. Turn on AirDrop on both your iPod and iPhone. This can be done by going to Control Center, pressing and holding the wireless network icon, and taping the AirDrop icon.
2. Open your file manager app on your iPod.
3. Locate the music file that you want to transfer. Press and hold on to that file. If there are multiple files, tap on them as well.
4. Now at the bottom of the screen, tap the Share button. Select Airdrop.
5. Choose the device where you want to send the music file, which in our case would be the iPhone device.
6. On your iPhone, a message may appear. Simply accept the request to send the file.
The advantage of AirDrop is of course the fact that it gives a device the ability to send or receive files. The disadvantage is that it’s a bit longer than when you use the internet or wired transfer.
Still, it’s a great method since you only need the two devices, nothing more, nothing less. It’s quite a convenient method if you ask me.
Another thing, if you want to avoid any issues when you transfer iPod music to iPhone with AirDrop, I suggest using the same Apple ID on both devices.
People Also ReadHow to Move Music to iCloud StorageHow to Transfer Music from iTunes to iPhone
A lot of iPod users are into music, but if you start to notice that there are some issues on your device, don’t leave it alone without doing anything. The best thing you can do is prepare for the worst-case scenario, which is data loss.
Now that you know transfer iPod music to iPhone, that shouldn’t be any problem for you now. However, I still suggest being careful when handling your iPod for good measure.
Leave a Comment
Comment

Technical Expertise for PC/Website Optimization
One of my passion is to develop software of my own
I write articles to share knowledge about IT technology and some experience in developing my own software, and developing my own software is one of my passions for work.
Phone Transfer
Transfer data from iPhone, Android, iOS, and Computer to Anywhere without any loss with FoneDog Phone Transfer. Such as photo, messages, contacts, music, etc.
Free DownloadHot Articles
 /
/
INTERESTINGDULL
/
SIMPLEDIFFICULT
Thank you! Here' re your choices:
Excellent
Rating: 4.6 / 5 (based on 95 ratings)
