FoneDog Screen Recorder
FoneDog Screen Recorder
Special Offer
Special Offer


By Vernon Roderick, Last updated: March 16, 2021
There are tons of ways to create animated GIFs. Considering how popular this form of media is, it’s only natural. However, the same cannot be said when trying to transfer GIFs. After all, they don’t completely belong to the photo category or even to the video category. Fortunately, there are tools out there that allow the transfer of files regardless of type.
This article was created for the purpose of showing five ways to transfer iPhone GIF to Mac. Let’s start with our first entry for the day.
Part 1. Transfer iPhone GIF to Mac through iTunesPart 2. Transfer iPhone GIF to Mac through iCloudPart 3. Transfer iPhone GIF to Mac via Messages AppPart 4. Transfer iPhone GIF to Mac using AirDropPart 5. Transfer iPhone GIF to Mac with CablePart 6. Alternative Method to Transfer iPhone GIF to MacFinal Words
There are many things you can do with iTunes. You can say that it is a universal tool in that it is available for most operating systems such as Windows and Mac. Lucky for us, one of the specialties of iTunes is file management, so transferring files would be a breeze.
While iTunes may be a great tool, trying to transfer iPhone GIF to Mac still takes a bit of effort. There are also things you will need to secure before you can use it. The following are the pre-requisites for iTunes:
Since we will be transferring a one-of-a-kind file type that is GIF, the steps might differ from what people usually do. Here are the steps to use iTunes to transfer iPhone GIF to Mac:
Note: You may also connect the two devices to the same Wi-Fi connection if a USB cable is not available, but the wired transfer is still the most recommended.
Note: This allows iTunes to transfer the photos from the Mac into the iPhone Photos app, though it also works the other way around.
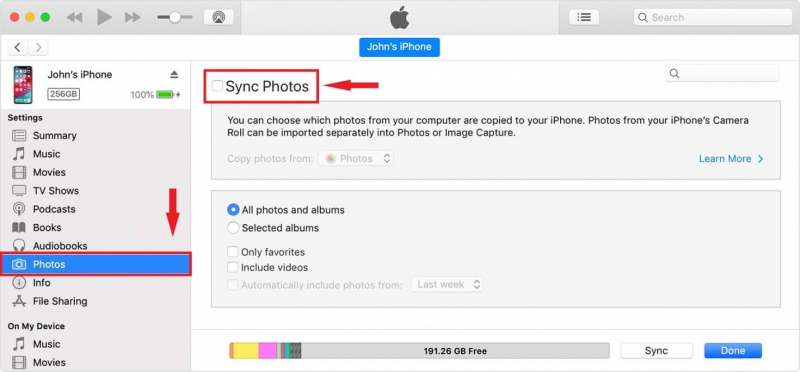
While you may be wondering why this method works, it’s mainly because GIFs are counted as Photos by your iOS device, or at least most GIFs.
Also, remember that this only needs to be done once, and you’re all good to go once you set it all up. Now we go to another way to transfer iPhone GIF to Mac that uses another built-in tool.
Our second entry involves the use of iCloud. It can be said that it is a bit similar to iTunes, though there are also some differences. While iTunes is a file management tool, iCloud is a storage service. But since both are offered by Apple, they are completely reliable.
You will have to get some things to be able to use iCloud. Here’s a list of the prerequisites for using iCloud to transfer iPhone GIF to Mac:
Now once you have fulfilled the aforementioned requirements, you will be able to use this method. Before that, remember that it is just like with iTunes in that you don’t have to do it again once you’ve set it up.
Note: The iCloud app is a default app on Mac desktop. Upon launching it for the first time, a setup interface will appear.
Note: The Files app is the file management app on iOS devices which are usually preinstalled upon purchase of the product.
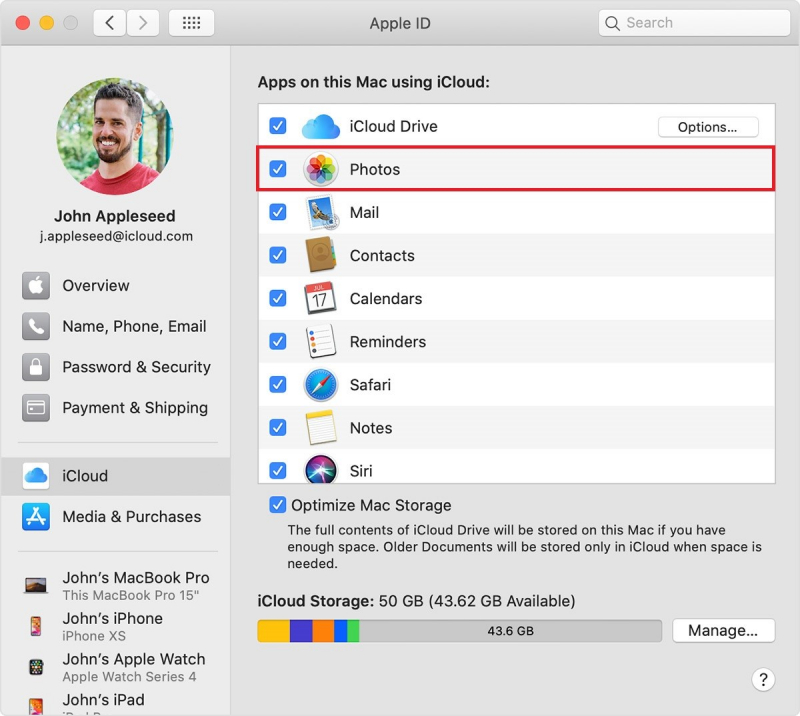
While iCloud is a viable option, you can’t use its component, iCloud Photos. This is because iCloud Photos don’t support animated GIFs, so you can only rely on iCloud Drive.
Although it’s not as popular as the method that involves iTunes and iCloud, this one might appeal to you due to its simplicity. We will be using the Messages app for this method. The process is basically sending a message that contains a GIF to your own address, then access that message through your Mac.
For this, you will only need an internet connection and the Messages app, though that should already be taken care of since it is a default app.
However, there are some restrictions. Particularly, you can only use this method in certain regions such as United States, United Kingdom, Canada, and more. If it doesn’t work for you, assume that it is restricted to your country.
As previously said, this method makes use of the Messages app, but the most important thing you have to remember is the #images. Either way, here’s how you can transfer iPhone GIF to Mac using the said app:
The only disadvantage of this is that you will only be able to transfer iPhone GIF to Mac if the GIF itself already exists on the internet. If not, then you won’t be able to find it from the Find images option, though that is very unlikely.
You may have already heard of AirDrop. Basically, it is a feature that is similar to Bluetooth, though there are some differences. Either way, it is also the same as our aforementioned options in a way that it is a built-in function for Apple products.
You might find that the prerequisites for this one are a bit different from what you’ve become used to. Regardless, the following are the prerequisites for using this method:
As you can see, this method doesn’t require an internet connection, unlike the other three options. However, the two devices should still connected to the same network, preferably Wi-Fi, though it doesn’t need to have internet.
The steps for this method are a bit similar to the Messages option. Additionally, this is not a one-time process so you will have to follow these steps every time you want to transfer iPhone GIF to Mac:
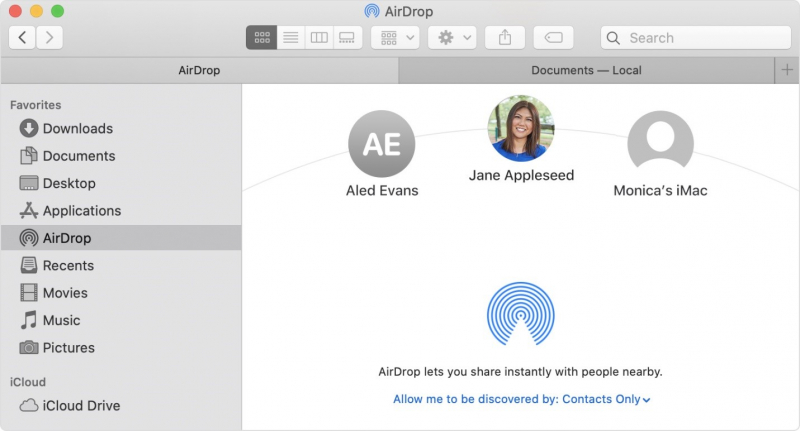
The advantage of this is that it can be done more quickly than our previous methods. This is perhaps because it doesn’t rely on your internet connection to be fast.
If you’re not fond of the previous options, your last option is to use a cable. Again, this is not a one-time process. However, there are perks of this method. One, it is the easiest and quickest method. Two, it doesn’t have many requirements. Three, it should be possible regardless of your situation.
As the name suggests, this method requires you to use a cable. With that said, your main requirement is a USB cable, preferably one that is compatible with your Mac and iPhone. While it may cost a bit, you won’t have to buy a new one if you have taken good care of the USB cable that came along with your iPhone.
Considering how simple the process is, there’s no need to discuss the steps one by one. You simply have to connect one end of the USB cable to the iPhone and another end to the Mac. Then, transfer the necessary files.
With this, you can easily transfer iPhone GIF to Mac. It’s easy as that, but it’s not for everyone, especially for those that don’t feel comfortable plugging in their smartphone to a desktop that might have some virus.

Although I said that the previous entry was the last entry, I still have one last recommendation if none of the aforementioned options work for you. This involves the use of a third-party tool called FoneDog Phone Transfer.
Compared to our other options, FoneDog Phone Transfer was made specifically for our goal, and that is to transfer files from one device to another. Such as transferring files from iPhone to iPhone. Although it requires installing a third-party tool, it is good enough to be worth your time. In addition, you can also transfer contacts from iPhone to mac in this tool, if you need to use it, you can click to learn about it.
Phone Transfer
Transfer files among iOS, Android and Windows PC.
Transfer and backup text messages, contacts, photos, video, music on computer easily.
Fully compatible with iOS 13 and Android 9.0.
Free Download

People Also ReadHow to Transfer iPhone Files to MacHow to Transfer iPhone Messages to Mac
We have different ways to socialize. While others like sending emoticons, some of us prefer sending GIFs that we talk about will entertain our friends. Unfortunately, it’s not easy to find a good GIF, and that is why it’s crucial to save our favorite GIFs.
This article helped you find ways to transfer iPhone GIF to Mac. That way, you can easily share with your friends the GIFs that you love without having to take a long time looking for them.
Leave a Comment
Comment

Technical Expertise for PC/Website Optimization
One of my passion is to develop software of my own
I write articles to share knowledge about IT technology and some experience in developing my own software, and developing my own software is one of my passions for work.
Phone Transfer
Transfer data from iPhone, Android, iOS, and Computer to Anywhere without any loss with FoneDog Phone Transfer. Such as photo, messages, contacts, music, etc.
Free DownloadHot Articles
 /
/
INTERESTINGDULL
/
SIMPLEDIFFICULT
Thank you! Here' re your choices:
Excellent
Rating: 4.8 / 5 (based on 65 ratings)
