FoneDog Screen Recorder
FoneDog Screen Recorder
Special Offer
Special Offer


By Adela D. Louie, Last updated: January 2, 2024
Are you having trouble embedding videos and audio clips on your PowerPoint file? Were you getting an error message that says your PowerPoint Codec Unavailable? Then this is for you as we are going to show you some ways on how to fix when PowerPoint Codec is Unavailable.
One of the best things about the MS PowerPoint program is that you can actually embed some audio clips or even some videos on your presentation. However, just like any other program, there are times wherein you can encounter some problems. If you encounter problems when using other applications, such as chrome does not display images, we can also help you solve them.
And one of the most common problems that you might experience using the PowerPoint program is when you are not able to play any videos that are embedded in the program. And because of that, you get an error message that PowerPoint Codec Unavailable. Or another error that you might get is that the Media file is not available.
Part 1. How To Fix PowerPoint Codec Unavailable?Part 2. Conclusion
There are different ways on how you can fix this error and enjoy the benefit of embedding videos again in your PowerPoint presentations. So, here are the best ways to do it.
The first that you should try in order for you to fix the problem is to change the file extension of your PowerPoint presentation. You can also try to convert the video embedded in your presentation for you to be able to make it work and use a common format for the program to read. And with that, here are also some other simple yet effective ways on how you can fix PowerPoint Codec Unavailable.
Step 1: If in case that the file on your PowerPoint program that has an unavailable codec is made by using an old version of the PowerPoint program, then all you need to do is to right-click on the PPT file and then have it changed to “pptx” file extension.
Step 2: Create a copy of your file to any path you would like. To do this, you can press the Control + C keys for you to copy the file and then Control + V keys for you to paste it. And after that, go ahead and right-click on your file for you to have an acceptable copy.
Step 3: Then, right-click on the new file you made and then have the file extension change from pptx to zip file.
Step 4: After that, go ahead and unzip the file that is zipped into a certain folder by using any compressing software. In a normal process, you can just simply right-click on the unzipped file and then choose the unzip file option from the drop-down menu.
Step 5: Then from the unzipped folder, go ahead and go to ppt then click on the media folder. From there, you will be able to see different kinds of files that you were able to embed on your PowerPoint programs like your photos, videos, and audios.
Step 6: Then after that, go ahead and have your audios converted to an MP3 or WAV format. Then convert your videos to WMV and MP4. A quick tip here is for you to try both of the formats so you to make sure that you are going to have the compatible format for your PowerPoint. Then after that, replace your embed media using the files that you have formatted.
Aside from the one mentioned above, there is a built-in feature of PowerPoint program that you can use and that is its media compatibility settings. And in order for you to know how this works, here is a guide that you can follow.
Step 1: Launch the PowerPoint file that you are working with and then click on the File tab from its menu bar.
Step 2: And from there, go ahead and click on the Info button. Then, your PowerPoint program will be able to find the embedded media that is not compatible with it. And if there is any incompatible media found, the Optimize Media Compatibility button will show up on your screen. So just click on it and it will optimize your embedded media.
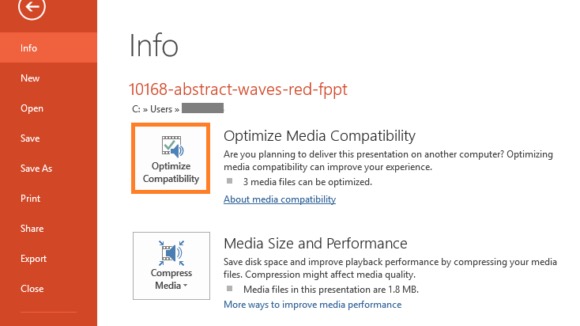
Step 3: It will also be able to scan your media. And once that the solution is found, then it will automatically solve the problem.
On the other hand, if in case that the Optimize Media Compatibility was not able to solve the problem on your PowerPoint codec unavailable, it will just automatically show you the things that you can do in order for you to fix it.
There is also a possibility wherein your video or your audio that you have embedded in your PowerPoint presentation. There are times that the format of your media embedded in your file is not compatible. So what you will be needing to do here is to have them converted to a more compatible format.
Here are the compatible format depending on the PowerPoint version you are using.
Audios:
Videos:
Here on the final solution that we are going to show you, we are going to guide you on how you can empty your folder of your temporary files on your PowerPoint program. This actually works because there are times wherein when your temp files are fully loaded, it causes some malfunctions on using the program. So, in order for you to clean up your TEMP folder on your Windows 10 PC, here are the steps that you need to follow.
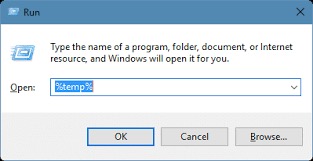
Step 1: Go ahead and press the keys Window + R button at the same time.
Step 2: And then, there will be a new window that will show up on your screen located on your lower left part. So from there, you have to key in %TEMP% and then click the OK button.
Step 3: After that, go ahead and choose all of the files that have the TMP extension on it.
Step 4: Then delete those files.
Step 5: Once that you are done, go ahead and restart your computer and try using your PowerPoint program again and see if you were able to fix the PowerPoint codec unavailable error.
So there you have it. Those are the ways on how you can fix the PowerPoint codec unavailable issue that you are having. The solutions that we have shown you above actually work so go ahead and try them on your computer and we are sure that the issue you are having will be fixed in no time.
People Also ReadA Complete and Easy Guide on How to Use Assistive Touch7 Best Solutions for Streaming Radio Not Working Chrome
Leave a Comment
Comment

Tech Website Writing /Content Optimization
Singing, smiling, surprising every day!
So as a technical writer, it is my duty to gather effective and reliable solutions to answer questions on how to deal with the issues they are having with their devices.
Hot Articles
 /
/
INTERESTINGDULL
/
SIMPLEDIFFICULT
Thank you! Here' re your choices:
Excellent
Rating: 4.7 / 5 (based on 58 ratings)
