FoneDog Screen Recorder
FoneDog Screen Recorder
Special Offer
Special Offer


By Gina Barrow, Last updated: January 28, 2018
“Would you like to have your Android data backup and restore to the new phone? In this article, you will learn how to transfer all your stuff from the old phone to the new Android.”
Part 1. How to Backup and Restore Android Safely – Recommended MethodPart 2. Drag and Drop Android Media Files to PCVideo Guide: Android Backup and Restore to the New PhonePart 3. How to Backup Android Phone - BasicPart 4. Summary
Android data backup and restore to the new phone is easy, fun, and interactive when you use FoneDog Toolkit- Android Data Backup & Restore. This software is already complete with both the ‘backup and restore’ options in one place. FoneDog Toolkit- Android Data Backup & Restore is flexible, convenient, and compatible with almost 8000+ devices.
To use FoneDog Toolkit- Android Data Backup & Restore, follow these:
First, you need to download and install FoneDog Toolkit- Android Data Backup & Restore on the computer. Launch the program once it has been successfully downloaded and choose Android Data Backup & Restore among the options on the main screen.
Next is to connect the Android device to the computer using a USB cable. Wait until the device is recognized.

Launch Fonedog Toolkit--Step1
Once the Android device is recognized, it will ask you to allow the USB debugging on the Android. To enable the USB debugging mode, go to Settings from the home screen, then find and tap ‘About Phone’.
Tap Build Number 7 times or until a message appears ‘ You are under developer mode’. Go back to Settings, and tap Developer Options. Toggle the USB debugging on. Click OK on the Android device and then click OK on the program screen to continue.
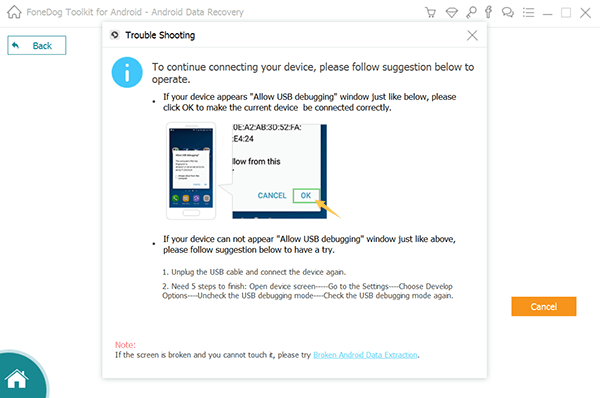
Enable USB Debugging--Step2
The next step is to choose the desired backup option. Click on ‘Device Data Backup’ so you can selectively choose the files you want to get hold of.
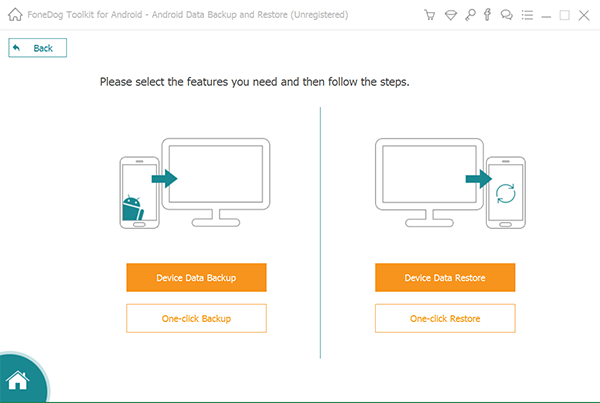
Choose Desired Backup Option--Step3
On your screen you will see a list of files you can backup, select the desired data files and then click ‘Start’ to begin the backup process.
The backup process may take some time depending on the total file size. Avoid disconnecting your phone/tablet during this part.
Click OK when the program prompts for the complete backup.
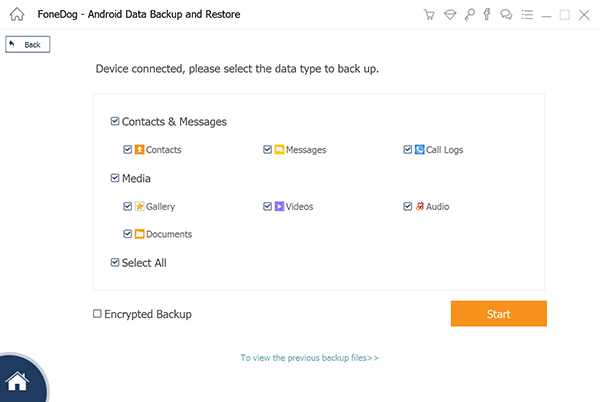
Start Backup--Step4
To Restore:
After how to back up Android phone, you can easily transfer or restore the backup files in just a few steps.
After launching the program FoneDog Toolkit- Android Data Backup & Restore click on ‘Device Data Restore’. All the backup files will be displayed according to the date and time stamps. Choose the desired backup file to restore on the new Android device.
Also Read:
How to Selectively Backup Android Phone Data
Backup and Restore All Data on Android
Choose Device Data Restore--1
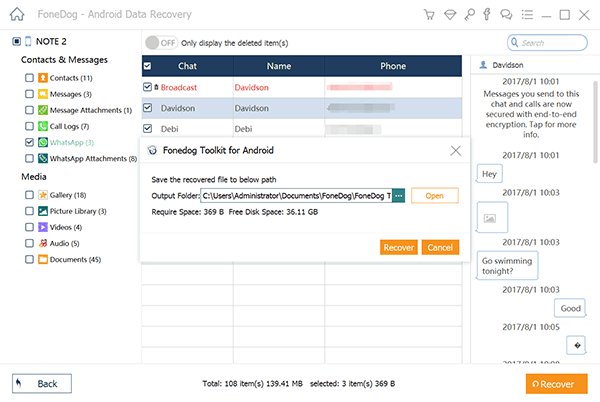
After the entire backup contents are extracted by FoneDog Toolkit- Android Data Backup & Restore, you can now choose the files you only need on the new phone. From here you can selectively choose each file category and then click the ‘Restore’ button at the bottom of the screen.
The restoration process will also take a while based on the file sizes. FoneDog Toolkit- Android Data Backup & Restore will ask you to reconfirm the restore process, click ‘OK’ for confirmation. Wait until the entire process is completed. At this point please avoid disconnecting the Android device to avoid unwanted issues.
Choose Data Types--2
Android data backup and restore to the new phone is very easy to do when you use FoneDog Toolkit- Android Data Backup & Restore. It is safe and convenient to use even for beginners.
Pictures, music, videos, and other media contents can be easily transferred to the computer without needing any kinds of software. Follow the steps on how to do it:
Either just switching to a new smartphone or upgrading, we all know that changing is tedious work. Android has better options than iOS but it still requires time and effort to do this process. If you are using an Android phone, you must first be familiar with your backup options in case you need so in here we will guide you on how to backup your data.
Android Lollipop backup service
Google is still top when it comes to cloud storage and luckily you can take advantage of this backup option on your Android devices running on the lollipop and higher.
In case you might use a new Android in the future all your apps, settings and other data will automatically be downloaded on the new device as long as you are using the same backup account. It can restore the following details:
Android data backup and restore to a new phone can be done in many ways; however the most convenient so far is to use FoneDog Toolkit- Android Data Backup & Restore. You can simply backup all the data inside the phone in just one click and restore them the same way! This software is compatible with almost all Android devices available in the market today. Download your own free trial version to experience this wonderful program ever developed.
Leave a Comment
Comment

Technical/Creative Writer
Kitchen, my safe space; black, my favorite color
Was a Technical Specialist for a while, troubleshooting Smartphone and Software-related issues until a writing stint caught my attention.
Android Data Backup & Restore
Back up your Android data and selectively restore to Android
Free Download Free DownloadHot Articles
 /
/
INTERESTINGDULL
/
SIMPLEDIFFICULT
Thank you! Here' re your choices:
Excellent
Rating: 4.7 / 5 (based on 86 ratings)
