FoneDog Screen Recorder
FoneDog Screen Recorder
Special Offer
Special Offer


By Vernon Roderick, Last updated: April 2, 2021
Toshiba Satellite is a brand of laptop that is developed by Toshiba and was one of the earliest laptops. And just like any computer, it can experience issues such as the laptop will not boot up or the partition and hard drives get corrupted and data are deleted or missing.
It has a factory software recovery image. The recovery image is usually stored in the hidden partition of the laptop drive which you can access for Toshiba Satellite recovery.
With this, there are several methods detailed in this article that will help you on how to do Toshiba Satellite recovery on your laptop. You can choose whether to recover using Partition Recovery or from an external source such as CD, DVD, or USB flash drive.
If you need more, you can also use FoneDog Data Recovery which will also help in the data recovery process. It can recover any type of file, from any device and in any situation.
Part 1. The Best Software to Recover FilesPart 2. When You Need Toshiba Satellite RecoveryPart 3. How Toshiba Satellite Recovery Works Part 4. Toshiba Satellite Recovery via CD/DVD MethodPart 5. Toshiba Satellite Recovery via Recovery Partition MethodPart 6. Toshiba Satellite Recovery via USB MethodPart 7. In Summary
An easy-to-use, reliable and professional data recovery wizard that helps you recover your deleted or missing files, FoneDog Data Recovery supports recovery of any type of data such as email, photo applications, video, audio archive, documents, and other types of file. In any situation and any device, this convenient to use tool can do data recovery for both Windows and Mac operating systems.
The software offers a free trial version that you can download. Two scan modes are available such as the quick and deep scan. You can choose to preview the files before data recovery and apply search filters. Launch, scan and restore. Recover any data from any situation across all devices. Continue to read below on the usage of the tool.
Data Recovery
Recover deleted image, document, audio and more files.
Get deleted data back from computer (including Recycle Bin) and hard drives.
Recover loss data caused by disk accident, operation system crushes and other reasons.
Free Download
Free Download

After you have downloaded and installed FoneDog Data Recovery, go to the Start menu and search for FoneDog Data Recovery from the list of Programs. Alternatively, click its pinned icon on the taskbar or the shortcut icon on your desktop (if a shortcut is created or the tool is pinned to the taskbar).
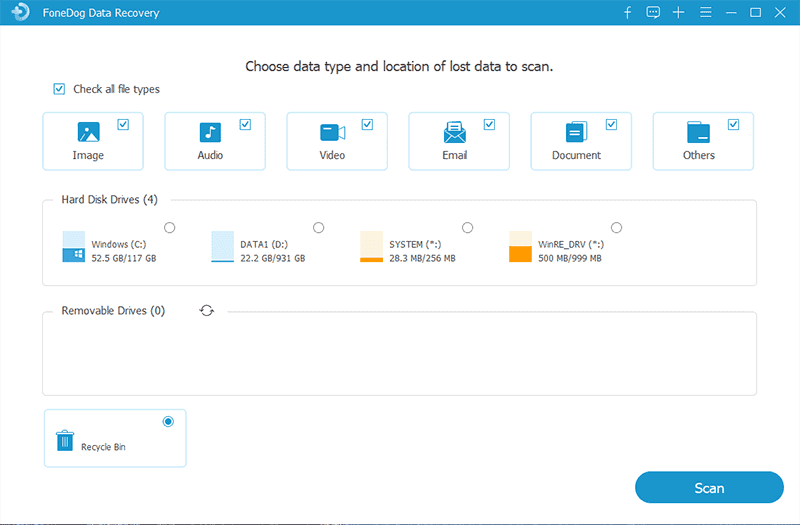
Choose the types of files that you want to restore to your computer. Then, choose the hard disk drives where you need to recover the deleted or missing files. Click the Scan button located on the bottom right of the wizard to begin the data scan. By default, a quick scan is performed on your device. Any type of file can be recovered including applications, music, video, photo, archive, document, and many others.
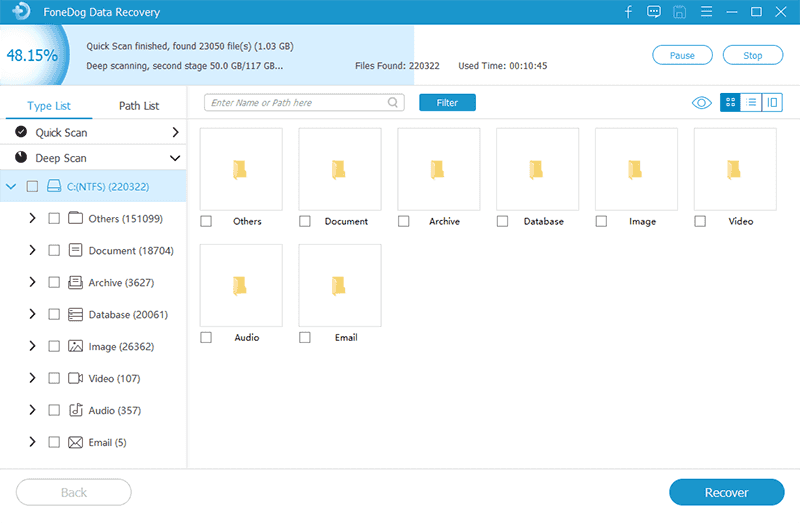
Scan your device by choosing what mode: quick scan or deep scan. Quick scan performs at a quicker speed while Deep scan yields more results but takes longer to finish. After the data scan, you can choose to preview the files before the data recovery process. You can also apply some search filters to limit the results that are returned hence saving time.
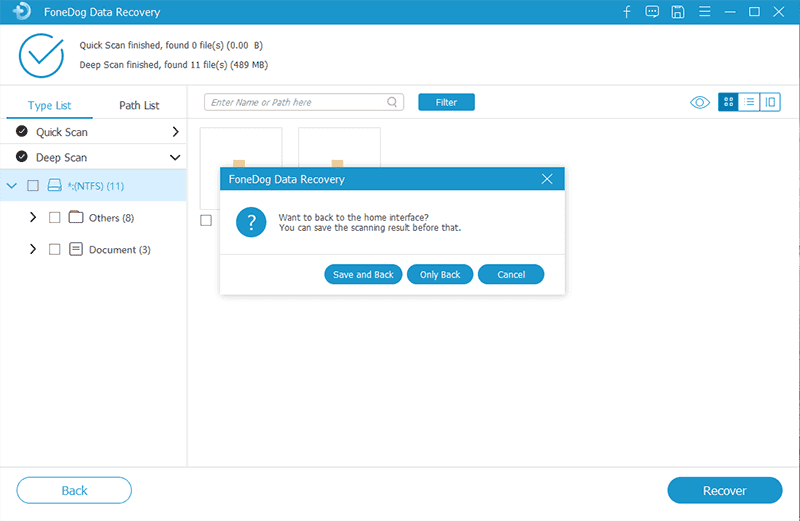
Select the files that need to be recovered. Then, click the Recover button found on the bottom right corner of the wizard to begin recovering the data. Remember that you do not close the wizard until the recovery process is complete. Make sure also that your laptop is not turned off or restarted while doing the recovery process.
Your Toshiba Satellite laptop is working well a few days ago and all of a sudden it does not boot up to the operating system, or the partition got corrupted and all of the data are wiped out. This spells great trouble, a very upsetting situation since all of your important files are stored on your computer.
The probable reasons why the problem occurred may be caused by a malicious attack on your computers such as virus and malware threats, hard drive failure, drive formatting errors, corrupted drive, bad sectors, system crash, and other hardware and software issues.
This can cause data loss in your system. Files may be deleted, missing, or get corrupted due to application issues, data transfer process issues, accidental deletion, permanent deletion such as when you press the Shift + Delete keys in your files, emptying of the Recycle Bin, or sudden drive formatting and many others. So this time you need Toshiba Satellite Recovery.
This will guide you on how to perform Toshiba Satellite Recovery. You can restore Toshiba Satellite laptops to their factory setting following certain methods. Some of the Toshiba laptops depending on the versions come with a hidden partition in the hard drive that has the same files as the recovery disc which is used for data recovery. You can create a recovery disc using any media device such as a compact disc or USB drive. You can also purchase from Toshiba a recovery disc if this does not come with your laptop.
All the data including your applications will be deleted when you restore your system to its original factory settings. So make sure to create backups of your data from your Toshiba Satellite laptop to an external media or another hard drive (not the system drive) before proceeding.
The default system drive is Drive C: where your operating system is installed. Plugin your laptop to a power source through the AC adaptor to avoid interruptions while doing the system recovery process.
The instructions below may differ depending on your machine. You can confirm the guidelines by going to the Toshiba website and view there the Owner’s Manual of your Toshiba Satellite laptop. Select product support and search for your laptop to view the steps on how to recover the internal storage drive.
After the recovery, you can perform a Windows operating system update to make it current and run the Toshiba Service Station to download any updates and install them on your Toshiba Satellite laptop.
This simple process will guide you on how to perform the Recovery Disc method to your Toshiba Satellite laptop using a CD or DVD.
Step 01: Place your recovery disc (CD or DVD) in the optical drive.
Step 02: Boot up your Toshiba Satellite laptop. If your laptop is powered on, shut it down and turn it on again. You can hold down the Power button for 10 seconds to turn off your laptop. You can also go to the Windows Start menu, then Power Options, and select ShutDown.
Step 03: When on the BIOS screen, press the F8, F5, or Delete key repeatedly.
Step 04: On the next section of the screen, use the arrow keys to navigate the screen. Select the Boot Devices setting.
Step 05: On the Boot Devices, change the order of the devices such that CD or DVD Drive is the first on the list that you want to boot. This is for the recovery disc.
Step 06: Turn off your laptop.
Step 07: Make sure that the recovery disc is already placed in the optical drive of your laptop. Then, boot up your laptop. Wait for the system while it boots up to the Toshiba Recovery Wizard.
Step 08: Follow the steps from the CD or DVD recovery disc process that will prompt you to restore your Toshiba Satellite laptop to its factory condition. During the recovery process, do not switch off or restart your laptop. Wait until the recovery process has completed its run.
This section provides step-by-step instructions to teach you how to perform the method of Toshiba Satellite Recovery (HDD Recovery, or called Free Recovery) to your Toshiba Satellite laptop.
Step 01: Boot up your Toshiba Satellite laptop. If your laptop is powered on, shut it down and turn it on again. You can hold down the Power button for 10 seconds to turn off your laptop. You can also go to Start, then Power Options, and select ShutDown.
Step 02: While holding the Power button, press and hold the zero key (0) to boot up your laptop.
Step 03: When the laptop starts to beep, release the zero key (0).
Step 04: When on the Toshiba screen’s initial display, press the F12 or F8 key to go to the boot menu. If the laptop boots to Windows before entering the boot menu, press CTRL + ALT + DELETE keys to reboot your laptop. Then, press the F12 or F8 keys again.
Step 05: Select Repair your computer then hit the Enter key. On the next section of the screen, use the arrow keys to navigate the screen. Select the Toshiba HDD Recovery option then hit the Enter key.
Step 06: A warning prompt will appear in the wizard screen that tells you that when the system recovery process is executed, all data will be deleted and the software image will be rewritten to its original factory setting. Choose the appropriate operating system you have.
Step 07: Select Yes to continue with the system recovery process.
Step 08: Select the Recovery of Factory Default Software method. This is a recommended method for recovering the original factory image and will also delete all partitions in your hard drive.
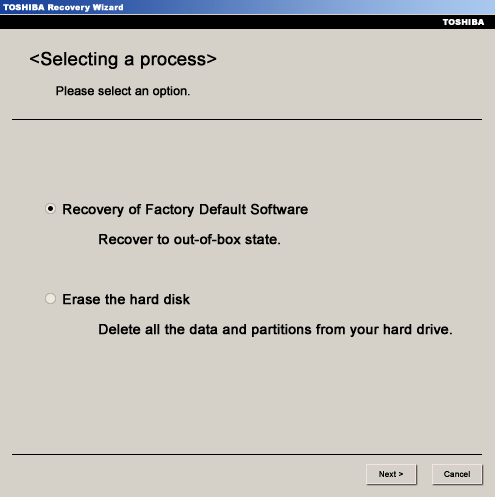
Step 09: Click Next to continue.
Step 10: Select the Recover to Out-of-Box State method.
Step 11: Click Next to continue.
Step 12: Then, click Next again to begin the system recovery. During the recovery process, do not switch off or restart your laptop. Wait until the recovery process has completed its run. The laptop may restart several times to install the necessary components. Follow the on-screen instructions when prompted.
This simple process will teach you how to perform the method of recovery to your Toshiba Satellite laptop using a USB flash drive where the recovery files are stored. The files are the same as what is in the recovery disc.
Step 01: Your USB Flash drive contains the recovery files same as what is in the recovery disc. Connect the USB flash drive to your Toshiba Satellite laptop.
Step 02: Boot up your Toshiba Satellite laptop. If your laptop is powered on, shut it down and turn it on again. You can hold down the Power button for 10 seconds to turn off your laptop. You can also go to the Windows Start menu, then Power Options, and select ShutDown.
Step 03: When on the BIOS screen, press the F8, F5, or Delete key repeatedly.
Step 04: On the next section of the screen, use the arrow keys to navigate the screen. Select the Boot Devices setting.
Step 05: On the Boot Devices, change the order of the devices such that the USB Flash Drive option is the first on the list that you want to boot. This is for the recovery disc.
Step 06: Turn off your laptop.
Step 07: Make sure that the recovery USB drive is already connected to your laptop. Then, boot up your laptop. Wait for the system while it boots up to the Toshiba Recovery Wizard.
Step 08: Follow the steps from the recovery disc process that will prompt you to restore your Toshiba Satellite laptop to its factory condition. During the recovery process, do not switch off or restart your laptop. Wait until the recovery process has completed its run.
People Also ReadHow to Use Flash Drive Repair Tool to Fix Corrupted USB and Recover DataHow to Recover Deleted Emails in Gmail from Your Account
There are times that laptops fail due to hardware or software issues. It is highly recommended to do regular backups of your important files in case something worse will happen to your computer. Such as in the case of Toshiba Satellite laptops, it comes with a factory software recovery image that you can use to do system recovery and restore to its original factory condition.
This article provides various processes that one can follow in order to perform a Toshiba Satellite recovery. You can also create a recovery image disc and store it in a separate external device. Another recommended tool that you can use to recover lost or missing data is the FoneDog Data Recovery program which is a reliable and professional data recovery wizard that will work for any data type and in any device, running on Windows or Mac.
Leave a Comment
Comment

Technical Expertise for PC/Website Optimization
One of my passion is to develop software of my own
I write articles to share knowledge about IT technology and some experience in developing my own software, and developing my own software is one of my passions for work.
Data Recovery
FoneDog Data Recovery recovers the deleted photos, videos, audios, emails, and more from your Windows, Mac, hard drive, memory card, flash drive, etc.
Free Download Free DownloadHot Articles
 /
/
INTERESTINGDULL
/
SIMPLEDIFFICULT
Thank you! Here' re your choices:
Excellent
Rating: 4.7 / 5 (based on 67 ratings)
