FoneDog Screen Recorder
FoneDog Screen Recorder
Special Offer
Special Offer


By Gina Barrow, Last updated: January 7, 2022
If you have been using iTunes for quite some time now, it’s a big hassle when you receive this error “The iPhone could not be synced because the sync session failed to start”. Getting this kind of error will not let you proceed any further and it can be frustrating when you need to sync your iPhone as soon as possible.
This error actually pertains to a lot of possible causes. It can be a failure on your iTunes, the USB cable, or a faulty iOS or operating system.
Follow these 6 effective ways to get rid of the error “The iPhone could not be synced because the sync session failed to start”.
Part 1. 6 Effective Solution to Fix iPhone Could Not be Synced ErrorPart 2. Bonus Solution - Use a Professional iTunes Repair SoftwarePart 3. Summary
There are plenty of methods to fix the "iPhone could not be synced because the sync session failed to start" error. In case you receive this iPhone synced error, learn how to fix it using these 6 methods:
Before you plug in your iPhone and sync it with iTunes, make sure that your computer (whether Windows or Mac) is updated. To install the latest macOS, follow these:
If you don’t see Software Update, go to the AppStore to find the update.
Windows is automatically updated however, some updates are not being sent at the same time, so you can manually update your PC by going to:
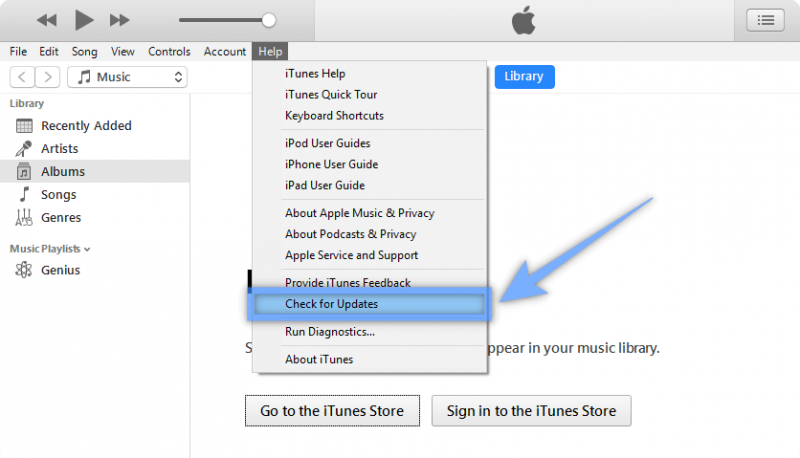
After you have updated or checked your computer’s operating system, the next thing you can do is to install the latest iTunes update.
Download and install iTunes on your computer and then begin syncing your iPhone.
Have you tried rebooting all the devices? Restarting the computer and the iPhone could greatly help stop all the ongoing processes and start anew.
Give your computer a quick power down along with your iPhone. After a couple of minutes, restart all the devices and try connecting them to see if the syncing is now possible.

Perhaps iTunes was not able to complete the sync because it cannot save a new backup, a backup is corrupted, or it has overwritten the old backups. It can be messy and the best thing you can do is to delete previous backups.
Those backups that you are confident that you no longer need. Here’s how to do it:
Another possible reason why you received the error “The iPhone could not be synced because the sync session failed to start” is the USB connection. Here are some quick fixes you can do:
Resetting the sync history of your iTunes can resolve many kinds of sync issues on your iPhone. Follow these steps to reset sync history on iTunes:
Alternative Tip:
Because syncing will overwrite all the existing data for your Music, Photos, Movies, and, TV Shows, it is best to have an alternative backup for your iPhone. You can use iCloud but if you prefer backing up your data to a computer then there are a number of excellent backup options online.
If you can’t sync your iPhone to iTunes, then you can use other backup services such as FoneDog iOS Data Backup & Restore. This software provides an easier and more efficient backup solution for your iDevices. It offers the following:
iOS Data Backup and Restore
One click to backup the whole iOS device to your computer.
Allow to preview and restore any item from the backup to a device.
Export what you want from the backup to your computer.
No data loss on devices during the restore.
iPhone Restore Won't Overwrite Your Data
Free Download
Free Download

Here’s how you can utilize FoneDog iOS Data Backup & Restore:
Step 1. Install FoneDog iOS Data Backup & Restore and connect your iPhone using a USB cable
Step 2. Select iOS Backup & Restore on the main program menu
Step 3. Choose your desired backup mode. Standard is a faster option and does not have any passwords set while the Encrypted mode gives you the option to create a password for your backup. Just be sure to remember the password otherwise, there is no way for you to restore the encrypted backup.
Step 4. Select All data type or you can selectively mark certain files you wish to backup
Step 5. Wait for the backup process to be completed

You can create as much backup as you want using FoneDog iOS Data Backup & Restore. In case you want to restore a backup, just head over to iOS Restore from the menu and find the most recent or appropriate backup file you need.
If all else fails in trying to fix the error “The iPhone could not be synced because the sync session failed to start, then the next excellent option for you is to look for professional software that can fix your iOS or iTunes.
We highly recommend using FoneDog iOS System Recovery, a plug and play kind of program that easily detects the current issue that your iPhone is having.
Just simply download the software and let it walk you through the steps on how to fix your device in no time!
People Also ReadHow to Sync Messages from iPhone to Mac/iPadHow to Restore iPhone from iCloud or iTunes Backup
The next time you receive this The iPhone could not be synced because the sync session failed to start error, you won’t be bothered anymore because you have the 6 best methods to resolve it.
And if you are looking for a better sync alternative, FoneDog iOS Data Backup & Restore gives you more advantages when it comes to features, efficiency, and convenience. It only takes a quick install for you to enjoy the one-click backup highlights.
What other ways have you done to resolve this sync error?
Leave a Comment
Comment

Technical/Creative Writer
Kitchen, my safe space; black, my favorite color
Was a Technical Specialist for a while, troubleshooting Smartphone and Software-related issues until a writing stint caught my attention.
iOS Data Backup & Restore
Back up your data to PC and selectively restore iOS data from backups.
Free Download Free DownloadHot Articles
 /
/
INTERESTINGDULL
/
SIMPLEDIFFICULT
Thank you! Here' re your choices:
Excellent
Rating: 4.7 / 5 (based on 105 ratings)
