FoneDog Screen Recorder
FoneDog Screen Recorder
Special Offer
Special Offer


By Nathan E. Malpass, Last updated: November 25, 2017
“I keep a lot of notes on my iPhone and just today, I accidentally deleted some of them. I don’t write them down on paper, so I can’t think of any way to get my hands on the important information written there. How can I recover my notes?
Can you suggest what iPhone Notes Recovery to recover my deleted notes?”
Part 1. iPhone Notes are ImportantPart 2. Retrieve Your Lost iPhone Notes the Old-fashioned WayPart 3. Get Quick and Effective iPhone Notes Recovery with FoneDog iOS Data RecoveryPart 4. Video Guide: How do I take Safe and Effective iPhone Notes RecoveryPart 5. Conclusions
The Notes app of the iPhone is very useful, the reason for which depends on the user. Some use it for simple note-taking while others set work-related reminders and make long lists with it.
You will find yourself in a tough spot if you just lost all your files from a failed iOS upgrade. Or if you restored an incorrect backup file from iTunes or iCloud. iOS system crashes can lead to catastrophic effects as well. That’s why it’s important to update to the latest version.
Whatever the cause, it’s imperative that you get back your deleted notes, fast. With our tutorial on iPhone notes recovery, you will know that there are more ways than one to restore them.
Let’s keep the ball rolling!
Recover lost notes from iPhone device
When you delete your notes, they go straight to the Recently Deleted folder. They stay there unless you actually erase them from that folder. It works just like the Recycle Bin in computers. To get to them, follow the instructions below.
It’s good if you were able to recover your notes with this process. However, if you saw that the Recently Deleted folder is empty, then you should try out our next solution.
Notes stay in the said folder for a short 30-day period. After that time, they are automatically deleted. This is one limitation this method has, so it’s important to explore other options.
The use of data recovery software is great as long as you choose one that’s trusted in the industry. Well, FoneDog iOS Data Recovery is. It has the highest data recovery success rate in the industry.
Plus, it supports all iPhone models including the latest iPhone X. It has versions for both Mac and Windows computers so you don’t need to be concerned with compatibility issues.
It also conveniently offers users with three options to get back their files from various iOS devices. If your primary goal is just to recover notes from your iPhone, then it would work perfectly as well. Simply select the best solution for you.
But first things first, download FoneDog iOS Data Recovery and connect your iPhone to your computer.
When to do this: Follow this approach if you were not able to sync your iPhone to iCloud or iTunes. If you’re unsure if your backups are complete, then this is a safer option.
Step 1. Select the option and start scan
Upon launching the software, select Recover from iOS Device and click Start Scan.
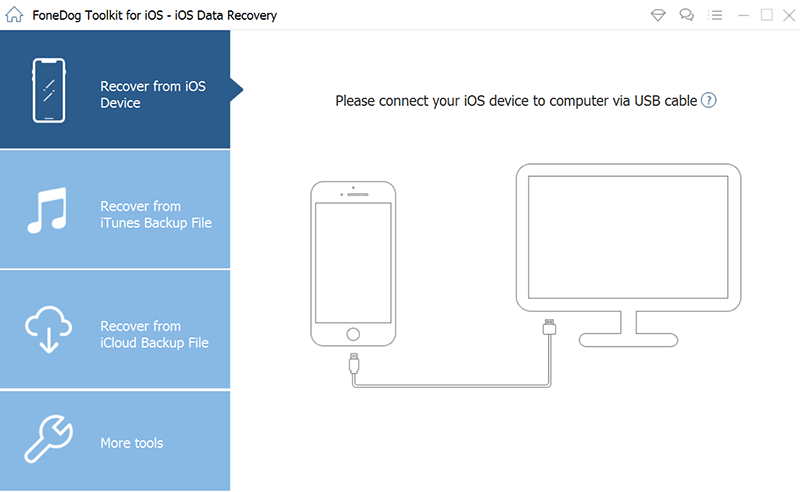
Select option and start scan you device--Step1
Step 2. Select and recover notes with iPhone Note Recovery
The scanning process may take several minutes. Nevertheless, it would be worth the wait.
On the left side of the interface, you will see a list of file types. Among them, select Notes under Memos & Others.
The window will then display a list of existing and deleted notes. You may preview the contents to know which ones you need.
Mark the notes you wish to recover and then tap on the Recover button to start downloading the files to your computer.
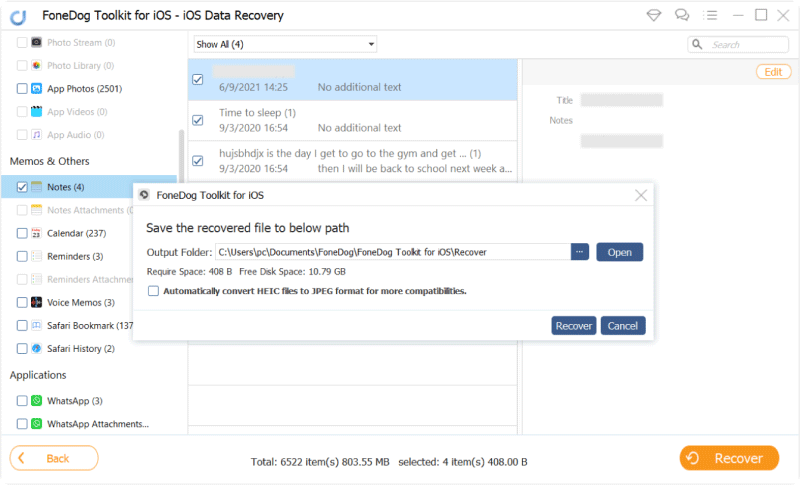
Choose and restore lost notes from iPhone--Step2
When to do this: Perform the steps below only if you’re certain that your notes are synced to iCloud.
It’s also recommended for iPhone users who do not want to format their phone, a process required to restore iCloud backup files.
1. Connect your iPhone to a PC and Sign into Your iCloud
On the left tab, select Recover from iCloud Backup File. You will be asked to log into your iCloud account.
Enter your Apple ID and password to proceed.
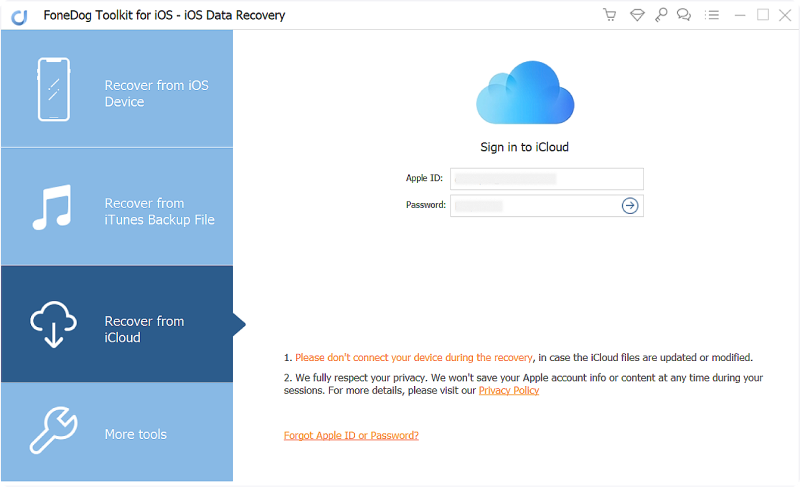
Launch the FoneDog and Connect your iPhone to a PC--1
2. Select files of notes to recover
A list of available backup files on your iCloud account will appear. Select one where you think your notes are saved.
The device name and date of backup are indicated so you would have no trouble choosing the correct backup file.
Hit Download. A pop-out will appear, asking you for the file types you wish to recover.
Tick on Notes. Marking only the needed items will save you time and shorten the scanning process. Click Next.
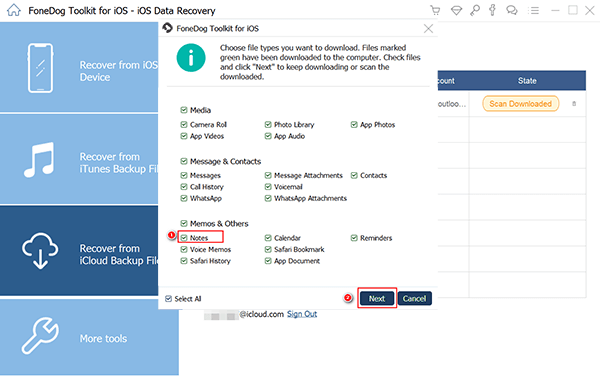
Choose deleted files of notes for Recovery--2
3. Restore erased notes via iPhone Note Recovery
The window will now show you all the notes found.
The right portion of the interface allows you to take a look at each one of them before you actually restore them.
Mark the checkboxes of the desired notes and click Recover.
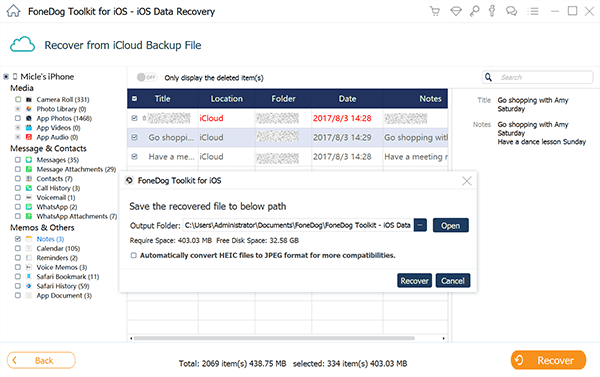
Extract deleted notes with the iCloud backup file--3
When to do this: Go with this method if you regularly sync your device with iTunes and you don’t want to end up downloading all your backup files.
#1. Run, select and start scan iPhone device
After launching the program, select Recover from iTunes Backup File from the list of options.
Select which of the listed iTunes backup files you want to access. Hit Start Scan to extract the files from the chosen file.
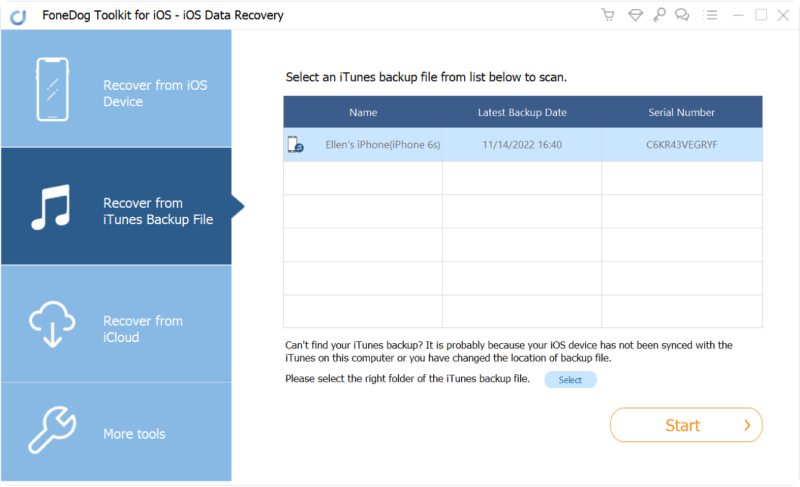
Launch, choose and start scan iPhone device on your PC--#1
#2. Restore deleted or lost notes with iPhone Note Recovery
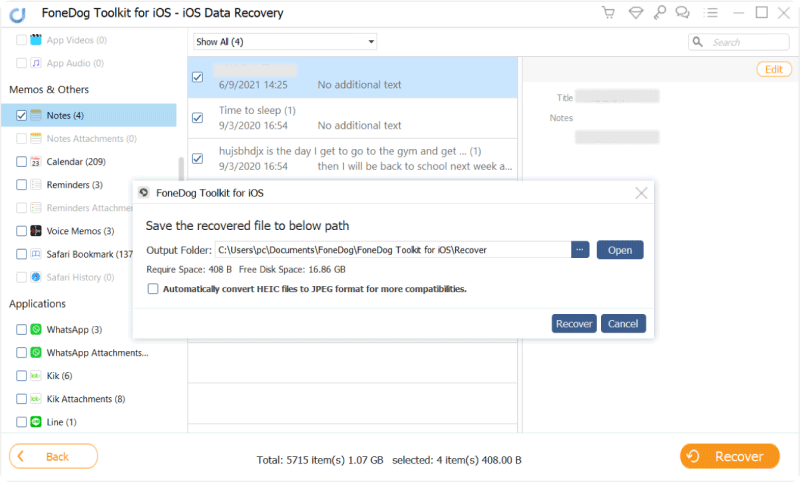
Different file types will be shown on the left side of the interface. Simply click on Notes.
This will display all notes that were synced to iTunes. Review the notes and decide which ones to keep.
Tick the corresponding items and click on Recover. You will then be asked to set the folder where you want the files to be saved to.
Everything goes well and then you will restore deleted notes with the help of iPhone note recovery which also calls FoneDog iOS Data Recovery.
People Also Read:
How Can I Recover Deleted Contacts from iPhone 8/8Plus
How to Recover Deleted Call History from iCloud
Recover deleted or lost notes from iTunes Backup file-#2
Losing your notes is a sure source of stress, so recovering them shouldn’t be. That’s where FoneDog toolkit - iOS Data Recovery comes in. if you happen to lose any more data, then use the software ASAP. Recoverable data is not limited to notes.
Your images, documents, and SMS can easily be restored too.
Moving forward, the best thing to do is to sync your iPhone to iCloud. Here’s a step-by-step guide to help you.
These 5 steps will now automatically backup your notes with iCloud. You may also set up iCloud syncing on your other iOS devices. That way, you can also access your iPhones’ notes on your iPad. Isn’t that neat?
Leave a Comment
Comment

iPhone/Android Devices’ Maintenance Expert
Staying home, listening to music, writing tech articles
Many people asked me to repair their mobile phones so I have a lot of experience in mobile phone repair, and I know a lot about Android or Apple phones.
iOS Data Recovery
3 Methods to recover your deleted data from iPhone or iPad.
Free Download Free DownloadHot Articles
 /
/
INTERESTINGDULL
/
SIMPLEDIFFICULT
Thank you! Here' re your choices:
Excellent
Rating: 4.4 / 5 (based on 102 ratings)
