FoneDog Screen Recorder
FoneDog Screen Recorder
Special Offer
Special Offer


By Nathan E. Malpass, Last updated: September 11, 2023
Transitioning to a new Android phone is an exciting prospect, offering enhanced features and improved performance. However, the process of on how to transfer contacts between Android phones has the potential to cause anxiety.
The thought of manually re-entering each contact can be daunting, especially if your address book is extensive. Luckily, in today's interconnected world, technology has streamlined this process, making it simpler than ever to seamlessly transfer contacts between Android phones.
In this article, we will guide you through various methods that cater to different preferences and situations. Whether you're upgrading to a newer device, switching brands, or simply safeguarding your contacts, you'll discover step-by-step instructions to ensure a smooth transfer.
We'll cover both traditional and modern techniques, highlighting their advantages and potential drawbacks, allowing you to choose the method that best suits your needs.
Say goodbye to the tedious task of manually copying contacts or resorting to outdated techniques. Let's dive into the world of hassle-free contact transfer and unlock the full potential of your new Android phone.
Part #1: Runner-Up Methods on How to Transfer Contacts between Android PhonesPart #2: The Top Tool on How to Transfer Contacts between Android Phones: FoneDog Phone TransferConclusion
Transferring contacts using a SIM card might be considered an old-school method, but it still proves to be effective, especially when dealing with a smaller number of contacts. The SIM card has long been a reliable carrier of contact information, and if your devices support this method, it's worth considering.
Here’s how to transfer contacts between Android phones using the SIM card:
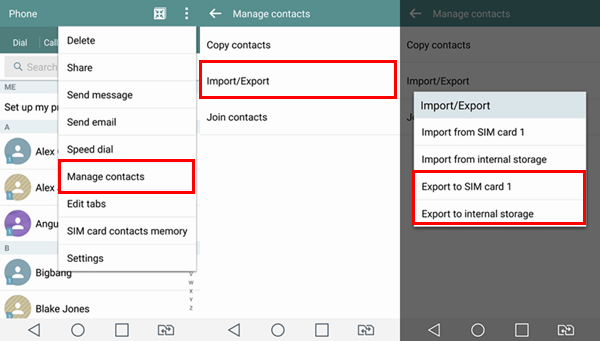
Using the SIM card method is a straightforward way to transfer contacts, particularly when you're dealing with a modest contact list. However, its limitations in terms of storage capacity and the inability to transfer comprehensive contact details might make it less appealing for users with extensive and diverse contact information.
If you're seeking a more comprehensive solution, stay tuned as we explore more advanced contact transfer methods in the upcoming sections.
You can use Bluetooth to transfer contacts between two iPhones, can you perform the same between two Android phones? Absolutely yes! Bluetooth technology enables contact transfer between Android phones without the need for internet access or physical connections.
The method involves pairing the phones, selecting contacts, and initiating the transfer via Bluetooth. While suitable for smaller contact lists, this method may not be as efficient for larger collections or when additional contact details need to be preserved.
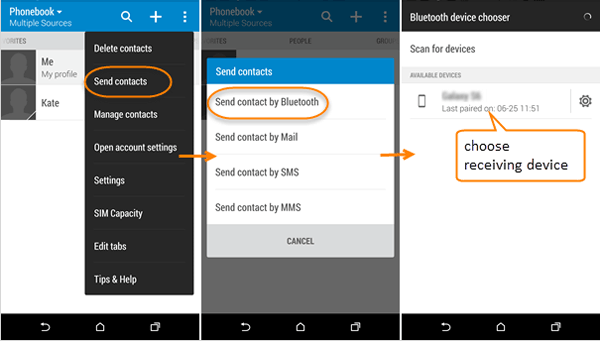
Using Bluetooth for contact transfer provides a simple and convenient way to migrate your contacts wirelessly. However, bear in mind that this method might not be suitable for larger contact lists due to potential limitations in speed and efficiency. For more advanced and comprehensive transfer options, continue reading as we explore alternative methods in the upcoming sections.
Google is usually used to transfer photos from one account to another, which is quite convenient. Transferring contacts using Google Contacts also offers a seamless and effective method that ensures your contacts are securely backed up in the cloud. This method is particularly useful when transitioning between Android devices, as it eliminates the need for manual transfers and allows for easy access across multiple devices.
Here's how to transfer contacts between Android phones using Google Contacts:
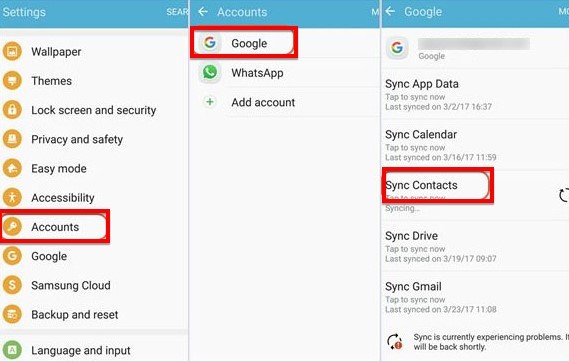
Using Google Contacts to transfer your contacts provides a reliable and efficient solution, especially when moving between Android devices. The contacts are securely stored in the cloud, ensuring easy access and synchronization across multiple platforms.
While an internet connection is required, the benefits of hassle-free, comprehensive contact management make this method an excellent choice for users seeking a seamless transition.
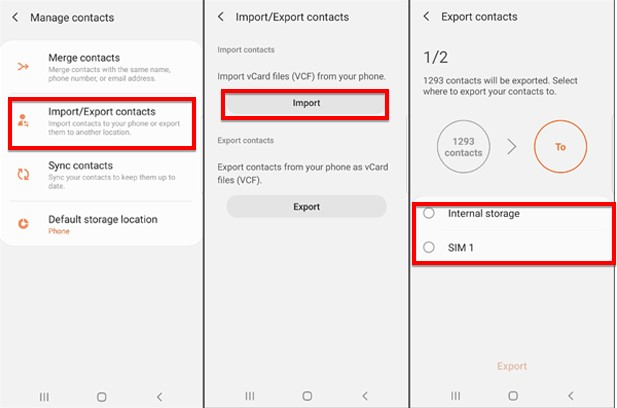
While more time-consuming, manually exporting and importing your contacts list offers a versatile approach that can be employed regardless of the device or platform. This method involves exporting your contacts as a file and then importing that file into your new Android phone. While it may require more steps, it gives you greater control over the process and is suitable for situations where other methods may not be applicable.
Here are the steps to implement it:
When it comes to transferring contacts between Android phones seamlessly and efficiently, the FoneDog Phone Transfer iPhone 15-supported tool emerges as a powerful solution. This dedicated tool simplifies the process by providing a user-friendly interface and a range of features that ensure your contact migration is smooth and hassle-free.
Phone Transfer
Transfer files among iOS, Android and Windows PC.
Transfer and backup text messages, contacts, photos, video, music on computer easily.
Fully compatible with the latest iOS and Android.
Free Download

Here is how to transfer contacts between Android phones using it:
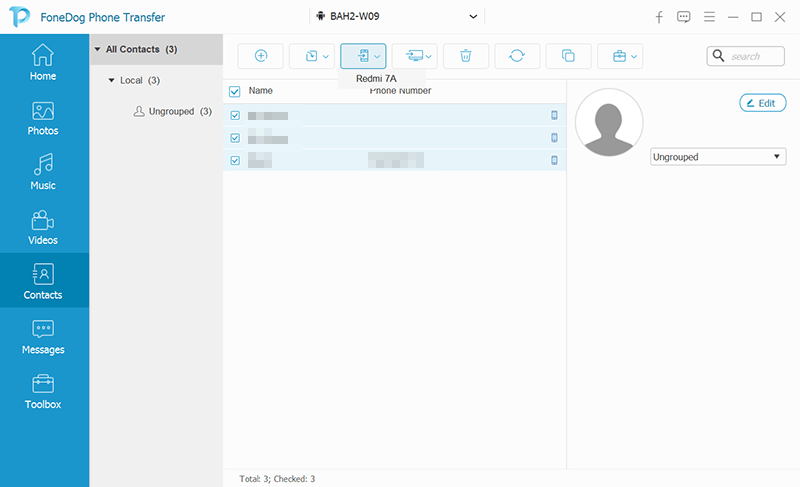
FoneDog Phone Transfer stands out as a top-notch tool for transferring contacts between Android phones. Its user-friendly interface, one-click transfer option, and comprehensive approach make it an ideal choice for users seeking a reliable and efficient contact migration experience. With FoneDog Phone Transfer, you can confidently transition to your new Android device, knowing that your contacts and important data are in capable hands.
People Also Read2023 Guide: How to Transfer Contacts from Sony to SamsungHow to Transfer Contacts from Samsung to iPhone: The Know-How
Transferring contacts between Android phones has evolved from being a cumbersome task to a streamlined process, thanks to various methods and tools at your disposal. In this article, we explored multiple techniques on how to transfer contacts between Android phones, each catering to different preferences and scenarios. Whether you're seeking simplicity, cross-platform compatibility, or a comprehensive approach, there's a method that suits your needs.
Whichever method you choose, remember that the goal is to ensure a smooth transition to your new Android phone while safeguarding your valuable contact information. With these methods at your disposal, you can confidently embrace your new device, knowing that your contacts will be right there with you.
Leave a Comment
Comment

iPhone/Android Devices’ Maintenance Expert
Staying home, listening to music, writing tech articles
Many people asked me to repair their mobile phones so I have a lot of experience in mobile phone repair, and I know a lot about Android or Apple phones.
Phone Transfer
Transfer data from iPhone, Android, iOS, and Computer to Anywhere without any loss with FoneDog Phone Transfer. Such as photo, messages, contacts, music, etc.
Free DownloadHot Articles
 /
/
INTERESTINGDULL
/
SIMPLEDIFFICULT
Thank you! Here' re your choices:
Excellent
Rating: 4.7 / 5 (based on 57 ratings)
