FoneDog Screen Recorder
FoneDog Screen Recorder
Special Offer
Special Offer


By Nathan E. Malpass, Last updated: January 27, 2024
In the digital age, music has become an integral part of our lives, providing the soundtrack to our daily routines. If you're an Apple user, chances are your iTunes library holds a treasure trove of your favorite songs and albums. However, the process on how to transfer iTunes music to iPhone can sometimes feel like navigating a labyrinth of settings and cables.
Fear not, for in this guide, we will demystify the process and show you how to seamlessly transfer your iTunes music to your iPhone. Whether you're a seasoned Apple aficionado or a newcomer to the iOS ecosystem, you'll find our step-by-step instructions easy to follow, and a top transfer tool to use.
Part #1: How to Transfer iTunes Music to iPhonePart #2: Bonus Tip: Transfer Music Among Computer, Android, And iOS Devices with FoneDog Phone TransferSummary
Transferring your cherished iTunes music to your iPhone can be done using several methods. In this first method, we'll explore how to seamlessly sync your iTunes account with your iPhone to ensure that your music collection is always at your fingertips.
Step #1: Prepare Your iTunes Library
Before you can begin the syncing process, make sure your iTunes library is up to date with all the music you want on your iPhone. You can add new songs, albums, or playlists to your iTunes library by purchasing them from the iTunes Store, ripping CDs, or adding music files from your computer.
Step #2: Connect Your iPhone to Your Computer
Using a USB cable, connect your iPhone to your computer. Make sure you have the latest version of iTunes installed on your computer.
Step #3: Launch iTunes
Open iTunes on your computer if it doesn't launch automatically upon connecting your iPhone.
Step #4: Authorize Your Computer
If you haven't already authorized your computer to access your iTunes account, you'll need to do so. Go to the "Account" menu in iTunes and select "Authorizations". Then, choose "Authorize This Computer" and enter your Apple ID credentials.
Step #5: Select Your Device
Click on the device icon that appears in the top-left corner of the iTunes window. This will take you to your iPhone's summary page.
Step #6: Configure Sync Settings
In the left sidebar, you'll see various options for syncing different types of content, including Music. Click on "Music".
Step #7: Choose What to Sync
You can choose to sync your entire music library or specific playlists, artists, albums, or genres. Make your selections according to your preferences.
Step #8: Start the Sync
Once you've configured your sync settings, click the "Apply" or "Sync" button in the bottom-right corner of the iTunes window. iTunes will begin transferring the selected music to your iPhone.
Step #9: Wait for the Sync to Complete
The time it takes to sync your music depends on the amount of data being transferred. Be patient and wait for the process to finish.
Step #10: Eject Your iPhone
After the sync is complete, safely eject your iPhone from your computer. You can now enjoy your iTunes music on your iPhone, and it will be accessible from the Music app.
This method provides a straightforward way to transfer your iTunes music to your iPhone by keeping your iTunes library and iPhone in sync. However, if you prefer more control over your music transfer process or want to avoid using a computer, there are alternative methods worth exploring in this guide.
If you prefer not to sync your iTunes music automatically or want to have more control over what songs go on your iPhone, manual management of media is an excellent option. In this method, we'll guide you through the process of how to transfer iTunes music to iPhone manually.
Step #1: Connect Your iPhone to Your Computer
Using a USB cable, connect your iPhone to your computer. Ensure that you have the latest version of iTunes installed.
Step #2: Launch iTunes
Open iTunes on your computer. It should recognize your connected iPhone.
Step #3: Authorize Your Computer
If you haven't previously authorized your computer to access your iTunes account, go to the "Account" menu in iTunes, select "Authorizations", and choose "Authorize This Computer". Enter your Apple ID credentials.
Step #4: Enable Manual Management
In iTunes, click on the device icon located in the top-left corner of the window. This will take you to your iPhone's summary page.
Step #5: Select "Manually Manage Music and Videos"
Under the "Options" section, check the box that says "Manually manage music and videos". This option allows you to manually add and remove music from your iPhone without syncing.
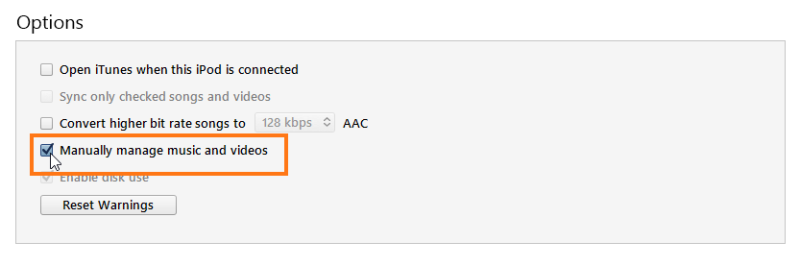
Step #6: Apply the Changes
Click the "Apply" button in the bottom-right corner of the iTunes window to save your settings.
Step #7: Add Music to Your iPhone
To transfer iTunes music to your iPhone manually, you can either:
Step #8: Wait for the Transfer
iTunes will copy the selected music to your iPhone. The time it takes depends on the amount of data being transferred.
Step #9: Eject Your iPhone
Once the transfer is complete, safely eject your iPhone from your computer.
By enabling manual management of music and videos, you have more control over what music goes on your iPhone and can add or remove songs as needed. This method is particularly useful if you have a large iTunes library and want to be selective about the content on your device. Enjoy your music on your iPhone hassle-free!
iCloud Drive offers a convenient way to access your iTunes music from any iOS device, including your iPhone. Here's how to transfer your iTunes music to your iPhone using iCloud Drive:
Step #1: Enable iCloud Music Library on Your iPhone
Step #2: Enable iCloud Music Library on Your Computer
Step #3: Upload Your iTunes Music to iCloud
Step #4: Wait for the Upload to Complete
The time it takes to upload your music to iCloud depends on the amount of data being transferred and your internet connection speed. You can check the progress in the iTunes status bar.
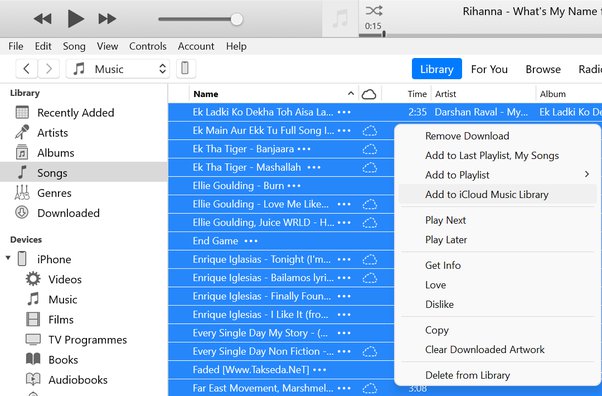
Step #5: Access Your Music on Your iPhone
Once the upload is complete, open the Music app on your iPhone. You should see your iTunes music available for streaming or downloading. You can choose to download specific songs or playlists to your iPhone for offline listening by tapping the cloud icon next to the music you want.
Step #6: Enjoy Your iTunes Music on Your iPhone
Your iTunes music is now accessible on your iPhone via iCloud Music Library. You can listen to your favorite songs and playlists whenever you like, even if you don't have your computer with you.
This method is ideal for users who prefer to keep their music in the cloud and want seamless access to their iTunes library across all their Apple devices. But is there a way to move music from computer to iPhone without using iTunes? Keep reading!
FoneDog Phone Transfer is a powerful and versatile iPhone 15-supported tool that simplifies the process of transferring music and other data among computers and various mobile devices, including both Android and iOS devices. Whether you want to move your iTunes music from a computer to your iPhone or share music between Android and iOS devices, FoneDog Phone Transfer offers a user-friendly solution.
Phone Transfer
Transfer files among iOS, Android and Windows PC.
Transfer and backup text messages, contacts, photos, video, music on computer easily.
Fully compatible with the latest iOS and Android.
Free Download

Here, we'll walk you through the steps on how to transfer iTunes music to iPhone using FoneDog Phone Transfer:
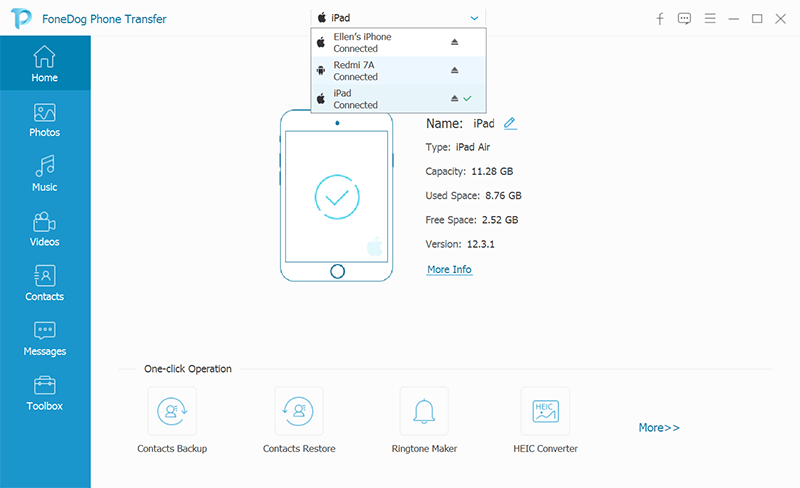
Step #1: Install and Launch FoneDog Phone Transfer
Start by downloading and installing FoneDog Phone Transfer on your computer. Launch the software once the installation is complete.
Step #2: Connect Your iPhone and Computer
Using USB cables, connect both your iPhone and your computer to the same network. FoneDog Phone Transfer will detect your devices automatically.
Step #3: Select "Phone to Phone Transfer" Mode
In the FoneDog Phone Transfer main menu, click on the "Phone to Phone Transfer" mode. This mode allows you to transfer data between your computer and your iPhone.
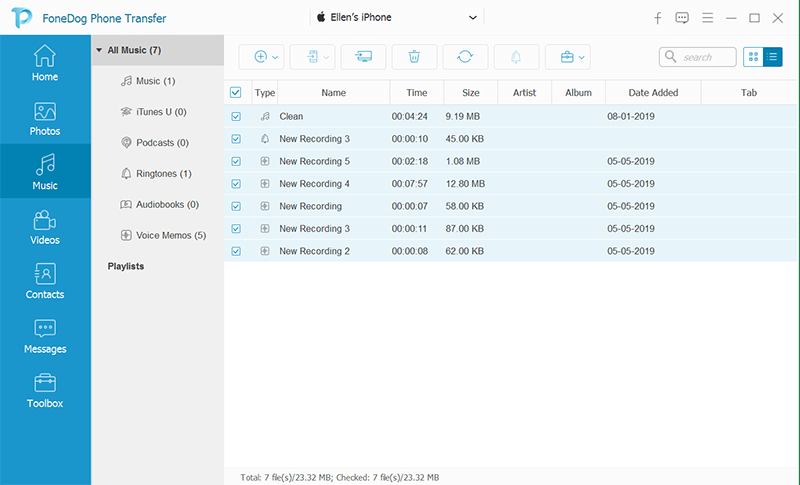
Step #4: Choose Music to Transfer
In the next window, you'll see a list of data types that can be transferred. Select "Music" or other data types from the list.
Step #5: Begin the Transfer
Click the "Start Transfer" button to initiate the music transfer process. FoneDog Phone Transfer will begin copying your iTunes music from your computer to your iPhone.
Step #6: Complete the Transfer
Wait for the transfer to finish. Once it's done, you'll see a confirmation message. Your iTunes music is now successfully transferred to your iPhone.
With FoneDog Phone Transfer, you can effortlessly move your iTunes music from your computer to your iPhone, and it supports various other data types and device combinations. This versatile tool simplifies cross-platform data transfers and ensures your music and other data are always within reach, regardless of the devices you use.
People Also Read2024 Guide: How to Transfer Music from Mac to iPhone?3 Ways on How to Move Music to iCloud Storage [2024 Updated]
Transferring iTunes music to your iPhone can be achieved through various methods, each catering to different preferences and needs. In this guide, we've explored three different methods on how to transfer iTunes music to iPhone.
Choose the method that best suits your needs and preferences to enjoy your iTunes music on your iPhone hassle-free. Whether you prefer automation, manual control, or cross-platform compatibility, there's a solution for everyone to enjoy their favorite tunes on the go.
Leave a Comment
Comment

iPhone/Android Devices’ Maintenance Expert
Staying home, listening to music, writing tech articles
Many people asked me to repair their mobile phones so I have a lot of experience in mobile phone repair, and I know a lot about Android or Apple phones.
Phone Transfer
Transfer data from iPhone, Android, iOS, and Computer to Anywhere without any loss with FoneDog Phone Transfer. Such as photo, messages, contacts, music, etc.
Free DownloadHot Articles
 /
/
INTERESTINGDULL
/
SIMPLEDIFFICULT
Thank you! Here' re your choices:
Excellent
Rating: 4.5 / 5 (based on 99 ratings)
