FoneDog Screen Recorder
FoneDog Screen Recorder
Special Offer
Special Offer


By Gina Barrow, Last updated: October 2, 2019
How do you transfer the old iPhone to new iPhone effectively? Are there more options besides the classic iTunes and iCloud?
These are the common questions raised by users who have recently changed or gotten their new iPhones. Of course, receiving a new iPhone is very exciting but then when you think about data transfer, you step back a little and ponder on which methods will work out for you.
Today, we will learn 3 recommended ways on how to transfer your data from the old iPhone to the new iPhone. There are new methods we discovered which we think will greatly help a lot of users especially the beginners out there who are still figuring out how to perform this process.
Read along to find out.
Part 1. Transfer Old iPhone to the New iPhone without iTunes and iCloud – Most Efficient MethodPart 2. How to Use Quick Start and iPhone Migration Feature to Setup New iPhonePart 3. How to Transfer Old iPhone to New iPhone with iTunes and iCloudPart 4. Conclusion
We all know that not everything we store on the old device should be transferred over to the new one. Some prefer a clean slate, while some needs a few important data only such as the phonebook, messages, and media files. We can always re-install apps and customize phone settings the way we want to.
But it seemed that you cannot perform a selective phone transfer easily. If we use iTunes or iCloud backup, we need to restore the entire backup to the new phone and it might clutter in the new device.
Restoring iTunes or iCloud backup might mean your new phone will have less storage space left for you to customize it. It is best if we can selectively choose those important files only so we can have more space on the new iPhone and install fresh and new apps.
But how are we able to do this kind of transfer? Don’t look any further, we have sorted this problem already and we introduce FoneDog Phone Transfer, it is a program that allows phone transfer in between iOS devices.
You don’t need to use iTunes or iCloud in order to move important files; FoneDog Phone Transfer lets you choose what files you need to transfer over.
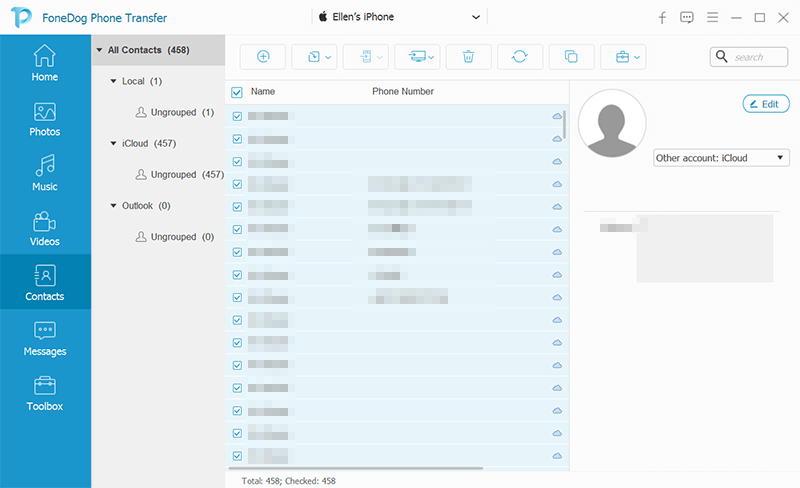
FoneDog Phone Transfer highlights:
To learn more about how you can use FoneDog Phone Transfer, you can download it for free! Here is how to use this simple program:
And that’s it! With just a few clicks, you can now continue setting up your new iPhone. You don’t have to do a lot of clicks and taps in order to move your files which can be the main cause of data loss.
FoneDog Phone Transfer keeps your data safe and secure from any forms of data loss which is why it provides few-clicks operation and upfront interface.
Apart from providing the most efficient transfer method, FoneDog Phone Transfer also lets us backup our contacts in just one click. You can also choose to restore them to another device.
This program also converts all HEIC images to JPG/PNG so you can view the pictures in any devices. You can also enjoy customizing your ringtones using this program.
Apple recently introduced a new feature called iPhone migration tool during the iOS 12.4 update. In this feature, you can transfer files from the old iPhone to the new iPhone either wirelessly or through cable connection (via lightning to USB-C camera kit adapter and a USB-C lightning cable).
This is actually a cool feature that Apple has ever added, imagine transferring your files without going through so much hassle. However, you have to ensure that both of your devices are updated to iOS 12.4 before you can use this feature.
You can always check for a software update before you begin the transfer. Once you have updated your phone, you can now start the transfer using QuickStart and iPhone Migration Tool.
For iOS devices running on iOS 11, you can take advantage of the QuickStart option to transfer your phone data. Quick Start restores apps, settings, and data from your iCloud backup.
The steps on how to QuickStart is similar to the iPhone migration tool.
iTunes and iCloud are two methods that iOS devices highly store their data to. Both the iTunes and iCloud have been reliable in backing up phone contents. If this is your first time to use iTunes and iCloud, follow these guides:
Most users, however, prefer using iCloud because it is wireless and you can do it at any time. But then, both options actually meant to transfer data entirely from the old iPhone down to the new one. You don’t have the option to transfer important phone contents only unlike the other methods we showed earlier.
In this article, we have shown you how to transfer old iPhone data to new iPhone using different methods. One of the most recommended methods is by using FoneDog Phone Transfer. It works flawlessly in transferring your contents selectively and has more features you can take advantage with.
Other methods we gave were using Apple’s QuickStart and iPhone migration tools, which are available on iOS 11 and iOS 12.4. If you are using an older iPhone, you might need to upgrade your software first before you can use these methods.
Have you tried doing any of these methods above? What transfer option is more convenient for you? Share us your thoughts in the comments!
Leave a Comment
Comment

Technical/Creative Writer
Kitchen, my safe space; black, my favorite color
Was a Technical Specialist for a while, troubleshooting Smartphone and Software-related issues until a writing stint caught my attention.
Phone Transfer
Transfer data from iPhone, Android, iOS, and Computer to Anywhere without any loss with FoneDog Phone Transfer. Such as photo, messages, contacts, music, etc.
Free DownloadHot Articles
 /
/
INTERESTINGDULL
/
SIMPLEDIFFICULT
Thank you! Here' re your choices:
Excellent
Rating: 4.8 / 5 (based on 102 ratings)
