FoneDog Screen Recorder
FoneDog Screen Recorder
Special Offer
Special Offer


By Nathan E. Malpass, Last updated: April 29, 2024
Music has become an integral part of our lives, providing us with entertainment, motivation, and solace. With the convenience of laptops and iPads, having your favorite tunes at your fingertips has never been easier. Whether you're preparing for a long journey, a workout at the gym, or simply relaxing at home, having your personalized music library on your iPad ensures that your audio companionship is always within reach.
However, the process to transfer music from laptop to iPad might seem troublesome, especially if you're not well-versed in the intricacies of device synchronization. Fear not! In this guide, we'll walk you through the various methods and techniques to seamlessly move music to your iPad.
Whether you're a tech-savvy enthusiast or a casual user, by the end of this article, you'll be empowered with the knowledge to curate your ideal musical experience on your iPad. Let's dive in and unlock the world of portable melodies!
Part #1: Ways to Transfer Music from Laptop to iPad [Mac]Part #2: Ways to Transfer Music from Laptop to iPad [Windows]Part #3: The Best Tool to Transfer Music from Laptop to iPad on Mac/ Windows: FoneDog Phone TransferConclusion
AirDrop, a feature nestled within the Apple ecosystem, allows for seamless wireless file transfers between compatible devices. The beauty of this method lies in its simplicity and lack of cables, making it an ideal choice for transferring music from your Mac laptop to your iPad.
Ensure that both your Mac laptop and iPad have Bluetooth and Wi-Fi turned on. Also, make sure that both devices are logged in with the same Apple ID. This harmony of settings is essential for successful AirDrop exchanges.
Navigate to the music files you wish to transfer on your Mac laptop. You can select individual tracks or entire albums—it's all up to your musical preferences.
Right-click on the chosen music files. From the context menu, select "Share" and then "AirDrop". A window will appear, displaying the available AirDrop recipients. Your iPad should be visible here. Click on your iPad's icon.
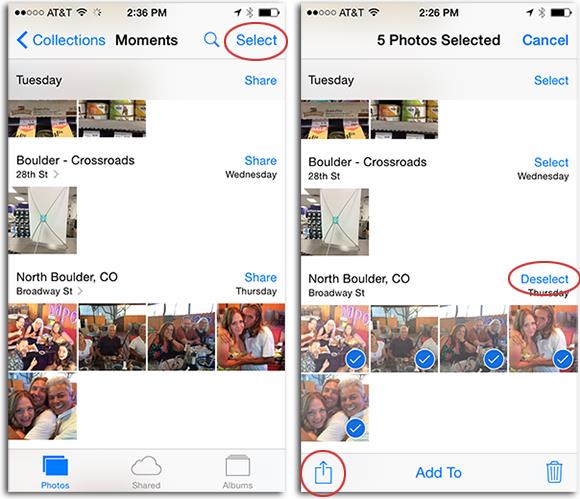
On your iPad, you'll receive an AirDrop notification. Tap "Accept" to initiate the transfer. The music files will start flowing from your Mac laptop to your iPad's welcoming digital embrace.
Once the transfer is complete, you'll find the music nestled within the appropriate app on your iPad, ready to accompany you on your audio journey.
AirDrop's magic lies in its simplicity and speed. It's a fantastic option when you're in close proximity to your Mac laptop and want to swiftly transfer a handful of music files.
connection is the most straightforward route. Using a Lightning USB cable opens up a path for music to flow seamlessly between your devices. This method is perfect for those moments when you crave a reliable wired connection. Here’s how to transfer music from laptop to iPad using a USB cable:
Ensure you have a Lightning USB cable at your disposal. This cable will serve as the bridge between your Mac laptop and iPad.
Plug one end of the Lightning USB cable into your Mac laptop's USB port.
Insert the other end of the cable into your iPad's charging port.
Your iPad might prompt you to unlock it to allow access to your Mac laptop. If prompted, simply unlock your iPad using your passcode or biometric authentication (Touch ID or Face ID).
A dialog box might appear on your iPad, asking if you trust this computer. This is your iPad's way of ensuring the security of the connection. Tap "Trust" to proceed.
On your Mac laptop, open Finder. In the sidebar, under the "Locations" section, you should see your iPad listed. Click on your iPad's name to establish the connection.
Within Finder, you'll notice various options for interacting with your iPad. Click on "Music" to access your iPad's music library.
In your Mac's Finder window, locate the music files you wish to transfer. Drag these files and drop them into the "Music" section under your iPad's name in Finder.
Your Mac laptop will begin transferring the selected music files to your iPad. The speed of the transfer depends on the size of the files and the speed of your USB connection.
Once the transfer is complete, safely eject your iPad from Finder on your Mac laptop. Now, on your iPad, open the Music app to find your newly added tracks.
Using a Lightning USB cable ensures a stable and secure transfer of your music files, making it an excellent choice when you're dealing with a larger number of tracks or when you prefer the reliability of a wired connection.
In the realm of digital connectivity, iCloud emerges as a cloud-based savior, enabling you to effortlessly sync music across your devices. This method is particularly convenient if you wish to access your music from any location, without the constraints of cables or physical proximity. Here’s how to transfer music from laptop to iPad using iCloud:
On your Mac laptop, open System Preferences and click on "Apple ID". Ensure that "iCloud Music Library" is checked. This will allow your music library to be synced across your devices via iCloud.
Open iTunes (or Music app) on your Mac. Select the songs or albums you want to upload to iCloud. Right-click on the selected music and choose "Add to Library".
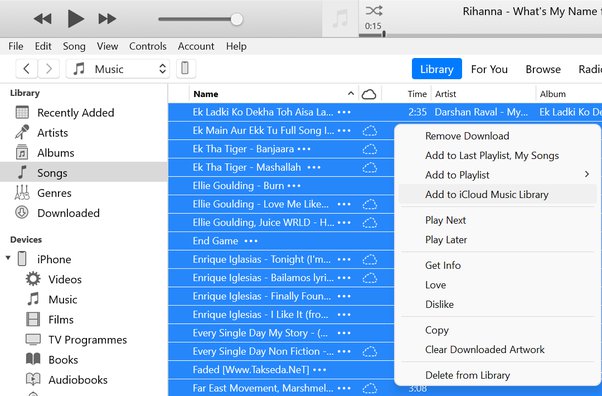
Your selected music will now begin uploading to iCloud. The time it takes depends on your internet speed and the size of the music files.
On your iPad, open the Music app and make sure you're signed in with the same Apple ID. Your uploaded music should start appearing in your library. The beauty of iCloud syncing is that you don't need to manually transfer the files; they're available for streaming or downloading on your iPad as long as you have an internet connection.
If you want to listen to your music offline, you can download specific songs or albums on your iPad. Just tap the download icon next to the music you want to have available offline. This way, you can enjoy your tunes even when you're not connected to the internet.
Apart from individual songs, you can also create and sync playlists, making it easy to curate your own custom listening experiences on your iPad.
Just as a conductor directs an orchestra, you have the power to orchestrate the movement of music from your Windows laptop to your iPad. In this section, we'll explore methods tailored for Windows users, starting with the tried-and-true method to transfer music from laptop to iPad using iTunes.
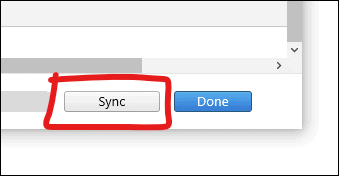
Using iTunes provides a structured and familiar approach to transferring music for Windows users. While Apple is transitioning away from iTunes, it's still a reliable choice for those who appreciate its functionalities.
Is there a way to transfer files from your computer to an iPad without using iTunes? Sure! When it comes to cloud storage and file sharing, Google Drive stands out as a reliable and accessible option. By utilizing Google Drive, you can seamlessly transfer music from laptop to iPad, all while enjoying the convenience of cloud-based storage.
On your Windows laptop, open a web browser and navigate to Google Drive (drive.google.com). Sign in with your Google account. If you don't have one, you'll need to create an account. Click on the "+" button or the "New" button, then select "File upload". Locate and select the music files you want to transfer from your laptop. These files will now be uploaded to your Google Drive.
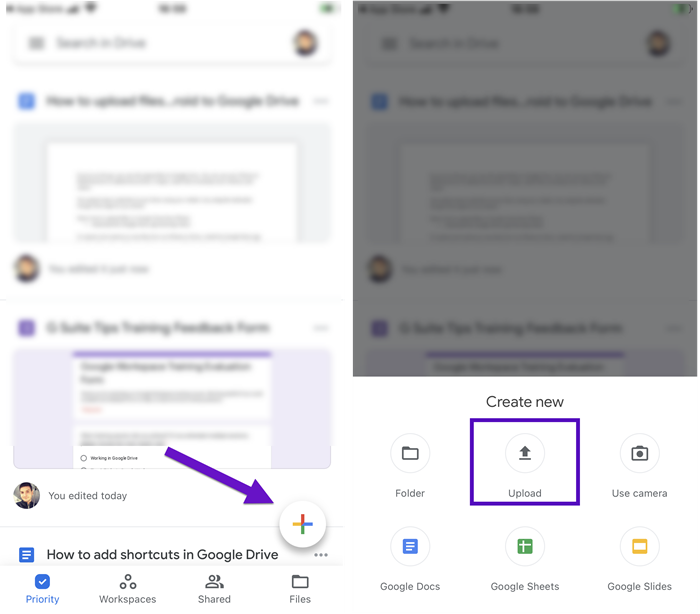
On your iPad, download and install the Google Drive app from the App Store. Open the Google Drive app and sign in with the same Google account you used on your Windows laptop.
In the Google Drive app, navigate to the folder where you uploaded your music files. Tap on a music file to select it, then tap the three dots (more options) icon. Select "Download" to download the file to your iPad.
The downloaded music files will now be accessible on your iPad. You can use the default Files app or a preferred music player app to listen to your transferred music.
For future use, consider organizing your music files within Google Drive by creating dedicated folders. This can help you easily locate and manage your transferred music.
Using Google Drive provides a flexible and user-friendly method to transfer music files between your Windows laptop and iPad. Additionally, it offers the advantage of having your music accessible from any device with an internet connection.
In the realm of seamless music transfers, having a reliable and efficient tool can make all the difference. Enter FoneDog Phone Transfer, a powerful iPhone 15-supported software solution that empowers you to effortlessly move your music from your laptop to your iPad, regardless of whether you're using a Mac or a Windows machine.
Phone Transfer
Transfer files among iOS, Android and Windows PC.
Transfer and backup text messages, contacts, photos, video, music on computer easily.
Fully compatible with the latest iOS and Android.
Free Download

Here’s how to use the tool to transfer music from laptop to iPad:
FoneDog Phone Transfer streamlines the process of transferring music from your laptop to your iPad, making it an excellent choice for those seeking a reliable and efficient solution.
People Also ReadGuide on How to Transfer Movies to iPadA Complete And Easy Guide On How To Transfer Data From One iPad To Another
In Conclusion, the journey on how to transfer music from laptop to iPad is marked by various methods and tools, each offering its own set of advantages. Whether you opt for the wireless convenience of AirDrop, the reliability of a USB connection, the flexibility of cloud-based services, or the efficiency of dedicated software like FoneDog Phone Transfer, your musical journey is well within reach. Choose the method that aligns with your preferences and needs, and let your music accompany you wherever you go.
Leave a Comment
Comment

iPhone/Android Devices’ Maintenance Expert
Staying home, listening to music, writing tech articles
Many people asked me to repair their mobile phones so I have a lot of experience in mobile phone repair, and I know a lot about Android or Apple phones.
Phone Transfer
Transfer data from iPhone, Android, iOS, and Computer to Anywhere without any loss with FoneDog Phone Transfer. Such as photo, messages, contacts, music, etc.
Free DownloadHot Articles
 /
/
INTERESTINGDULL
/
SIMPLEDIFFICULT
Thank you! Here' re your choices:
Excellent
Rating: 4.7 / 5 (based on 103 ratings)
