FoneDog Screen Recorder
FoneDog Screen Recorder
Special Offer
Special Offer


By Adela D. Louie, Last updated: March 19, 2018
Why google backup not working on Android?
For most Android users, backing up data is very important. This is for all users to have a copy of their data saved on their computer or in their Google Account.
On your Android devices, aside from your data, you can also backup your device settings like your Wi-Fi networks and password and applications data to your Google Drive.
However, there are just instances that your Google backup does not always work. Some Android devices have this conflict in regards to their Google Drive backup like the Samsung Galaxy, Google Nexus, Google Pixels, OnePlus, Huawei, Xioami, Redmi, and more.
Users are complaining that sometimes they are always receiving a pop-up message that says "Disabled by your Admin" whenever they are trying to do Backup and Restore. If this also occurs to you, then we have methods for you to try on how you are going to make your Google Backup working. Here are four methods to solve google backup not working on Android.
People Also ReadHow to Recover WhatsApp Messages after Uninstall?Quick Way on How to Backup Android Phone With Broken Screen
Part 1. Safe and Effective Way of Backing up Android DataPart 2. Check Your Network Connection and Make Sure You Have A Strong ConnectionPart 3. How to Remove and Add Google AccountPart 4. How to Clear Cache and Data on Your Google DevicePart 5. How to Update Your Google Drive and Your Android SystemVideo Guide: How to Backup Android DataPart 6. Conclusion
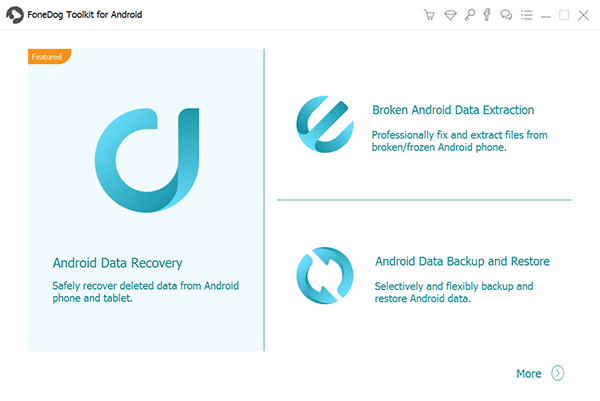
If all else failed and still you cannot fix the issue regarding your Google Backup, then its time to use third-party software that will be able to help you backup all your data from your Android device. We highly recommend the FoneDog Android Data Backup and Restore.
The FoneDog Android Data Backup and Restore can help you selectively backup your Android data to your computer with OneClick. This can also backup your Applications and Application Data.
The FoneDog Android Data Backup and Restore can let you preview and restore a backup to any Android devices because the FoneDog Android Data Backup and Restore are compatible to over 8000 plus Android device, this is why compatibility with this program is never an issue. It is also very safe to use because only you will be able to access your data.
This program can help you backup and restore your contacts, messages, call logs, gallery, videos, audios, and documents. FoneDog Android Data Backup and Restore is also safe because it will not overwrite any other data from your Android device, unlike other third-party software that will do that.
And, in addition to this, you can have the program downloaded and use it for free within 30-days. This is for you to test the program all you want so that you will also be sure that the FoneDog Android Data Backup and Restore really works. You can go ahead and check below for the guide on how to use the FoneDog Android Data Backup and Restore.
Have the program downloaded from our official website and then install it on your computer. Make sure that there is no other application running in the background.
Have the program running and then connect your Android device to your computer using your USB cable.
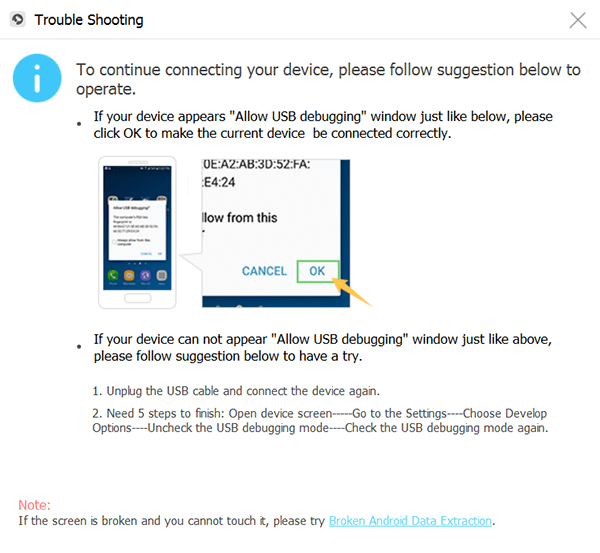
Once your Android phone is successfully detected by FoneDog Toolkit, you can now select "Android Data Backup and Restore". From here, you need to make sure that USB Debugging is enabled on your Android device.
If in any case, you are using an Android device that has an OS version of 4.0 and above, then you will be able to see a pop-up message on your Android device asking you to enable USB Debugging. Just go ahead and tap "OK".
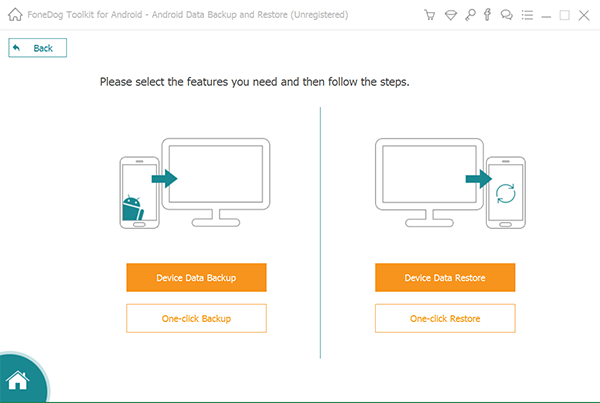
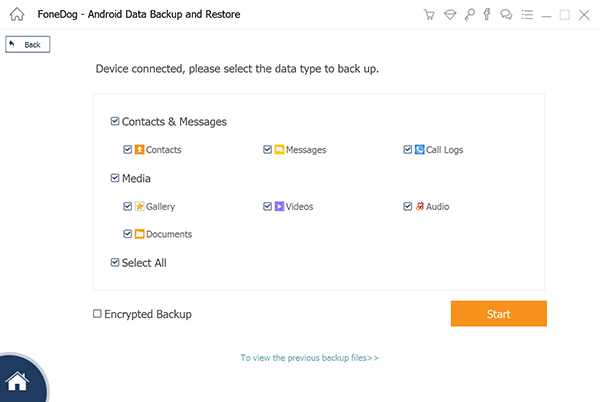
After FoneDog Android Data Backup and Restore had detected your device, go ahead and click "Device Data Backup". By default, you will see there that all files have a check mark beside it. Don't worry because you can still selectively select the data you wish to backup.
From here, you can select one or multiple files you want to backup. After selecting the files you want, go ahead and click the "Start" button.
The process then will take place and will require you to wait depending on the size of the files you are trying to back up.
Also, you have to make sure that the Android device will not be disconnected from your computer, do not use it or do not delete anything on your Android device.
Once the backup is complete, just go ahead and click the "OK" button. You will then be able to view the content of your files. If you want to restore the previous files that you just backed up, then you can continue with the process.

Once you have selected "Device Data Restore", FoneDog Android Data Backup and Restore will then show you some files from your latest backup. If you want, you can also choose different backup files from the list shown on your screen.
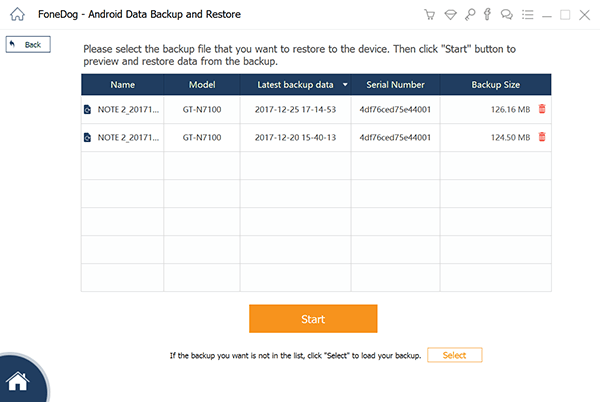
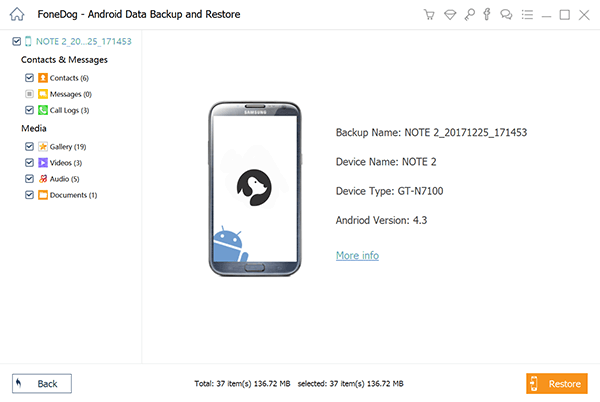
On this part, you will be needing to choose the data type that you wish to restore on your Android mobile device. You will be able to see a list of file types at the left side of your screen.
You can select the files you want to restore from the list shown and once you are done, just go ahead and click "Recover" button which is located at the lower right corner of your screen an then the process will now begin.
FoneDog Android Data Backup and Restore will also ask you to confirm the whole process. For you to confirm, just go ahead and click the "OK" button.
Wait until the program is done restoring your selected data. This process may take a few minutes. You have to make sure that your Android device stays connected and do not open any Android phone management software.
Always remember that your Google Backup requires a strong connection. You have to be sure that the network connection that you are connected to has a strong and stable connection. If you are using a wireless connection, then you might want to consider connecting to other WiFi connection that has a strong and stable signal.
However, if you are using your data connection, you have to check first if you might have set your backup using only your wifi connection. For you to check that, follow the steps below.
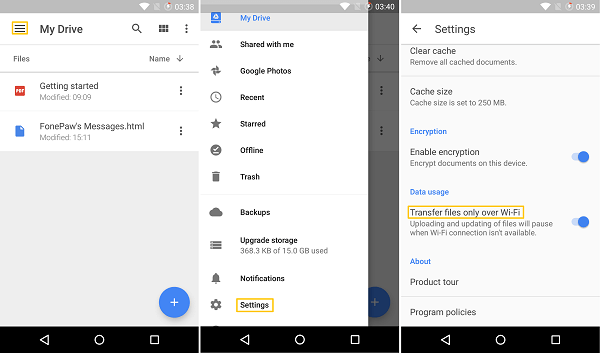
Step 1: Open Google Drive application on your Android device
Step 2: Tap on the three line icon found at the top right corner of your screen to open Menu.
Step 3: After that, select "Settings" option
Step 4: Locate "Transfer files only over Wifi"
Step 5: If it is turned on, you should turn it off for you to use your data connection.
Removing and adding back your Google Account again is one of the most helpful methods. For you to know how you can do this, follow the guide below.
Step 1: Go to "Settings"
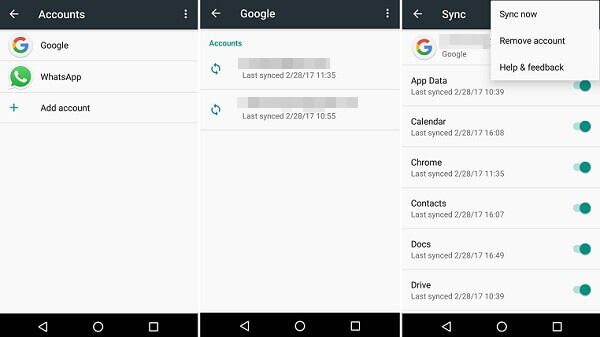
Step 2: Select "Accounts and Sync"
Step 3: You will then see a list of accounts, just go ahead and tap "Google".
Step 4: Tap the three dots at the top right corner of your screen and then select "Remove".
Step 1: Go to "Settings"
Step 2: Go to "Accounts and Sync"
Step 3: Select "Google" one more time
Step 4: Tap the three dots and then select "ADD"
Step 5: Select the same account that was previously there and then tap "Save".
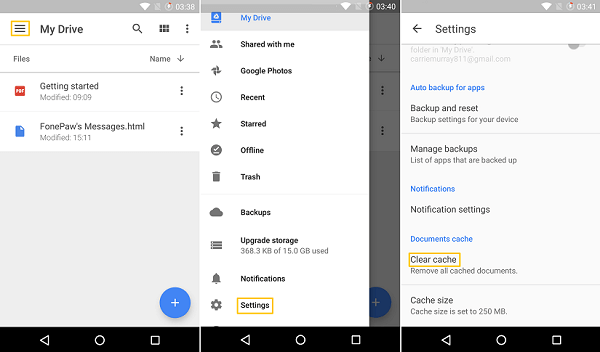
The main reason as to why your Androids applications are failing to run properly is your caches and data. That is why cleaning your cache and data is very much recommended for you to do. This is for you to solve the problem regarding your Applications that are failing to run. Cleaning your cache and data can also help your Google Drive to work again.
For you to clear your data and cache from your Android device, here are the steps you can follow.
Step 1: On your Android device, tap "Applications"
Step 2: And then, after that, look for "Settings" and then tap it.
Step 3: Find "Clear Cache" option under settings and then tap it for you to remove those unwanted data on your Android device.
Step 4: Once you are done, go ahead and restart your Android device so that the program will be refreshed and for you to know if your Google backup is now working.
This method can be done and used to fix the error. All you need to do is to update your Google Drive and your Android system. Doing this can help you fix some bugs in the older version that you have on your Android device.
To do some updates, follow the guide below.
Step 1: Go to "Settings"
Step 2: Go to "About Phone"
Step 3: And then go ahead and tap "System Updates" or "Software Updates"
All you need to do is to go to your Google Play Store and then you can check directly for an update on your Google Drive.
There are a lot of ways on how you can backup your data from your Android device. Actually, you can also use external memories for you to move all your data from your Android device to your external memory.
However, doing this will not allow you to backup all of your data because you can only back up a few of them. FoneDog Android Data Backup and Restore is the best solution to back up your data from your Android device. Why? Because this program can help you backup your contacts, messages, call history, photos, videos, audio, and your documents.
FoneDog Android Data Backup and Restore is very much safe to use and also very safe and effective as well when it comes to backing up your data because all you need to do is to follow the process given. This can also help you view easily your Android backup contents and can restore your data in the easiest way possible as well have the FoenDog Android Data Backup and Restore downloaded on your computer and you will never have to worry about the idea of backing up all your data from your Android mobile device and restoring them as well.
Leave a Comment
Comment

Tech Website Writing /Content Optimization
Singing, smiling, surprising every day!
So as a technical writer, it is my duty to gather effective and reliable solutions to answer questions on how to deal with the issues they are having with their devices.
Android Data Backup & Restore
Back up your Android data and selectively restore to Android
Free Download Free DownloadHot Articles
 /
/
INTERESTINGDULL
/
SIMPLEDIFFICULT
Thank you! Here' re your choices:
Excellent
Rating: 4.3 / 5 (based on 106 ratings)
