FoneDog Screen Recorder
FoneDog Screen Recorder
Special Offer
Special Offer


By Gina Barrow, Last updated: July 9, 2017
“I just went to sleep last night and when I woke up this morning, my Nexus 5 phone factory reset itself! How is this possible? How can I recover lost data from my phone? I am my phone for over a year now and using Android Lollipop 5.0.1 software version” ~Danny M.
This sounds pretty awful especially when the incident happened out of hand or totally not under your control. There have been reported cases of Nexus devices resetting all by themselves which can potentially be a software glitch from their end but may depend on the software version the Google Nexus is running on.
We all know that Google Nexus belongs to the elite smartphones so for sure they are aware of these incidents and their developers are practically working on it. However, the worse part of the issue now is that all your data were gone, just like that.
Though factory reset will only bring it back to its default settings like a brand new phone, the app settings will be removed as well as the entire customization you have done on the Nexus phone. All data such as contacts, messages, calendars, photos, audios, videos and other documents can only be restored from any available backups.
If you have added and secured backups on your phone, you can just easily restore them and start using the Google Nexus phone again. Find out if you have set a backup on your phone.
Part 1. Backup and Restore Different Contents from Google NexusPart 2. Recover Lost Data from Google Nexus Using FoneDog- Android Data RecoveryPart 3.Video Guide How to Extract Lost Data from Google Nexus?Part 4. Bonus Tips on How to Backup Files with Google Drive
If this is the first time that has happened, you need to assess the situation if prior to the resetting, the phone was dropped or has experienced any form physical damage. Either way, you need to make sure you are protected by backing up all data especially your contacts, messages and precious photos and much more.
There are several ways to backup personal contents from a Google Nexus phone. All you need to do is refer to the following below:
First, To add a Backup Account
Second, To Backup Contacts
Third, To Backup Data
Backup Photos, Music, and Videos to PC
If you only need to backup photos, music, and videos from Google Nexus phone, all you need to do is simply connect the Android phone to the computer with a USB cable. Create a folder on your computer to remind you later on. Media files can be copied this way and just needed to be regularly done to be updated.
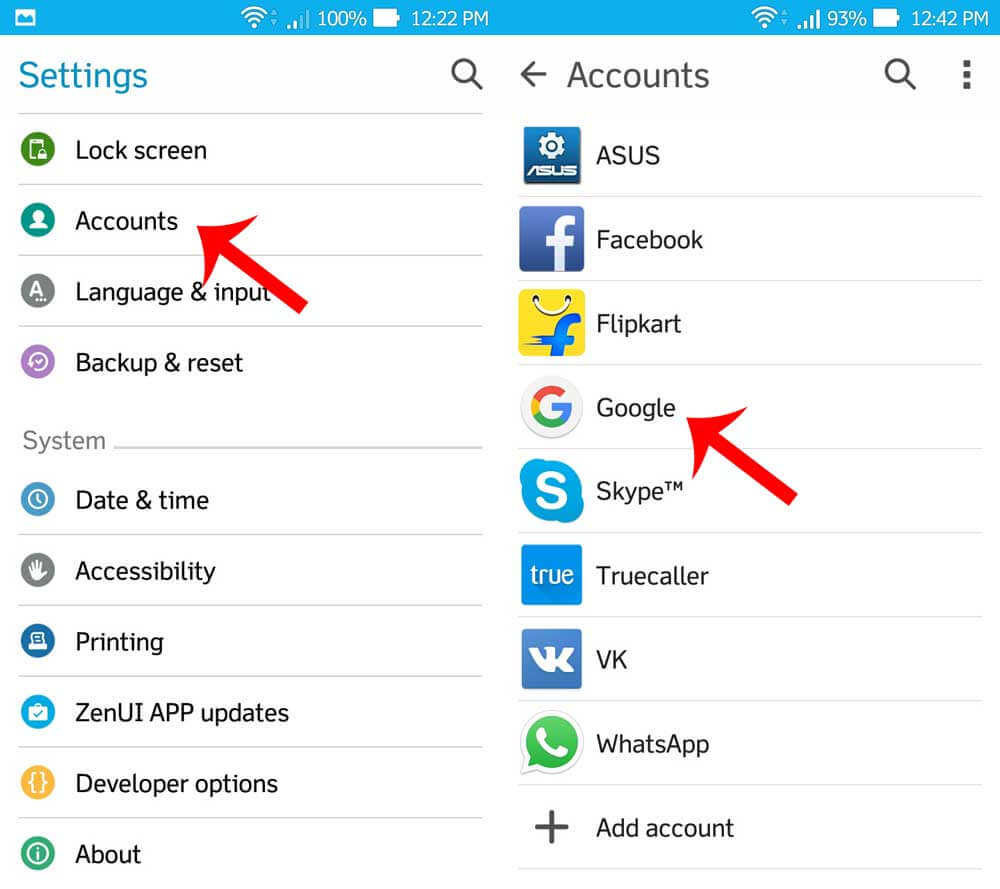 Add Backup Account
Go to Settings>Personal>Backup & Reset>Automatic Restore. Contacts and other files that were backed up on Google account will be restored automatically upon sign in.
You may easily recover lost data from the Google Nexus phone when you have backups available. However, the most annoying part of the situation is, if you did not set any backup on your Google Nexus phone. You will really need very good recovery software to retrieve those files. There are a lot of recovery programs out in the market but which one is working and reliable is quite difficult to know. To better make sure that you can still recover lost data, stop using the Google Nexus phone once you noticed that it reset on its own and most of the files were gone. It may overwrite those data and can be gone forever. In this article, you will meet a very good recovery program that will handle all the stress for you. It won’t require a technician after all. You can do the job easily and faster.
FoneDog- Android Data Recovery is efficient third party software that partners your Google Nexus phone in times like these. It only works on different operating system and had championed user recommendations.
It can help you easily recover lost data without any technical expertise needed. All you have to do is download the program online or by going to their website and install it on your computer.
In just a few clicks and a little patience, you can recover lost data in lesser time.For better step by step procedures follow these guides:
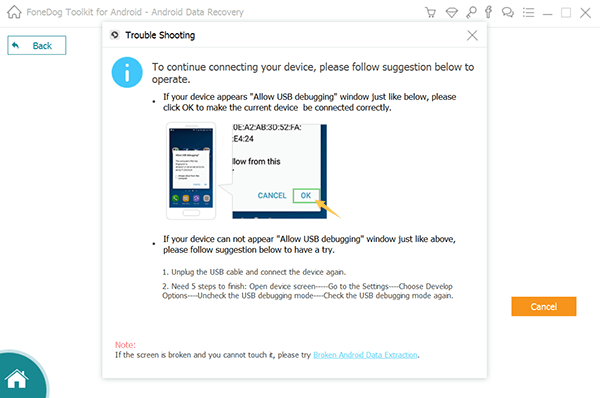
First things first, download the FoneDog- Android Data Recovery Program and install on your computer. Launch the software after installation and connect Google Nexus to the computer by using USB cable.
It may ask you to allow for USB debugging on the mobile phone, just click “OK”. You can also manually enable USB debugging on the handset if you have not received a pop-up message on the screen.

When the connection between the Google Nexus and the program was established, click “Next”.
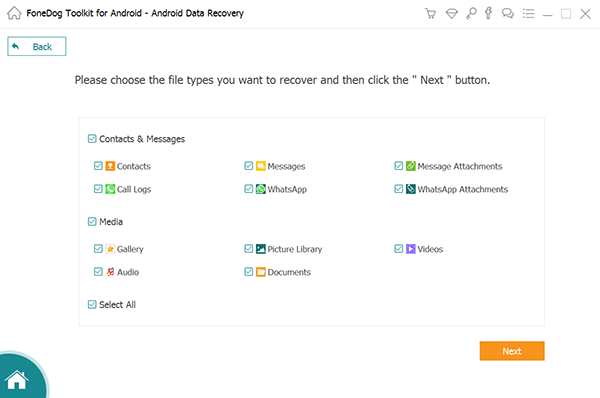
On the next window, you will need to choose the files for recovery. You have an option to “Select All” or selectively choose those you only needed. Click “Next ” to continue.
The next process will be the scanning of the Google Nexus device to recover lost data. The entire scanning process may take time depending on several factors like network connectivity, the amount of data being recovered, network speed. You have to be a little patient during this stage.
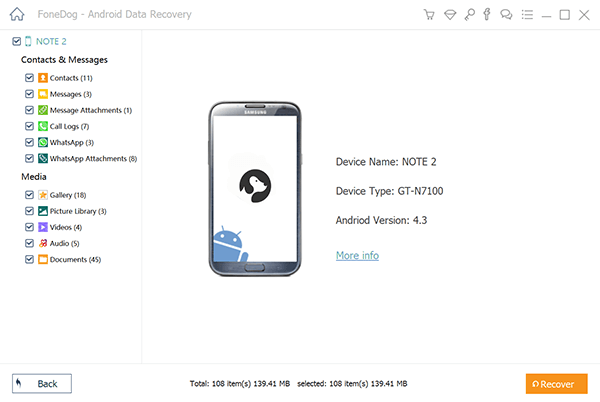
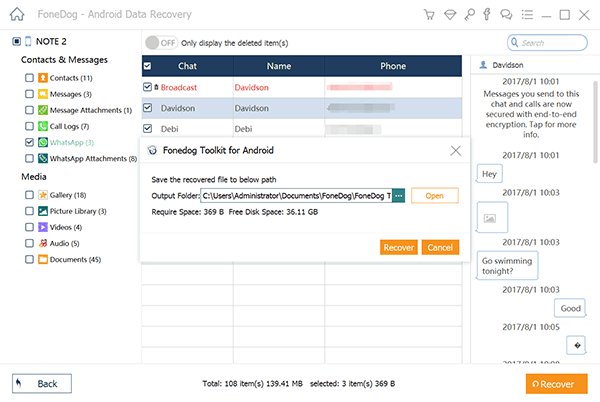
After the scanning, the program FoneDog- Android Data Recovery will show you a list of files recovered from Google Nexus phone. It will be seen on the left side of the screen and can be previewed individually for you to verify and confirm the lost data. If you receive an authorization notice on the screen pop-up when you try to recover lost data, click on “Allow” to continue the process. You can now select all or choose only those data you only needed. Click “Recover” and it will be saved on your computer.FoneDog- Android Data Recovery works best with Google Nexus 5/6 devices. If you are quite hesitant about this product, you can use the free trial version where you can use the program until you preview the lost data. This is to guarantee you that the software really works and is trusted by millions of Android users around the world.
To recover lost data from Google Nexus is so easy to do. FoneDog- Android Data Recovery is really a great program that is compatible with almost all Android devices and with the largest number of users around the world.
Android is very much flexible when it comes to features and other functions. There are various backup ways you can use to protect your phone and avoid data loss. We all know that data loss can be caused by accidents, software failures, and even purposely deleted but there is no excuse that you are unable to recover lost data whenever these kinds of unwanted things happen.
Backup to Google Drive
Google Nexus has Google Drive app as default settings on the phone so you can easily upload files and folders to your drive anytime. The files available for upload in Google Drive are photos, documents, audios, and videos.
To upload files and folders to Google Drive:
You can also set an automatic backup and upload Google photos to Google Drive. Learn how:
You can take advantage of this feature offered by Google. It offers 15GB free storage and optional purchase if you need more space in the future. When all else fails, you can always rely on FoneDog- Android Data Recovery it will surely recover lost data effectively.
Leave a Comment
Comment

Technical/Creative Writer
Kitchen, my safe space; black, my favorite color
Was a Technical Specialist for a while, troubleshooting Smartphone and Software-related issues until a writing stint caught my attention.
Android Data Recovery
Recover deleted files from Android phone or tablets.
Free Download Free DownloadHot Articles
 /
/
INTERESTINGDULL
/
SIMPLEDIFFICULT
Thank you! Here' re your choices:
Excellent
Rating: 4.7 / 5 (based on 65 ratings)
