FoneDog Screen Recorder
FoneDog Screen Recorder
Special Offer
Special Offer


By Gina Barrow, Last updated: July 12, 2017
“Can you restore iTunes backup to new iPhone? I just recently bought a new iPhone 7 and had backed up my old data to iTunes for easy transfer. However, I only need few apps and contents to set up on my new phone to avoid loading up with so much data. How can I restore selective apps and other contents from iTunes backup on my iPhone 7?”~Craig S. iPhone7 user
Getting a new phone especially the recent iPhone 7 can be very exciting and exhausting. It is exciting because we all love to witness and experience first-hand all the cool features and apps of the new device and exhausting because it can be dreading to transfer all your data from the old phone to the new one. It is quite better now that you can just backup all your phone contents and just restore the backup to the new device.
Nevertheless, getting a new iPhone is something we all love to. Backing up data and other personal files from the old phone will be the first thing to do. But How do I transfer everything from my old phone to my new phone? If you are comfortable in using iTunes, you can save and back up all files easily by simply connecting your device to the computer where you have installed the iTunes. However, we understand that there are some apps and settings that you want to use on the new phone and there are those that you want to just keep on the backup; which means, you might need to specifically restore only those you needed.
In order to restore iTunes backup content to iPhone 7/8/X/XR/XS/11/12 selectively, you might need to use other programs that will help you choose those apps you only wish to download on the new device. In this article, we will be explaining the different ways on how to maximize your new phone’s full potential as well as the different options to back up and restore data from iTunes.
Part 1. How to Backup Files and Other iPhone Contents to iTunesPart 2. Restore iTunes Backup to iPhonePart 3. Selectively Restore iTunes Backup Contents Using FoneDog iOS Data RecoveryVideo Guide: How to Restore Contents from iTunes BackupPart 4. Tips on How to Protect Your iTunes Backup Files
Having a backup is incredibly important because it will save you from any heartache in the future when unwanted incidents happen. It will not only give you backup but rather secures your data and other information from identity theft, damages, and other unwanted scenarios. In order to backup your iPhone to iTunes, follow these guides:
Step1. Connect iPhone and Launch iTunes
On your computer, launch iTunes and check for updates. If there is an available new version, update the software and afterward, connect the iPhone device. It is a good option to update the iTunes first prior to any activities though not necessary.
Step2. Turn Off iCloud from the phone
On your iPhone device, make sure that iCloud is disabled in order to create backups on iTunes. If iCloud is on, you are unable to create iTunes backup. Go to Settings>iCloud>Storage and Backup>turn off the iCloud Backup slide.
Step3. Create Backups on iTunes
Inside iTunes, look for the iPhone icon on the top left portion of the screen and right-click or CTRL + Click, then find Backup. iTunes will now finish the backup process on your iPhone device. You will see the notification on the screen.
Once you have already backed up your iPhone to iTunes, you can easily restore them whenever needed. iTunes basically backs up almost everything on your iPhone starting from contacts down to the browser settings. Files that are not usually backed up are those you have purchased from the App store because you will get the chance to re-download them. App store has records of you buying those so you can get it back anytime.
Wait until the whole restoration process is completed. You will see the progress on the screen and iTunes will notify you at once. The device will restart to complete the restoration then you can now disconnect the device. Most of the iPhone apps and content settings are backed up in iTunes. However, if you are planning to selectively choose which apps to restore only, it might not be possible in the iTunes.
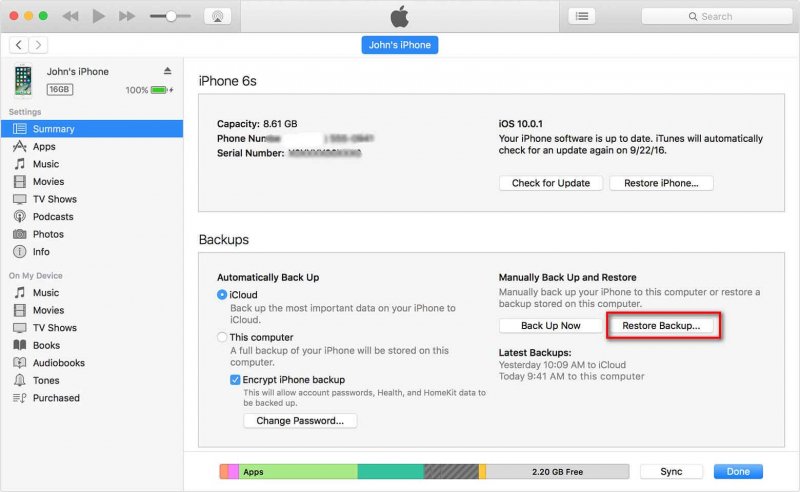
If you are planning to restore the entire backup file from iTunes to your iPhone, you can simply do the following steps:
Step 1. Launch iTunes and Connect iPhone Step 2. Click on the device icon from the left-most panel of the screen Step 3. Choose the Summary tab and click on restore. You may also click on Restore when you see this option.
FoneDog iOS Data Recovery allows you to selectively restore iTunes backup contents conveniently without the need to become an expert. FoneDog iOS Data Recovery is a program that aims to make every iOS device owner‘s lives better and easier. It has been providing backup options and data recovery to almost all Apple devices.
What seems impossible to you is very much possible with FoneDog iOS Data Recovery. Unlike other backup options where you have to extract the entire backup files on your new iPhone 7 and you are not allowed to choose only those you desire, FoneDog iOS Data Recovery will let you preview contents and specifically choose what you only wish to download on the new iPhone 7. So if you have your backup ready, you can go ahead and selectively restore iTunes backup contents by following these guides below:
On your computer either Windows or Mac, you need to download the FoneDog iOS Data Recovery program and install. After the successful installation, launch the software until you reach the main menu. Choose a Recovery mode to continue.
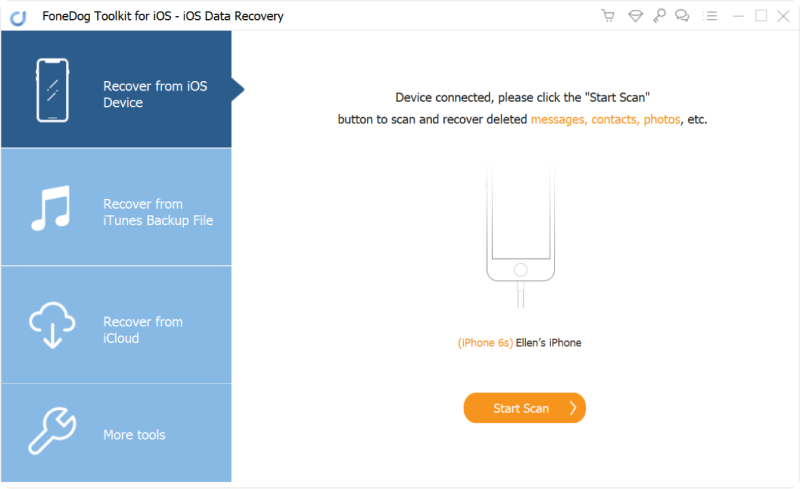
There are 3 ways to effectively use this FoneDog iOS Data Recovery software. In order to extract the backup contents selectively, you have to choose Recover from iTunes Backup file, and then connect your iPhone using the USB cable that came along with the original packaging. Automatically, the software will be able to detect the device and it will show you the entire lists of iTunes backup saved on your computer. Choose your iPhone device name and click ”Start Scan”.
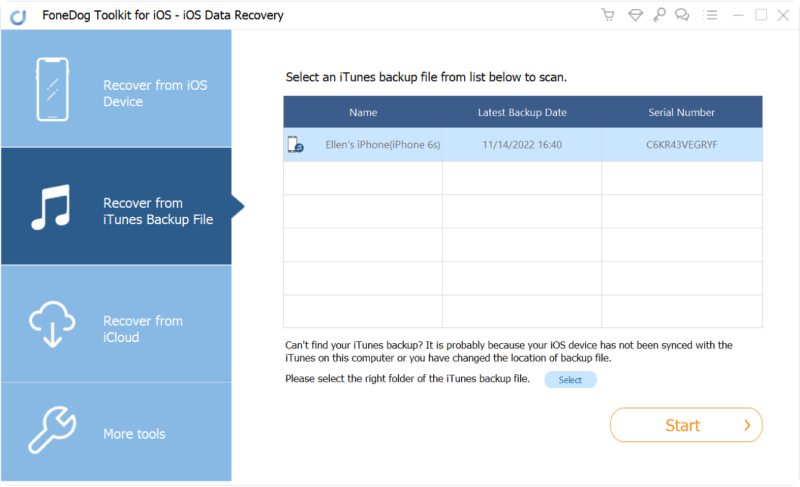
The program will now scan the iTunes backup contents and it may take a while before the entire contents to be extracted. Once the scanning is completed, and there is shown as a list of Viber Messages, videos, photos and so on it will now extract the files accordingly.
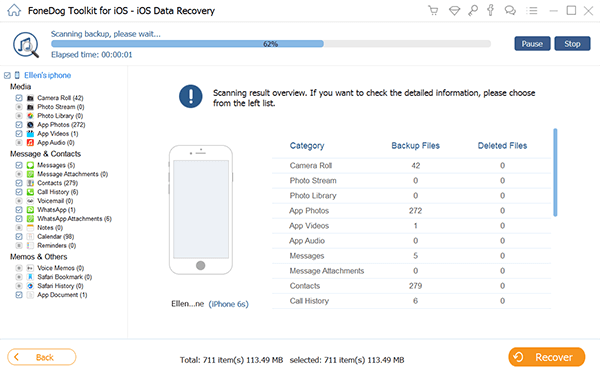
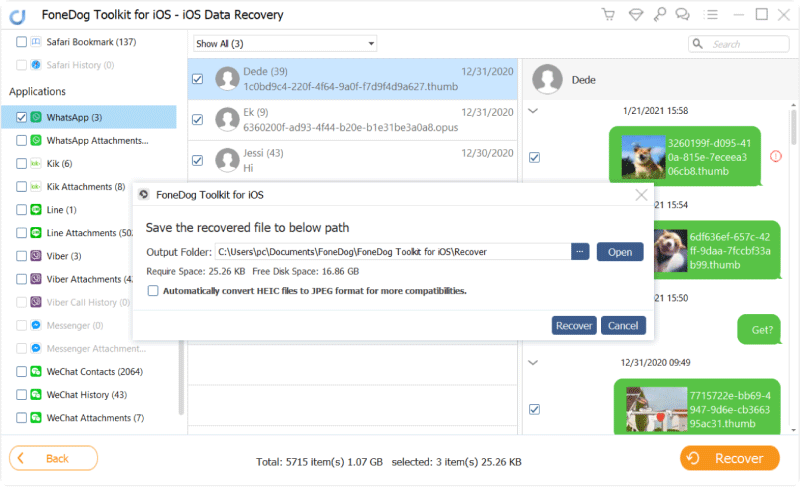
When the extraction is finished, you can now go over those categories which you want to download and use on the iPhone 7. You can now preview the items one by one and tick on the boxes beside each file in order to restore them. Click "Recover " button to save the backup contents on your phone or the computer.
Finally, you have selectively restored your iTunes backup contents onto the new iPhone 7 and you can now enjoy the latest iOS features and maximize its capabilities. Just in case you need to selectively restore iTunes backup contents again in the future, always bear in mind that FoneDog iOS Data Recovery is definitely worth a try. It is compatible with almost all iOS devices with more users worldwide.
Did you know that there are several ways to ensure protection for your backup contents in iTunes? Here are some tips to make sure all your data are safe.
Tip#1 Encrypt Backup files
You can view all the backup contents using your Mac computer and on the top menu click iTunes>Preferences. Go to the Devices tab and you will see a lock icon beside your device’s name. Click OK to close the tab.
Tip#2 iOS 11 software update
If you are planning to upgrade to the iOS 11 version, you can actually use iTunes on your computer to make it faster and more comprehensive. You iPhone may take a while to update the iTunes but doing it on a computer is better.
If in the future you might hear or see a friend who has the same issue like yours that they need to selectively restore iTunes backup contents, direct them to this article or you can inform them about how cool FoneDog iOS Data Recovery is.
People Also ReadHow to Recover the Deleted Facebook MessagesHow To Restore Your Deleted WhatsApp Message from iPhone
Leave a Comment
Comment

Technical/Creative Writer
Kitchen, my safe space; black, my favorite color
Was a Technical Specialist for a while, troubleshooting Smartphone and Software-related issues until a writing stint caught my attention.
iOS Data Recovery
3 Methods to recover your deleted data from iPhone or iPad.
Free Download Free DownloadHot Articles
 /
/
INTERESTINGDULL
/
SIMPLEDIFFICULT
Thank you! Here' re your choices:
Excellent
Rating: 4.7 / 5 (based on 93 ratings)
