FoneDog Screen Recorder
FoneDog Screen Recorder
Special Offer
Special Offer


By Nathan E. Malpass, Last updated: March 6, 2018
“My cousin once told me that I should activate Android’s auto-backup feature to make the most out of my phone. What does it do anyway? If I end up liking what I learn about it, how can I enable that feature on my phone?”
In this article, you will learn Where is auto backup on Android? And you will know Does Android Backup automatically?
Part 1. What You Need to Know about Android Auto BackupPart 2. How to Restore Backup from Google DrivePart 3. Do One-Click Android Backup with FoneDog Android Data Backup and RestorePart 4. Conclusion
People Also ReadWhat Does Android Backup and Restore Do?What Are the Best Android Backup Software for PC?
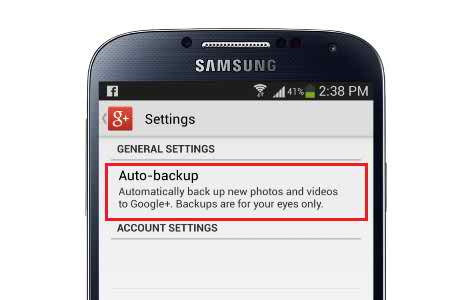
What is an auto backup Android? Auto Backup Android is a feature developed by Google for Android devices. Although it sounds like a great feature, there are things that you should know to make sure your data stays safe.
It is important to understand that it has its own limitations. This way, you’ll know what is being saved for you, and what you still need to back up on your own.
When you enable auto backup, these data are automatically saved to your Google account:
How do I turn off auto backup on Android? Easily, Just disable it on the above step.
These things can come in handy if you have a new Android device. By signing in to your Google account, the backup in your account gets synced to your new phone or tablet. This eliminates hours of data transfers that you still have to do if there is no auto backup.
Android’s auto backup doesn’t cover SMS and some settings though. Despite this drawback, this feature is still a heaven-sent for Android users. This is more so for those who don’t have the time or feel too lazy to do backups.
For the auto backup to work, there are 3 requirements you must meet.
To start backing up automatically, you should have the Google Drive app installed on your device. Make sure that you log in with your default Gmail account too.
You may see your backed-up photos and videos by launching Google Drive > Menu > Google Photos. On the other hand, your contacts are saved in Google Contacts.
You may access it by going to contacts.google.com via your device’s browser. Another way to verify if your data have indeed been backed up is going to Google Drive’s Settings > Manage backup.
Now that you know how to use Android auto backup, we’ll discuss how to back up the files not covered by the service, up next.
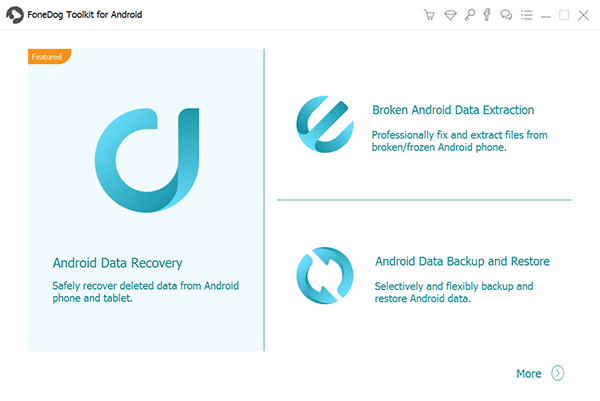
On the first part of this post, we did mention that there are certain file types that are not covered by Android’s auto backup. That’s where FoneDog Android Data Backup and Restore comes and saves the day.
As an android backup manager, this software backs up your contacts, text message, call logs, photos, videos, audio, documents, and WhatsApp messages and attachments. If you’re an avid user of WhatsApp, this spells good news.
The auto backup feature cannot back up your WhatsApp chat history, so you can use FoneDog instead.Let's see the steps of the android backup software.
To get started, download FoneDog Android Data Backup and Restore on your computer.
After installation is complete, run the program. Connect your phone or tablet to the computer with a USB cable. And start the android backup service.
For the software to detect your connected device, you must activate USB debugging. Check your device for any prompt to allow USB debugging. If you see one, simply tap OK.
If you don’t, you must manually enable USB debugging. There are different steps for various Android versions. Refer to the steps below to help you out.
You only have to activate USB debugging on your device once. The next time you perform a backup with FoneDog, you no longer need to do it again.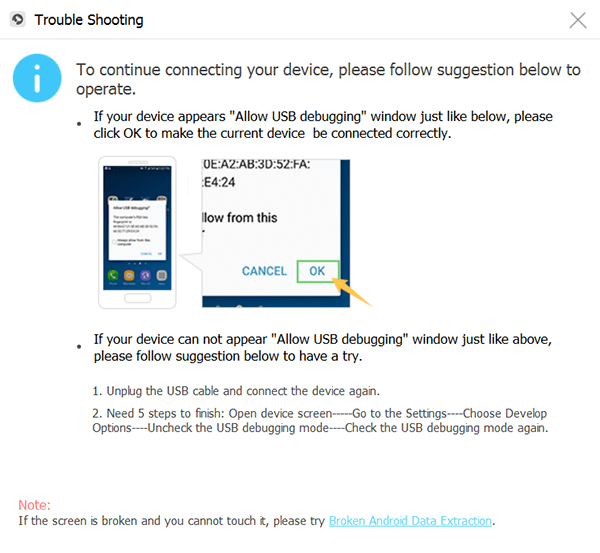
Android 4.2 or Higher
Go to Settings > About Phone > Tap Build Number until a prompt appears > USB debugging
Android 3.0 to 4.1
Head to Settings > Developer options > USB debugging
Android 2.3 or Lower
Go to Settings > Applications > Development > USB debugging
2 options will appear on the software. Select Device Data Backup. You will then be asked to choose the file types that you want to back up.
It is highly recommended that you select all. However, if you opt to back up some of them, you can mark the applicable items only. Press Start to start the backup.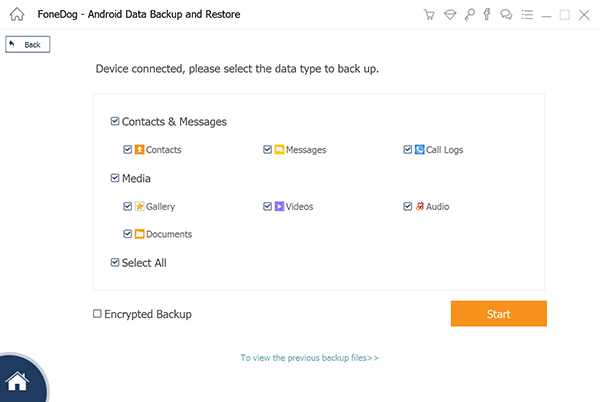
When the backup is complete, you will see the number of files in the backup as well as the file size. Should you want to learn how to restore your backup, proceed to Step 4.
To restore your backup, you only need to launch the program, connect your device and click on Device Data Restore.
Available backup files will appear on the screen. Check the details of each file and select the one that you need. Click Start.
The software will show you the file types in your chosen backup file. Tick those that you want to save back on your phone or tablet. Once done, hit Restore and press OK to confirm.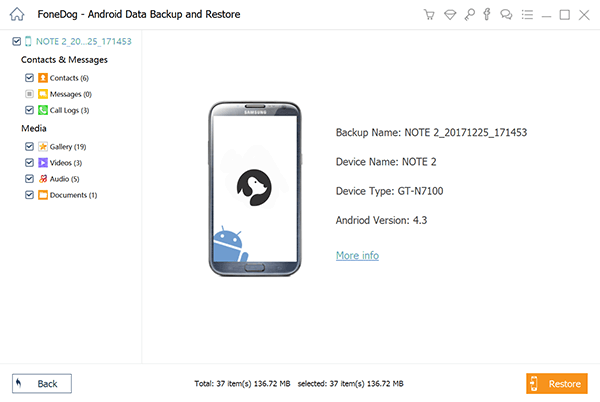
Auto backup Android is an excellent feature that no Android user must miss. Forgetting to do backups is now a thing of the past. The feature is available on all Android devices, and the only thing you have to do is to enable it.
That leaves you with no excuse to not back up your device. Google backup on Andorid is not the only way to backup your data. Backup your Android phone to pc is the best way to avoid data loss.
It has its own share of shortcomings, which luckily, FoneDog Android Data Backup and Restore can effectively address.
If you happen to have accidentally deleted or lost some of your files before you created a backup, you can also use FoneDog Android Data Recovery to get them back.
Follow the android data backup tutorial above, keep your data safe!
Leave a Comment
Comment

iPhone/Android Devices’ Maintenance Expert
Staying home, listening to music, writing tech articles
Many people asked me to repair their mobile phones so I have a lot of experience in mobile phone repair, and I know a lot about Android or Apple phones.
Android Data Backup & Restore
Back up your Android data and selectively restore to Android
Free Download Free DownloadHot Articles
 /
/
INTERESTINGDULL
/
SIMPLEDIFFICULT
Thank you! Here' re your choices:
Excellent
Rating: 4.4 / 5 (based on 108 ratings)
