FoneDog Screen Recorder
FoneDog Screen Recorder
Special Offer
Special Offer


By Gina Barrow, Last updated: October 7, 2017
“Have you already switched to the new iOS 11 on your iPad? If so, have you lost some files?” Learn how to quickly recover lost files from iPad after iOS 11 upgrade.
IOS 11 is finally here! Along with its cool and amazing features, data loss became one of the main concerns too. Apart from apps crashing and freezing due to some bugs, some files were gone easily after the iOS 11 upgrade. The most common scenarios for lost files could be any of the following:
If you are a victim of data loss on your iPad then this post is for you. In this article learn how you can upgrade your iPad and familiarize yourself with different ways to recover lost files from iPad after iOS 11 upgrade.
 Recover Lost Files from iPad after iOS 11 Upgrade
Part 1. What to do before the iOS 11 upgrade?Part 2. Recover Lost Files from iPad after iOS upgrade directly using FoneDog Toolkit- iOS Data RecoveryPart 3. Recover Deleted Data from iPad via iTunes backup using FoneDog Toolkit- iOS Data RecoveryPart 4. Recover Deleted Files from iPad using iCloud by FoneDog Toolkit- iOS Data RecoveryVideo Guide: How to Recover Lost FIles from iPad after iOS 11 Upgrade
We are all excited to use the latest and the most promising iOS update Apple ever created so we have compiled all the necessary things you should know before you jumpstart. Remember that just because your device is able to use the new iOS, it doesn’t necessarily mean you have to use it. Here is some checklist you should get to know:
For example, if you are using an older iPad or iPhone, let’s say an iPad mini 2 or an iPhone 5 S which are both compatible to iOS 11, then it will affect the way the device works even doing basic tasks. Newer models like iPhone 6S and 6 S Plus is very much able to compete with this iOS.
 iPad
iPad
When you have fully understood how iOS 11 will work for you then it is time to start the upgrade. To upgrade to the new iOS 11, follow these:
Before you jump to upgrading your iOS, be sure that you have created a backup of your iPad. Choose to backup between iCloud and iTunes.
ITunes Backup
ICloud Backup
ICloud automatically backs up your device contents everyday if it is turned on and the screen is locked. As long as you have not yet used up the free 5GB space then it will smoothly back up your iPad otherwise you can purchase for additional storage.
You can easily upgrade to iOS 11 via wireless connection. Using mobile data is not recommended because it may incur overage charges on your postpaid bill.
Go to Settings and tap General to begin with and then head over to Software update. If there is a notification that you have the latest update, tap download and install. You can also choose to upgrade at a later time by setting the requested time. Make sure you have enough battery life to support the upgrade or better yet, plug the iPad to a power source.
Before the download begins, it will ask you to enter the device pass code correctly. This is the same pass code you use on the device.
Wait until the download and install process is completed. After upgrading you can now set up your iPad and restore your device from your backup: iTunes or iCloud. Choose which one has the most recent backup.
If you have not backed up your iPad and you already have upgraded to the new iOS 11, then for sure you will experience great data loss. This is the part where you regret upgrading to the new version and losing important files stored on the iPad. However, you can still recover lost files from iPad after iOS 11 upgrade by using FoneDog Toolkit- iOS Data Recovery. Learn how this great program will help you!
FoneDog Toolkit- iOS Data Recovery has three effective recovery options:
People Also ReadGet Your Contacts Back after iOS11 UpdateHow can You Recover Lost Photos after iOS11 Update
These three different methods are certified to recover lost files from iPad after iOS 11 upgrade even if you don’t have backup, or would like to selectively restore from the iTunes and iCloud backups. First we will teach you how to recover directly from the iPad.
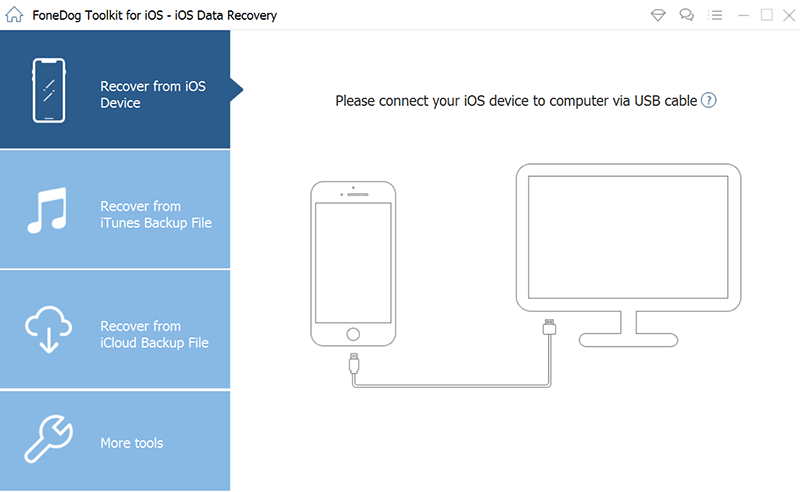
FoneDog Toolkit- iOS Data Recovery is available for download on both Windows and Mac so you can install it on your desired computer. After downloading, follow the installation instructions and launch the program right after. Choose ‘Recover from iOS device’ from the left side panel of the program screen to begin the recovery.
Connect iPhone to PC -- Step1
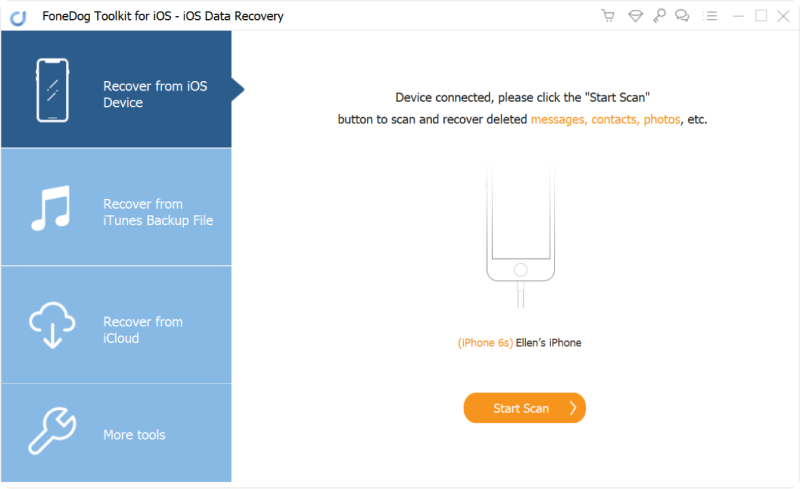
Using the lightning cable that came along, connect the iPad to the computer and wait until the device is automatically detected. Click ‘Start Scan’ to continue.
Note: You can temporarily disable the automatic syncing option of iTunes before launching FoneDog Toolkit.
Connected -- Step2
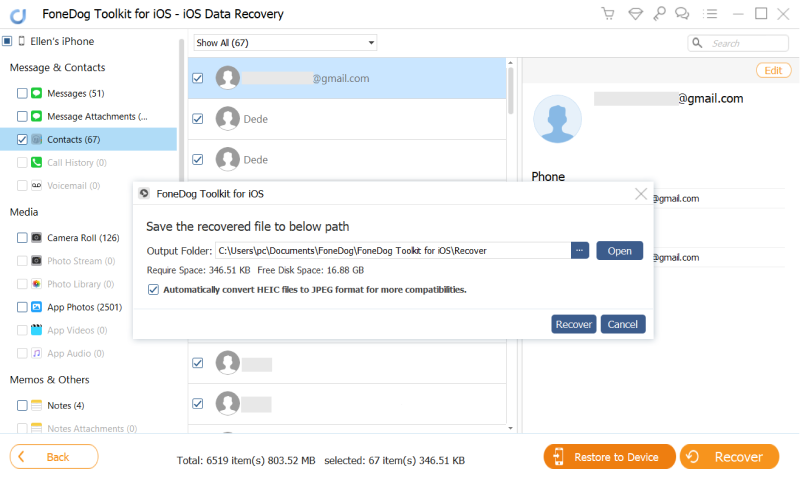
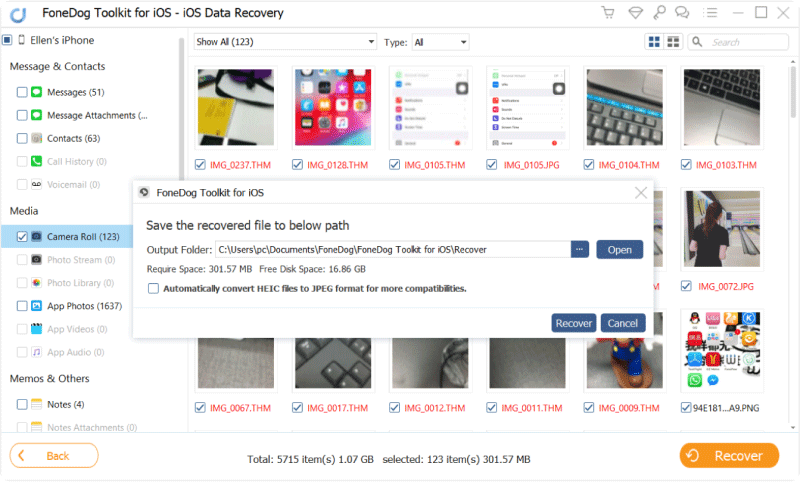
The scan will take some time depending on a load of data and network connection. When the scanning stops you can now preview all the lost files found. All the file categories on your iPad will be seen on the left side of the screen and all the file preview will be on your right side. You can open each file category and preview each file to see if the missing data you needed was there. If you have finally found all the lost files, you can mark them individually for selective restore or you can check the “Select All’ box to mark them all. Click the “Recover” button at the bottom of the screen to save them in an output folder you desire.
This is the easiest method to recover lost files from iPad after iOS 11 upgrade. FoneDog Toolkit- iOS Data Recovery has the highest retrieval rate in the industry that is why it is trusted by millions of users worldwide.
Recover Lost Files from iPad -- Step3
Another way to recover lost files from iPad after iOS 11 upgrade is via iTunes. However, the only thing that is quite annoying is you don’t have any option to restore specific items such as your contacts, messages, etc… unless you restore the entire iTunes backup contents. FoneDog Toolkit- iOS Data Recovery has made it even easier to recover from your iTunes backup by allowing you to preview and specifically restore desired items only.
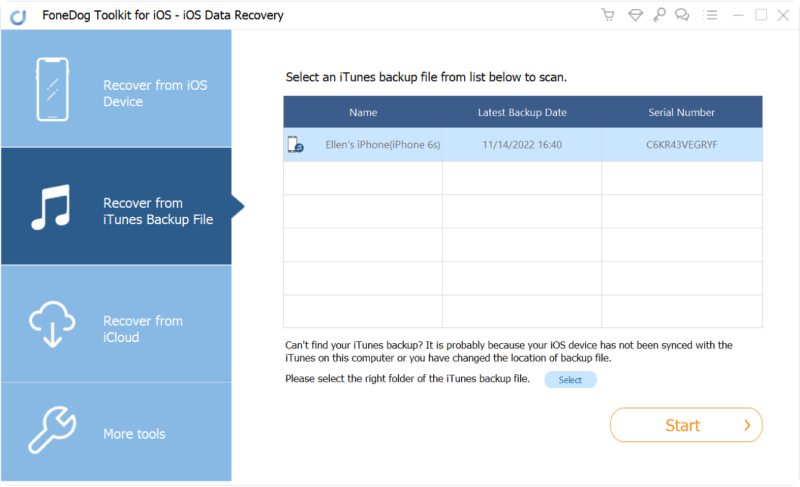
First, you need to open FoneDog Toolkit- iOS Data Recovery and make sure that the computer you are using is synced automatically with iTunes so there is no need for you to open the iTunes app. After the program has launched, click on the second recovery option from the left panel ‘Recover from iTunes Backup’ to begin.
Connect iPhone to PC -- 1
On the right screen side, choose the recent iTunes backup file to be scanned and extracted by FoneDog Toolkit- iOS Data Recovery. Click ‘Start Scan’ to continue.
Select iTunes Backup Files -- 2
The scanning will take a little longer while the program is extracting the entire iTunes backup contents. Once the scanning stops you are now able to see all the backup items such as messages, photos, videos, and much more. All the main categories will be on the left side wherein you can preview each of them on the right side. Set the output folder location on your computer and select those files you needed. For selective recovery, mark those files you require or you can select them all to recover all items. Click the ‘Recover’ button to save all the recovered files on your computer.
You have finally found a smoother way to recover lost files from iPad after iOS 11 upgrade. Now you can continue to customize your iPad the way you want it to be.
Recover Deleted Data from iPad -- 3
ICloud got some new updates as well with the recent iOS 11 upgrade however it is the same restore option that you need to apply the entire backup and not being able to choose what you needed at the moment. This type of restore option is causing more data loss especially to your new apps and current data that were not yet backed up. This is where FoneDog Toolkit- iOS Data Recovery comes along, you are able to recover lost files from iPad after iOS 11 upgrade seamlessly.
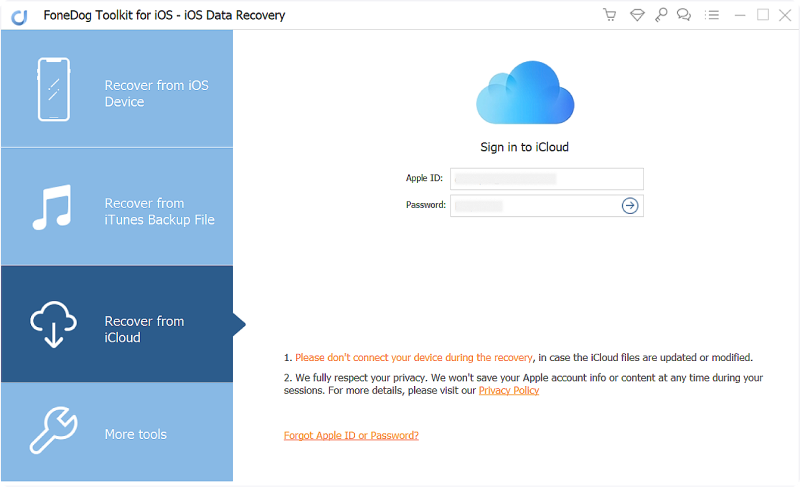
Run FoneDog Toolkit- iOS Data Recovery and click on the last recovery option ‘Recover from iCloud Backup’ and log on to your iCloud account. You don’t have to worry about your privacy protection since FoneDog Toolkit does not store any sensitive details such as username and password to adhere to privacy compliance. Make sure you are using the same iCloud account details on your iPad.
Log on iCloud -- #1
Note:
If you have turned on the two-way authentication protection then you need to temporarily disable it while using this program.
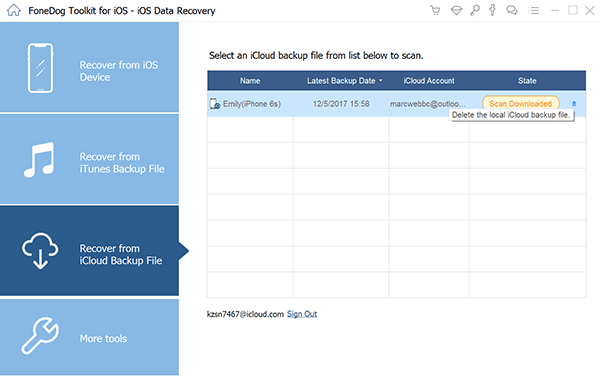
After logging in, you will see all the backup files made by iCloud. Choose the most recent backup file and click on the ‘Download’ button. When you see a small pop-up window with all the files inside your iCloud backup, select those you want to recover only. This will make the download and extraction faster. Click ‘Next’ to continue.
Select iCloud Backup -- #2
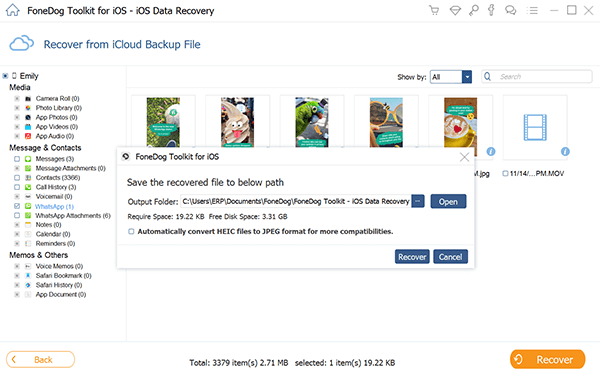
The scanning takes a while before it will display all the extracted files from iCloud backup. Once it stops, you can now see the files you have checked for recovery earlier. Preview each and once you have found what files you exactly needed, then click on the ‘Recover’ button at the bottom of the screen. You can decide where you can save the folders on the computer.
Recover Lost Files from iPad -- #3
These three different choices for you to recover lost files from iPad after iOS 11 upgrade are all effective. You only need to determine which one you think will work best for you.
Leave a Comment
Comment

Technical/Creative Writer
Kitchen, my safe space; black, my favorite color
Was a Technical Specialist for a while, troubleshooting Smartphone and Software-related issues until a writing stint caught my attention.
iOS Data Recovery
3 Methods to recover your deleted data from iPhone or iPad.
Free Download Free DownloadHot Articles
 /
/
INTERESTINGDULL
/
SIMPLEDIFFICULT
Thank you! Here' re your choices:
Excellent
Rating: 4.6 / 5 (based on 73 ratings)
