FoneDog Screen Recorder
FoneDog Screen Recorder
Special Offer
Special Offer


By Nathan E. Malpass, Last updated: April 22, 2024
These sleek and powerful iPad devices are not just for surfing the web and playing games; they also hold a treasure trove of important data. From precious photos and videos to essential documents and apps, your iPad likely contains information that you wouldn't want to lose. That's why understanding how do I back up my iPad is crucial.
But what does it mean to back up your iPad, and why should you do it? In this article, we'll walk you through the process of backing up your iPad, covering everything from the basics to more advanced options. Whether you're worried about losing your favorite vacation photos or your important work files, we've got you covered.
Part #1: How Do I Back Up My iPad? Runner-Up Methods to ExplorePart #2: How Do I Back Up My iPad with FoneDog iOS Data Backup & Restore Tool?Summary
Backing up your iPad is essential to protect your data, and one of the most convenient ways to do this is by using iCloud. iCloud is Apple's cloud-based storage service that allows you to securely store your data, including photos, videos, apps, and more. Here's how do I back up my iPad using iCloud:
Step #1: Connect to Wi-Fi
Ensure your iPad is connected to a Wi-Fi network. iCloud backups can be substantial, and a Wi-Fi connection ensures a smooth and efficient backup process.
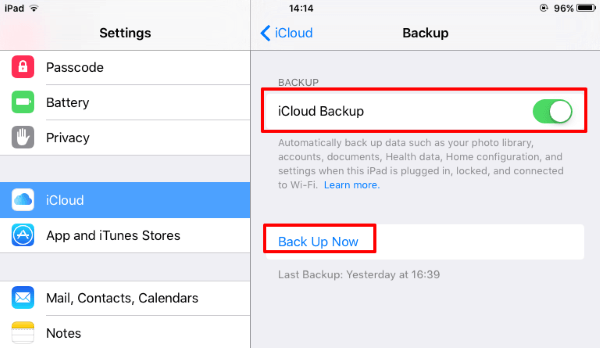
Step #2: Enable iCloud Backup
Step #3: Start the Backup
Once iCloud Backup is enabled, your iPad will automatically back up when it's connected to Wi-Fi, locked, and plugged into a power source (or if the battery level is sufficient). You can also manually initiate a backup by tapping "Back Up Now" in the iCloud Backup settings.
Step #4: Monitor and Manage Backups
You can check the status of your backup and manage your storage by going to "Settings" > [your name] > "iCloud" > "Manage Storage". From here, you can see what's taking up space in your iCloud storage and make adjustments as needed.
Step #5: Restore from iCloud Backup
Should you ever need to restore your iPad from an iCloud backup, you can do so during the initial setup or by going to "Settings" > "General" > "Reset" > "Erase All Content and Settings". After erasing your device, follow the on-screen instructions to set it up and select "Restore from iCloud Backup".
Using iCloud to back up your iPad is an effective way to ensure your data is safe and accessible in case of device loss, damage, or an upgrade. However, if you're not sure about the time iCloud backup takes or want to explore additional backup options, keep reading as we delve into other runner-up methods for iPad backup.
While iCloud offers a seamless way to back up your iPad, some users may prefer to use iTunes for their backups. iTunes provides more control and allows you to create local backups on your computer. Here's how to back up your iPad using iTunes:
Step #1: Prepare Your Computer
Ensure you have the latest version of iTunes installed on your computer. If not, download and install it from the official Apple website.
Step #2: Connect Your iPad
Use a USB cable to connect your iPad to your computer. iTunes should open automatically, but if it doesn't, launch iTunes manually.
Step #3: Trust This Computer If prompted on your iPad, tap "Trust This Computer" to establish a secure connection.
Step #4: Select Your Device
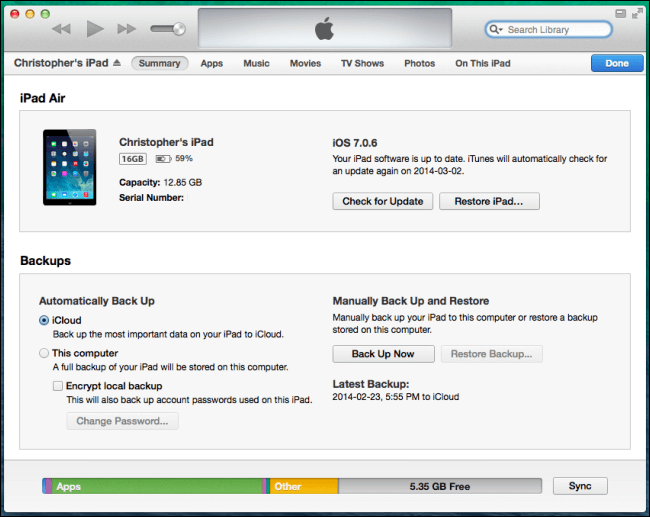
In iTunes, click on the iPad icon, located in the upper-left corner of the iTunes window. This will take you to your device's summary page.
Step #5: Back Up Your iPad
Step #6: Monitor and Restore
Your iPad's backup will be stored on your computer. You can access and manage your backups through iTunes. To restore from a backup, connect your iPad to the computer, click "Restore Backup" on the device's summary page, and select the backup you want to restore from.
Using iTunes gives you the advantage of having complete control over your iPad backups, especially if you want a local copy on your computer. This method is useful when you want to keep your backups separate from cloud-based solutions.
However, with the introduction of macOS Catalina and later, iTunes has been replaced by the Finder for backup and sync purposes, so keep this in mind when using newer macOS versions.
If you're running macOS Catalina or later, iTunes has been replaced by Finder for device management and backups. Here's how do I back up my iPad using Finder on your Mac:
Step #1: Connect Your iPad
Use a USB cable to connect your iPad to your Mac. Ensure your Mac is running macOS Catalina or a later version.
Step #2: Trust This Mac
If prompted on your iPad, tap "Trust This Computer" to establish a secure connection.
Step #3: Open Finder
Finder should open automatically when you connect your iPad. If it doesn't, you can open Finder manually.
Step #4: Select Your iPad
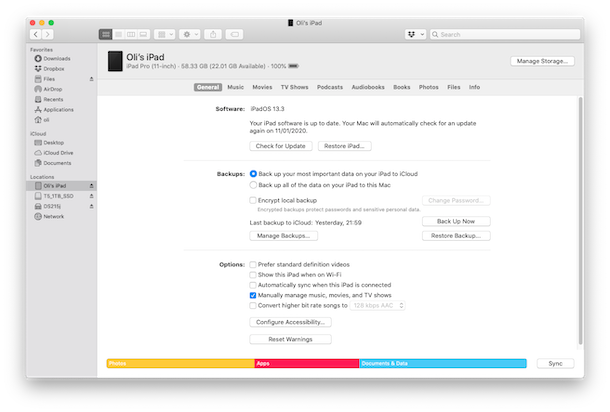
In the Finder sidebar, under the "Locations" section, you'll see your iPad listed. Click on it to access your device.
Step #5: Create a Backup
Step #6: Monitor and Restore Your iPad's backup will be stored on your Mac. You can access and manage your backups through Finder. To restore from a backup, connect your iPad to your Mac, click "Restore Backup" in the Finder window, and select the backup you want to restore from.
Using Finder on Mac provides a seamless and user-friendly way to back up your iPad if you're running macOS Catalina or a later version. It's a straightforward process and allows you to have local backups on your Mac, just like the previous iTunes method. Keep in mind that this method is specifically for Mac users and is not applicable to Windows users.
While Apple offers iTunes for iPad backups, sometimes iTunes backup might get corrupted. At this moment you can also use Google Drive to back up specific data from your iPad. Google Drive is a versatile cloud storage solution that allows you to keep your important files, photos, and documents safely stored. Here's how to back up your iPad using Google Drive:
Step #1: Install Google Drive
If you haven't already, download and install the Google Drive app from the App Store on your iPad. Sign in to your Google account or create one if you don't have an account.
Step #2: Configure Backup Settings
Open the Google Drive app and tap the three horizontal lines in the top-left corner to open the menu. Scroll down and tap "Settings".
Step #3: Set Up Backups
Under the "Backup and reset" section, tap "Back up my data". This option allows you to back up your device's settings, app data, call history, and SMS messages to your Google account. Ensure this option is turned on.
Step #4: Choose What to Back Up
Return to the main menu of the Google Drive app and tap "Backups". Here, you can see a list of the device backups associated with your Google account. You can tap on each backup to see what's included and manage them.
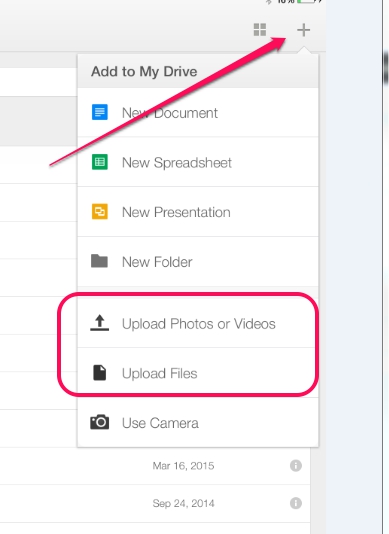
Step #5: Back Up Files and Photos
Google Drive also allows you to manually upload files and photos from your iPad. Simply tap the "+" button in the bottom-right corner of the app and select the files or photos you want to back up. They will be stored in your Google Drive account.
Step #6: Access Backed-Up Data
You can access your backed-up data by logging into your Google Drive account from any device with the Google Drive app or through a web browser.
Using Google Drive to back up your iPad is an excellent option, especially if you want to store specific data and files in a cloud-based platform outside of Apple's ecosystem. It provides additional flexibility and cross-device accessibility, making it a versatile choice for backup and data storage.
FoneDog iOS Data Backup & Restore Tool is a powerful and user-friendly iPhone 15-supported software designed to simplify the process of backing up and restoring your iOS devices, including your iPad. This tool offers a comprehensive solution for data management and backup, allowing you to safeguard your important data efficiently and conveniently.
iOS Data Backup and Restore
One click to backup the whole iOS device to your computer.
Allow to preview and restore any item from the backup to a device.
Export what you want from the backup to your computer.
No data loss on devices during the restore.
iPhone Restore Won't Overwrite Your Data
Free Download
Free Download

Key Features
Here's a step-by-step guide on how do I back up my iPad using the FoneDog iOS Data Backup & Restore Tool:
Step #1: Download and Install the Software
Start by downloading and installing the FoneDog iOS Data Backup & Restore Tool on your computer (available for both Windows and Mac).
Step #2: Launch the Software and Connect Your iPad
Launch the software and use a USB cable to connect your iPad to the computer. Ensure your iPad is recognized by the tool.
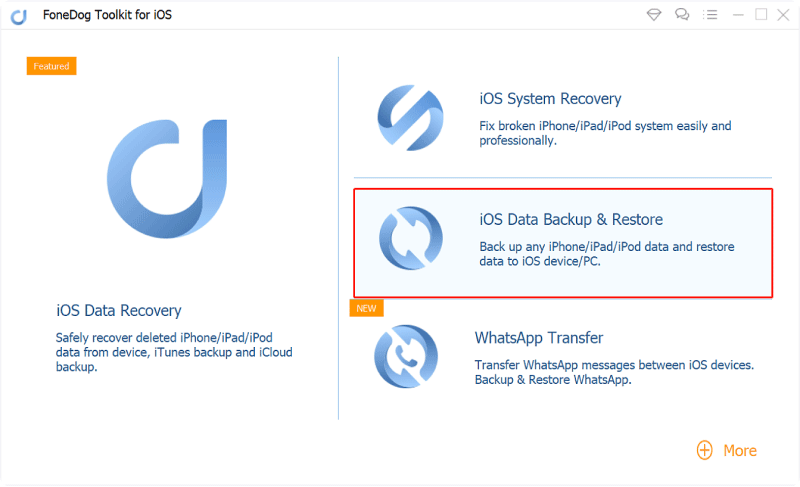
Step #3: Select the Backup Option
In the main interface, choose the "iOS Data Backup & Restore" option. You will see two options: "iOS Data Backup" and "iOS Data Restore." Click on "iOS Data Backup".
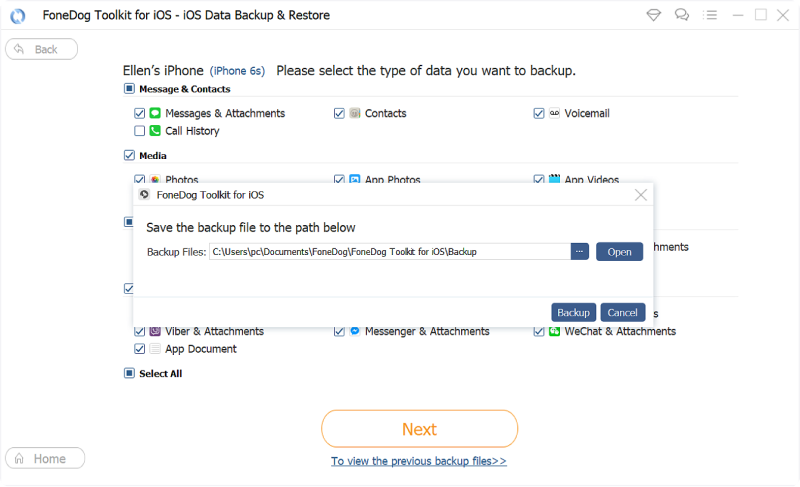
Step #4: Choose Data Types to Back Up
The software will allow you to select the types of data you want to back up. Choose the data categories you wish to include in your backup. You can preview the data before making your selection.
Step #5: Start the Backup Process
After selecting your desired data, click the "Backup" button to initiate the backup process. You can also choose to encrypt the backup by setting a password.
Step #6: Monitor the Backup Progress
The software will display the backup progress, and once completed, it will notify you.
Step #7: View and Restore Backups
You can access your backups and restore them to your iPad or another iOS device using the "iOS Data Restore" option in the software.
FoneDog iOS Data Backup & Restore Tool simplifies the backup and restore process for your iPad, providing you with a versatile and user-friendly solution. With its selective backup feature, data preview, and cross-device compatibility, you can trust this tool to keep your iPad's data safe and accessible whenever you need it.
People Also Read2 Best Methods to Backup Macbook to iCloud in 2023The Best Way to Backup Photos
In this comprehensive guide, we've explored various methods on “how do I back up my iPad”, ensuring that your valuable data remains safe and easily recoverable. Whether you prefer the convenience of Apple's iCloud, the control offered by iTunes or Finder, the cross-platform flexibility of Google Drive, or the feature-rich FoneDog iOS Data Backup & Restore Tool, you have options to choose from. Each method has its unique advantages, so select the one that best suits your needs.
Leave a Comment
Comment

iPhone/Android Devices’ Maintenance Expert
Staying home, listening to music, writing tech articles
Many people asked me to repair their mobile phones so I have a lot of experience in mobile phone repair, and I know a lot about Android or Apple phones.
iOS Data Backup & Restore
Back up your data to PC and selectively restore iOS data from backups.
Free Download Free DownloadHot Articles
 /
/
INTERESTINGDULL
/
SIMPLEDIFFICULT
Thank you! Here' re your choices:
Excellent
Rating: 4.7 / 5 (based on 81 ratings)
